Inleiding
Thank you for choosing the Atlanta Digital LCD Radio Alarm Clock, Model 1882-0. This compact and easy-to-use alarm clock features a clear LCD display, temperature indication, and a radio-controlled time function for automatic synchronization. This manual provides detailed instructions for setup, operation, and maintenance to ensure optimal performance.
Veiligheidsinligting
- Batteryveiligheid: Use only the specified battery type. Ensure correct polarity (+/-) when inserting batteries. Do not mix old and new batteries, or different types of batteries. Remove batteries if the device will not be used for an extended period. Dispose of used batteries responsibly according to local regulations.
- Plasing: Place the clock on a stable, flat surface. Avoid direct sunlight, extreme temperatures, high humidity, or dusty environments.
- Skoonmaak: Moenie skuurmiddels of oplosmiddels gebruik nie. Vee af met 'n sagte, droë lap.
- Waterblootstelling: Hierdie toestel is nie waterdig nie. Vermy blootstelling aan water of ander vloeistowwe.
Pakketinhoud
- Atlanta Digital LCD Radio Alarm Clock (Model 1882-0)
- Instructiehandleiding (hierdie dokument)
- (Batteries are typically not included and must be purchased separately)
Produk verbyview
Maak jouself vertroud met die hoofkomponente en kontroles van jou wekker.

Figuur 1: Voorkant View. This image displays the front of the Atlanta Digital LCD Radio Alarm Clock. The large LCD screen shows the current time (10:40), radio control signal indicator, DST indicator, alarm time (6:00), and temperature (24.6°C). Below the screen are three buttons: "TIME", "ALARM", and "+ / -". A red snooze/light button is visible on the top edge.
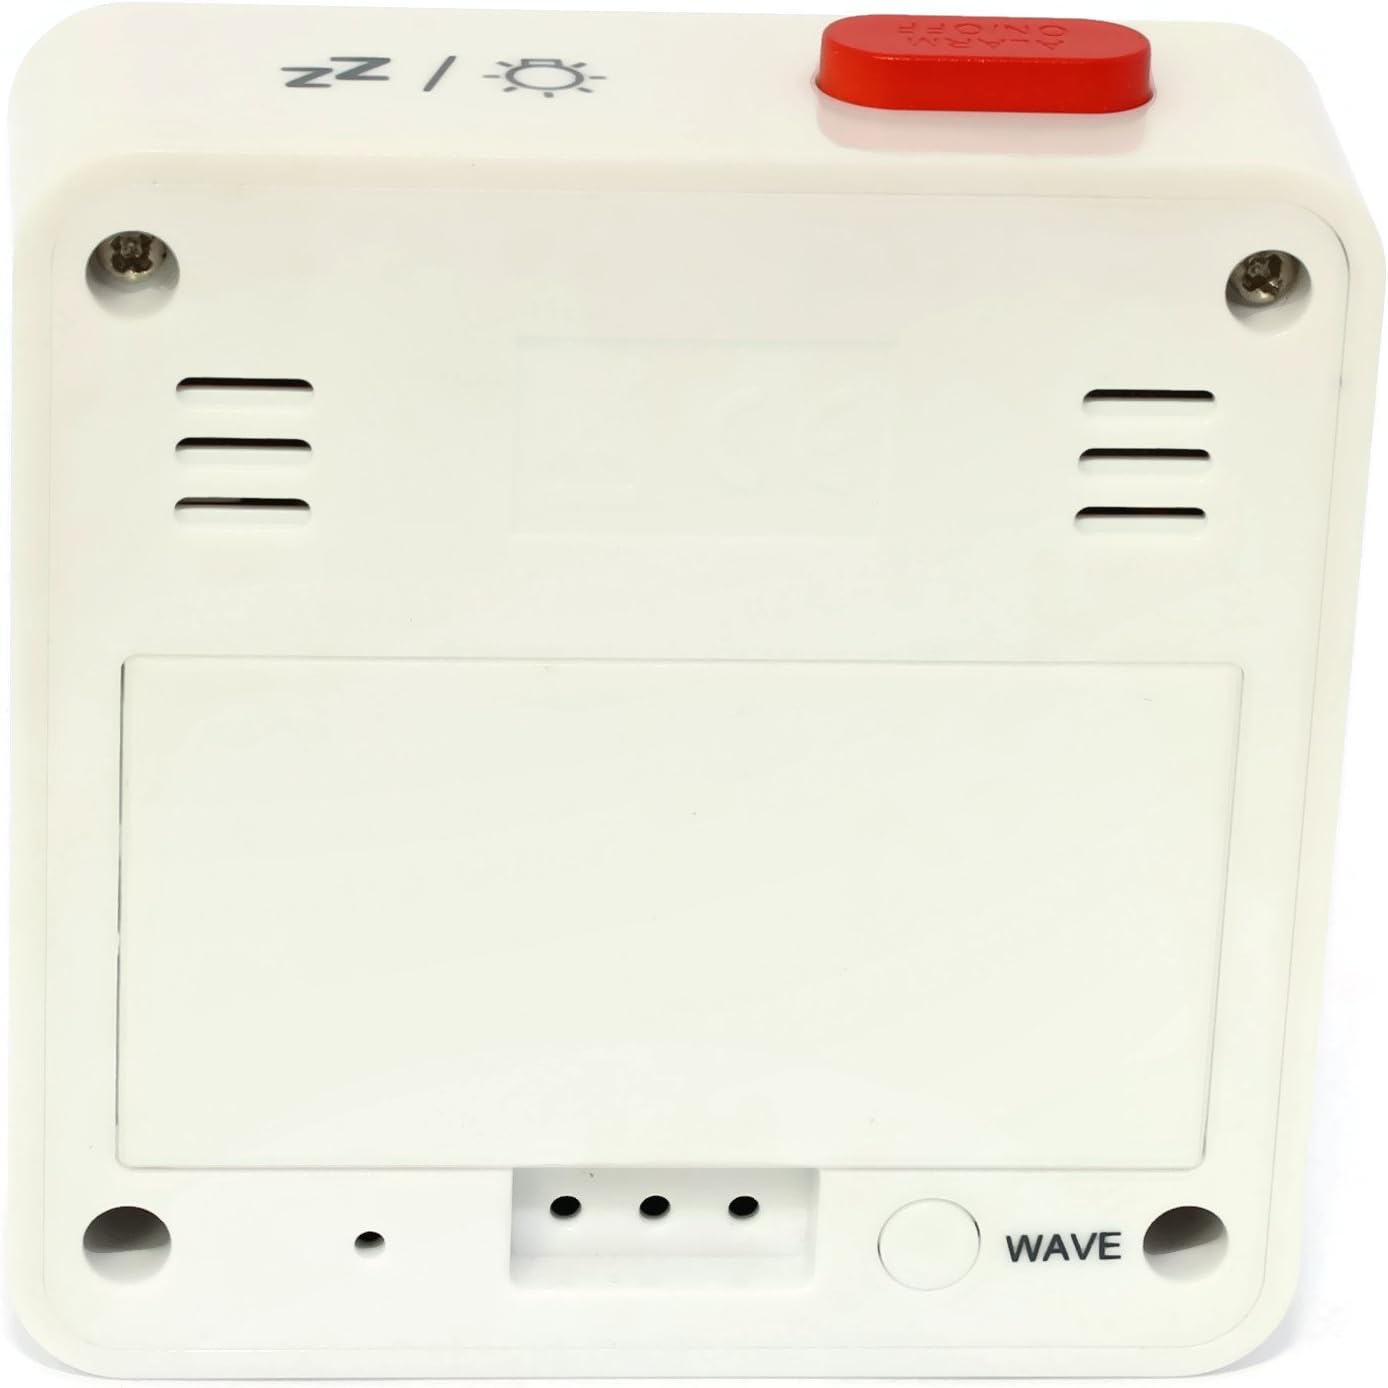
Figuur 2: Terug View. This image shows the back of the Atlanta Digital LCD Radio Alarm Clock. The large rectangular cover for the battery compartment is prominent. Below it, a circular "WAVE" button is visible, used for manual radio signal reception. Ventilation slots are present on both sides of the upper back panel.
Kontroles en vertoonelemente:
- LCD-skerm: Shows time, alarm time, temperature, and radio control status.
- TIME-knoppie: Used to set the current time manually.
- ALARM-knoppie: Used to set and activate/deactivate the alarm.
- + / - Knoppies: Used to adjust values (time, alarm) and potentially toggle settings.
- SNOOZE / LIGHT Button (Top): Activates snooze function during an alarm; illuminates the display backlight.
- WAVE Button (Back): Initiates manual radio signal reception for time synchronization.
- Battery Compartment (Back): Hou die benodigde batterye.
Opstelling
1. Battery Installasie
- Open the battery compartment cover located on the back of the clock (refer to Figure 2).
- Insert the required batteries (e.g., 2x AAA, not included) according to the polarity markings (+ and -) inside the compartment.
- Maak die batterykompartement se deksel stewig toe.
- The clock will power on and attempt to receive the radio-controlled time signal.
2. Initial Time Synchronization (Radio Control)
Upon battery insertion, the clock will automatically search for the radio time signal. This process may take several minutes. During this time, a signal icon (e.g., ((()))) sal op die skerm flikker.
- For best reception, place the clock near a window and away from electronic devices that may cause interference.
- Once the signal is successfully received, the time will be set automatically, and the signal icon will appear solid.
- If the signal is not received after a few minutes, press the GOLF button on the back of the clock to initiate a manual search.
3. Manual Time Setting (If Radio Control is Unavailable)
- Druk en hou die TYD knoppie vir ongeveer 3 sekondes ingedruk totdat die uursyfers begin flikker.
- Gebruik die + or - knoppies om die uur aan te pas.
- Druk die TYD knoppie weer om die uur te bevestig en na die minuutinstelling oor te skakel.
- Gebruik die + or - knoppies om die minute aan te pas.
- Druk die TYD knoppie weer om te bevestig en die tydinstellingsmodus te verlaat.
Bedryfsinstruksies
1. Stel die alarm in
- Druk en hou die ALARM knoppie vir ongeveer 3 sekondes ingedruk totdat die alarmuursyfers begin flikker.
- Gebruik die + or - knoppies om die verlangde alarmuur aan te pas.
- Druk die ALARM knoppie weer om die uur te bevestig en na die alarmminuutinstelling te gaan.
- Gebruik die + or - knoppies om die verlangde alarmminute aan te pas.
- Druk die ALARM button once more to confirm and exit alarm setting mode.
2. Aktivering/Deaktivering van die alarm
- Druk kortliks die ALARM button to toggle the alarm on or off.
- When the alarm is active, an alarm icon (e.g., a bell symbol) will appear on the display.
- As die alarm klink, druk die SNOOZE / LIG button on top to activate the snooze function. The alarm will sound again after a few minutes.
- Om die alarm heeltemal af te skakel, druk enige ander knoppie (bv. TYD, ALARM, +, -) or let it sound for its full duration.
3. Agterligfunksie
Druk die SNOOZE / LIG button on the top of the clock to illuminate the display for a few seconds, allowing for easy viewin toestande met swak lig.
4. Temperatuurvertoning
The clock continuously displays the ambient temperature. The unit of temperature (Celsius or Fahrenheit) may be switchable by a dedicated button or a combination of existing buttons (refer to specific model variations if applicable, otherwise it defaults to Celsius as shown in the image).
Onderhoud
Skoonmaak
- Wipe the clock's exterior with a soft, dry, lint-free cloth.
- Do not use liquid cleaners, aerosol sprays, or abrasive materials, as these can damage the finish or internal components.
Battery vervanging
- When the display becomes dim or the clock functions erratically, it is time to replace the batteries.
- Volg die batteryinstallasiestappe wat in die "Opstelling"-afdeling uiteengesit word.
- Verseker die korrekte wegdoening van ou batterye.
Probleemoplossing
| Probleem | Moontlike oorsaak | Oplossing |
|---|---|---|
| Die skerm is leeg of dof. | Batterye is leeg of verkeerd ingesit. | Vervang batterye en maak seker dat die polariteit korrek is. |
| Tyd is verkeerd. | Poor radio signal reception or manual time not set. | Move the clock to a location with better reception (near a window). Press the GOLF button for manual synchronization. If still incorrect, set the time manually. |
| Die alarm lui nie. | Die alarm is nie geaktiveer nie of verkeerd gestel. | Ensure the alarm icon is visible on the display. Recheck alarm time settings. |
| Snooze-funksie werk nie. | Alarm was turned off instead of snoozed. | Ensure you press the SNOOZE / LIG button when the alarm sounds, not other buttons. |
Spesifikasies
- Model: 1882-0
- Handelsmerk: Atlanta
- Kleur: Wit
- Materiaal: Plastiek
- Vertoon tipe: Digitale LCD
- Afmetings (L x B x H): 6.5 x 2.1 x 6.5 cm (ongeveer 2.56 x 0.83 x 2.56 duim)
- Gewig: 65 gram (ongeveer 2.29 onse)
- Kragbron: Battery powered (e.g., 2x AAA, not included)
- Spesiale kenmerke: Temperature Display, Alarm, Radio-Controlled Time, Backlight, Snooze
- Beoogde gebruik: Binneshuise
Waarborg en Ondersteuning
Specific warranty information for your Atlanta product may vary by region and retailer. Please refer to the documentation provided at the time of purchase or visit the official Atlanta webwebwerf vir gedetailleerde waarborgbepalings en -voorwaardes.
For technical support or inquiries, please contact your retailer or the manufacturer's customer service department. Contact information can typically be found on the product packaging or the official brand webwebwerf.
Note: Information regarding spare parts availability is not provided by the manufacturer.