Inleiding
Welcome to the user manual for your Fuvision 16GB 1080P HD Spy Pen Camera Video Recorder. This manual provides detailed instructions on how to set up, operate, and maintain your device. Please read it carefully to ensure proper usage and to maximize the product's functionality.
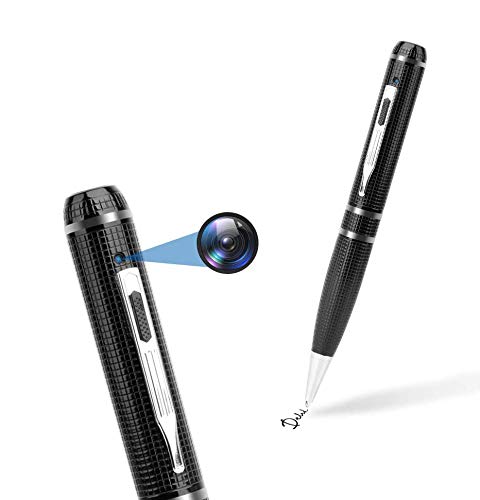
An image showing the Fuvision 16GB 1080P HD Spy Pen Camera, highlighting its discreet design as a functional writing pen.

A person holding the Fuvision Spy Pen Camera, illustrating how its design allows it to be discreetly used as a regular pen.
Pakketinhoud
Verifieer asseblief dat al die volgende items in u pakket ingesluit is:
- Fuvision 16GB 1080P HD Spy Pen Camera
- USB Data/Charging Cable
- 3 x Pen Refills
- Gebruikershandleiding (hierdie dokument)
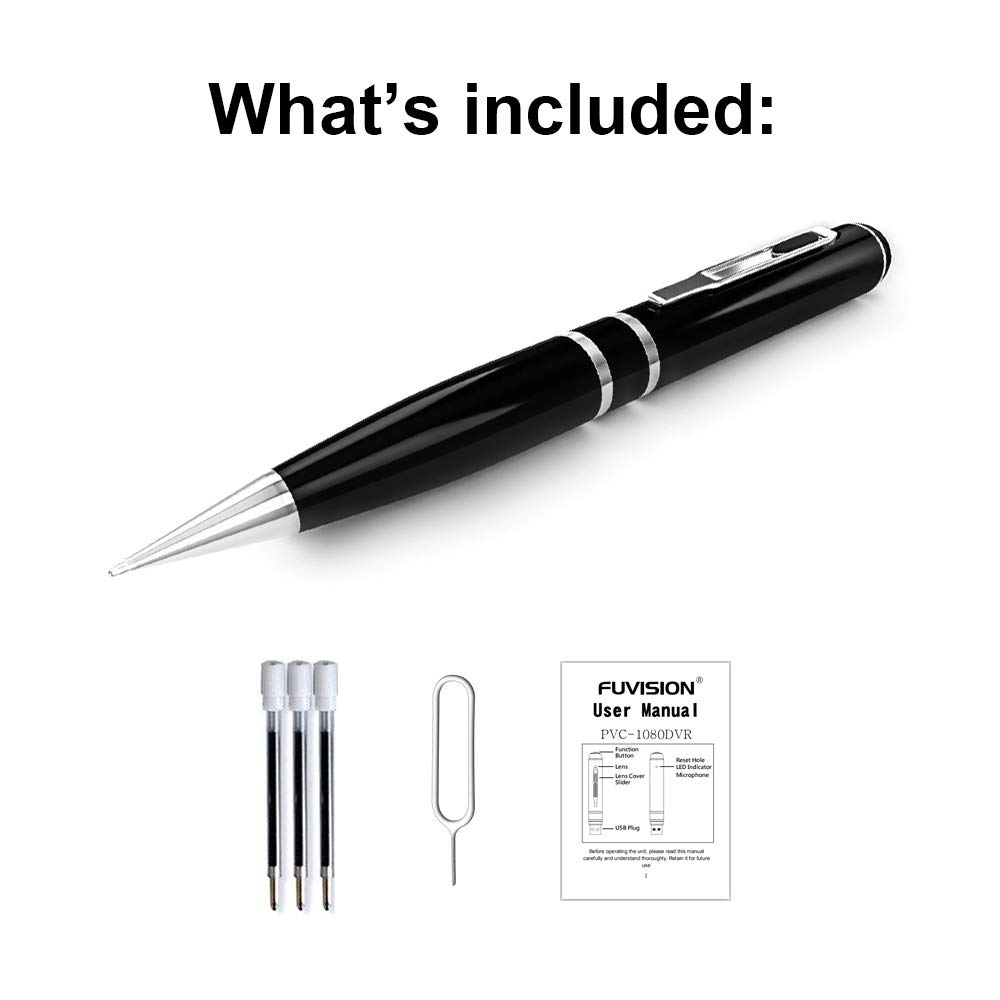
An image displaying all items included in the package: the Fuvision Spy Pen Camera, three ink refills, a USB data/charging cable, and a printed user manual.
Produk verbyview en komponente
Familiarize yourself with the various parts of your Fuvision Spy Pen Camera:

A detailed diagram of the Fuvision Spy Pen Camera, pointing out key components such as the Reset Hole, LED Indicator, USB Plug, Function Button, Lens Cover Slider, and the Camera Lens.

Another diagram illustrating the Fuvision Spy Pen Camera's features, including the ON/OFF button, USB port, HD camera location, and the functional ball-point pen tip.
- Funksie knoppie: Used for powering on/off, starting/stopping recording, and switching modes.
- Kameralens: The hidden lens for video and photo capture.
- LED-aanwyser: Provides status feedback (power, recording, photo mode).
- USB-prop: Located at the top, used for charging and data transfer.
- Stel gat terug: For resetting the device if it becomes unresponsive.
- Ball-Point Pen: Fully functional writing pen.
Opstelling
1. Laai die toestel
Before first use, fully charge the pen camera. Connect the USB plug of the pen to a computer's USB port or a 5V DC USB wall adapter using the provided USB cable. The charging time is approximately 4 hours. The LED indicator will show charging status (specific LED behavior for charging is not detailed, assume it turns off or changes color when fully charged).
2. Aanvanklike aanskakeling
After charging, the device is ready for use. The pen has a built-in 16GB memory, so no external memory card installation is required.
Bedryfsinstruksies
1. Skakel aan en af
- Om aan te skakel: Press and hold the Function Button on the top for a few seconds until the LED lights up. It will flash purple a few times, then turn off. This indicates the device has started recording. The LED is off during recording to maintain discretion.
- Om af te skakel: Press and hold the Function Button for a few seconds until the LED flashes purple a few times, then turns off completely.
2. Video Recording Mode
- Begin opname: When the device is powered on, it automatically begins recording video. The LED will flash purple a few times and then turn off, indicating active recording.
- Stop opname: Press the Function Button once quickly. The recording will stop, and a red LED will turn on, indicating the pen is in STANDBY mode.
- Loop opname: The device supports loop recording, which means it will automatically overwrite the oldest files wanneer die geheue vol is.
3. Fotomodus
- Switching to Photo Mode: From STANDBY mode (red LED on), double-click the Function Button. The red LED will change to blue, indicating the device is now in Photo Mode.
- Neem 'n foto: In Photo Mode (blue LED on), press the Function Button once. The purple light will blink a few times to confirm a photo has been taken.
- Exiting Photo Mode: Double-click the Function Button again. The device will return to STANDBY mode (red LED on).
4. Koppel aan 'n rekenaar
To transfer recorded videos and photos, connect the pen camera to your computer using the provided USB cable. The device will appear as a removable disk drive. It is compatible with Windows XP/2003/Windows7/8/10 and Apple Mac OS X - 10.7 operating systems.
Onderhoud
1. Algemene Sorg
- Vermy om die toestel te laat val of om dit aan sterk impakte te onderwerp.
- Hou die toestel weg van water, vog en uiterste temperature.
- Store the pen in a cool, dry place when not in use.
2. Skoonmaak
Use a soft, dry cloth to clean the exterior of the pen. Do not use liquid cleaners or solvents, as they may damage the device.
Probleemoplossing
Algemene kwessies en oplossings:
- Toestel skakel nie aan nie: Ensure the battery is fully charged. Connect to a power source and charge for 4 hours.
- Opname begin nie: Check if the device is powered on correctly (LED flashes purple then turns off). Ensure the battery has sufficient charge.
- Kan nie aan rekenaar koppel nie: Try a different USB port or a different computer. Ensure the USB cable is securely connected.
- Toestel reageer nie: Locate the Reset Hole (refer to Product Overview) and gently press it with a thin object (like a paperclip) to reset the device.
Spesifikasies
Detailed technical specifications for the Fuvision 16GB 1080P HD Spy Pen Camera:

'n Beeldvertoningasing the clear video quality produced by the Fuvision Spy Pen Camera, indicating its 1080P Full HD resolution with still shot functionality.
| Video-resolusie | 1080P (1920x1080) @ 30fps |
| Foto resolusie | JPG 4032x3024 |
| Pixel | 2.0 Mega Pixel CMOS |
| Interne geheue | 16 GB |
| Batterylewe | Approximately 120 minutes continuous recording |
| Rekordmodusse | Continuous record, Loop Recording |
| Video-formaat | AVI |
| USB-koppelvlak | 2.0 |
| Laai Voltage | DC-5V (500mA) |
| Laai tyd | Ongeveer 4 uur |
| View Hoek | 65° |
| Bedryfstelselversoenbaarheid | Windows XP/2003/Windows7/8/10, Apple Mac OS X - 10.7 and above |
| Afmetings | 155 × 14.5 × 14.5 mm (6.1 x 0.57 x 0.57 duim) |
| Item gewig | 100 g (0.22 lbs) |
| Kragbron | Batteryaangedrewe (1 litiumioonbattery ingesluit) |
| Aanbevole gebruike | Motion Detection (feature mentioned in product details, but not detailed in operation) |
Belangrike veiligheidsinligting
- Moenie probeer om die toestel uitmekaar te haal of te verander nie.
- Hou buite bereik van kinders.
- Gooi die battery weg volgens plaaslike regulasies.
- Gebruik slegs die meegeleverde USB-kabel vir laai en data-oordrag.