1. Inleiding
Thank you for choosing the Lenco PDR-030 DAB+/FM Portable Digital Radio. This manual provides essential information for setting up, operating, and maintaining your device. The PDR-030 offers high-quality digital radio reception (DAB+) and traditional FM radio, along with features such as an integrated rechargeable battery for portability, an RDS display, station memory, and an alarm clock function.
Ingesluit komponente:
- Lenco PDR-030 Digital Radio
- AC Power Adapter (220 Volt)
- Gebruikershandleiding
2. Belangrike veiligheidsinligting
- Moenie die toestel aan reën of vog blootstel om brand of elektriese skok te voorkom nie.
- Maak seker die kragadapter se volumetage pas by jou plaaslike kragtoevoer.
- Moenie die c oopmaak nieasing. Verwys alle diens na gekwalifiseerde personeel.
- Vermy die plasing van die eenheid naby hittebronne of in direkte sonlig.
- Handle the integrated battery with care. Do not attempt to replace it yourself.
- Hou die toestel weg van sterk magnetiese velde.
3. Produk verbyview
Familiarize yourself with the main components and controls of your Lenco PDR-030 radio.
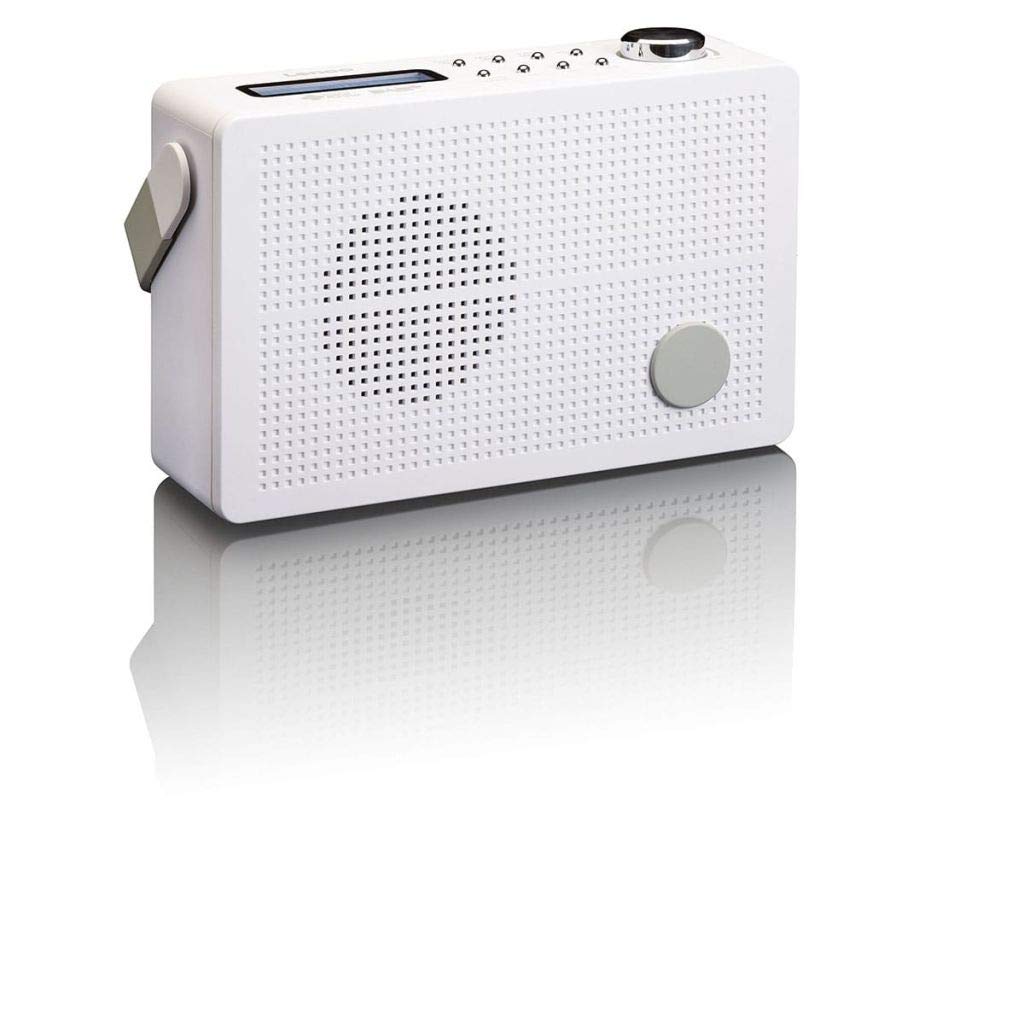
Figuur 3.1: Front Panel of Lenco PDR-030 Radio. Features include a blue backlit LCD display, power/source button, alarm, sleep, info/menu, preset buttons, select/snooze, scan, previous, next buttons, and a rotary volume knob.
Sleutelkontroles en -kenmerke:
- Vertoon: Two-line illuminated LCD for time, date, station name, and information.
- Aan/af-/bronknoppie: Turns the radio on/off and switches between DAB+ and FM modes.
- Volumeknop: Pas die klank-uitsetvlak aan.
- Teleskopiese antenna: For optimal radio signal reception.
- Koptelefoonaansluiting (3.5 mm): Vir privaat luister.
- Alarm/Sleep/Info/Menu/Preset Buttons: For various functions including setting alarms, sleep timer, accessing information, menu navigation, and managing station presets.
- Select/Snooze/Scan/Prev/Next Buttons: For station tuning, menu selection, and snooze function.
4. Opstelling
4.1 Aanskakeling van die radio
The PDR-030 can be powered by the included AC adapter or its integrated rechargeable battery.
- AC krag: Connect the supplied 220V AC power adapter to the DC input jack on the radio and then to a wall outlet. The radio will automatically begin charging the internal battery.
- Batterykrag: The integrated Lithium-ion battery allows for portable use. Ensure the battery is sufficiently charged before use without the AC adapter.
4.2 Antenna-opstelling
Extend the telescopic antenna fully for optimal reception of both DAB+ and FM signals. Adjust its position for the best signal quality.
4.3 Initial Power On and Station Scan
- Druk die Kragbron knoppie om die radio aan te skakel.
- Upon first use, the radio will automatically enter DAB+ mode and perform a full scan for available digital radio stations. This may take a few minutes.
- Sodra die skandering voltooi is, sal die radio na die eerste beskikbare stasie inskakel.
5. Bedryfsinstruksies
5.1 Krag aan/af
Druk die Kragbron knoppie om die radio aan of af te skakel.
5.2 Moduskeuse (DAB+/FM)
Druk die Bron druk die knoppie herhaaldelik om tussen DAB+ en FM-radiomodusse te wissel.
5.3 Stemstasies
- DAB+ Mode:
- After the initial scan, use the Vorige en Volgende buttons to navigate through the list of available DAB+ stations.
- To perform a new full scan, press the Spyskaart button, navigate to "Full Scan" using Vorige/Volgende, en druk Kies.
- FM-modus:
- Druk die Skandeer knoppie om outomaties vir die volgende beskikbare FM-stasie te skandeer.
- Vir handmatige afstemming, druk en hou die Vorige or Volgende knoppies om die frekwensie fyn in te stel.
5.4 Saving and Recalling Preset Stations
The radio allows you to store up to 10 DAB+ and 10 FM preset stations.
- Om 'n voorafinstelling te stoor:
- Stem na die verlangde stasie.
- Druk en hou die Vooraf ingesteld knoppie totdat "Vooringestelde Stoor" op die skerm verskyn.
- Gebruik die Vorige/Volgende knoppies om 'n voorafbepaalde nommer (1-10) te kies.
- Druk Kies to confirm and save the station.
- Om 'n voorafinstelling te herroep:
- Druk die Vooraf ingesteld knoppie kortliks.
- Gebruik die Vorige/Volgende knoppies om die verlangde voorafingestelde nommer te kies.
- Druk Kies to tune to the preset station.
5.5 Volumebeheer
Draai die Volumeknop clockwise to increase the volume and counter-clockwise to decrease it.
5.6 RDS Functionality (FM Mode)
In FM mode, the RDS (Radio Data System) function displays information such as station name, program type, and other broadcast data on the two-line LCD display.
5.7 Wekkerfunksie
The PDR-030 can be used as an alarm clock with two separate alarm times.
- Stel 'n alarm:
- Druk die Alarm knoppie.
- Gebruik Vorige/Volgende to select Alarm 1 or Alarm 2, then press Kies.
- Follow the on-screen prompts to set the alarm time, duration, source (Buzzer or Radio), frequency (Daily, Once, Weekdays, Weekends), and volume.
- Ensure the alarm is set to "On" and press Kies te red.
- Sluimer-funksie: As die alarm klink, druk die Sluimer knoppie om dit tydelik vir 'n vasgestelde tydperk stil te maak.
- Slaaptimer: Druk die Slaap button repeatedly to set a sleep timer (e.g., 15, 30, 45, 60 minutes) after which the radio will automatically turn off.
5.8 Koptelefoonverbinding
Connect 3.5mm stereo headphones to the headphone jack for private listening. The internal speaker will be muted automatically.
6. Onderhoud
6.1 Skoonmaak
Wipe the radio's exterior with a soft, dry cloth. Do not use abrasive cleaners, waxes, or solvents as they may damage the finish. Ensure no liquids enter the device.
6.2 Batterysorg
The integrated Lithium-ion battery is designed for long life. To maximize battery lifespan:
- Vermy om die battery gereeld heeltemal te ontlaai.
- If storing the radio for an extended period, charge the battery to approximately 50% and store in a cool, dry place.
- Moenie probeer om die battery self te vervang nie. Kontak gekwalifiseerde dienspersoneel indien batteryprobleme ontstaan.
7. Probleemoplossing
| Probleem | Moontlike oorsaak | Oplossing |
|---|---|---|
| Geen krag nie | AC adapter not connected or faulty; battery discharged. | Check AC adapter connection. Charge the battery. |
| Swak DAB+/FM-ontvangs | Antenna nie uitgebrei nie; swak seinarea; interferensie. | Fully extend and adjust the telescopic antenna. Move the radio to a location with better signal. Avoid placing near other electronic devices. |
| Geen klank nie | Volume too low; headphones connected; mute activated. | Increase volume. Disconnect headphones. Check if mute is active (if applicable). |
| Alarm klink nie | Alarm not activated; alarm volume too low; incorrect time setting. | Ensure alarm is set to "On". Check alarm volume. Verify current time and alarm time settings. |
8. Spesifikasies
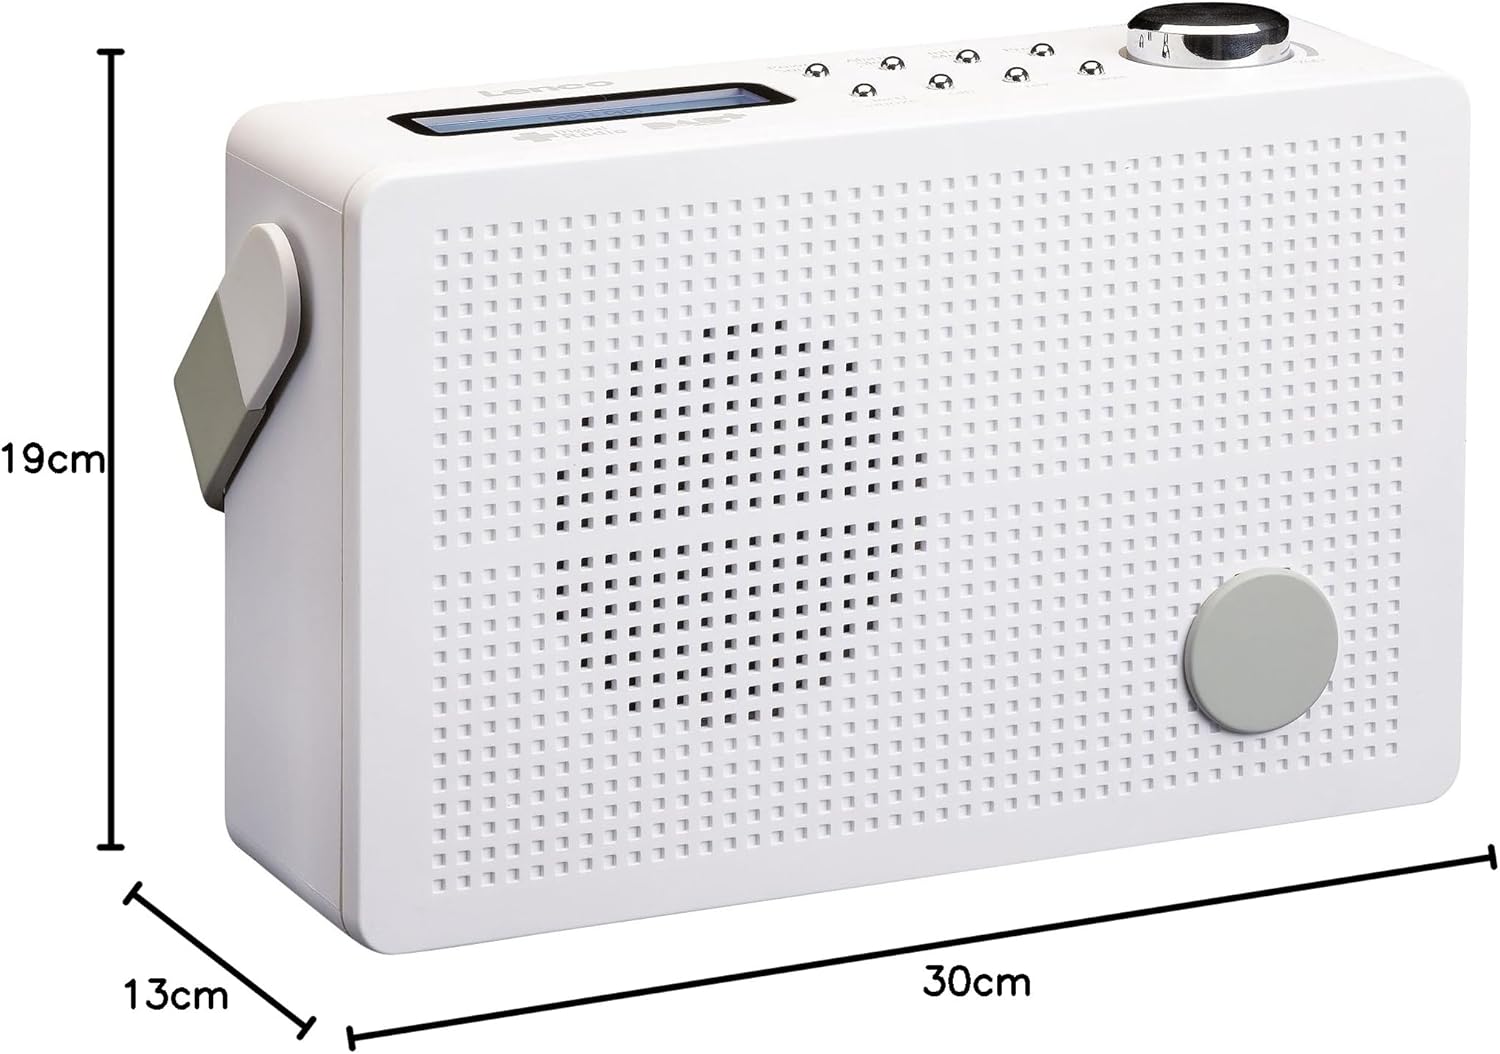
Figuur 8.1: Lenco PDR-030 Dimensions.
| Kenmerk | Detail |
|---|---|
| Modelnommer | PDR-030 |
| Tuner Tegnologie | DAB+, FM (Ukw) |
| Kragbron | Battery-Powered (Integrated Lithium-ion), AC Adapter |
| AC Voltage | 220 Volt |
| Produkafmetings (B x D x H) | 21.4 x 6.5 x 13.8 cm (approx. 22.5 x 8.5 x 15 cm as per another spec) |
| Item gewig | 9 g (Note: This seems incorrect, likely 670g from description) |
| Materiaal tipe | Plastiek |
| Hardeware-koppelvlak | 3.5 mm Audio (Headphone Jack) |
| Spesiale kenmerke | Portable, RDS Display, Alarm Clock, Station Memory (10 DAB+, 10 FM) |
Note: Some dimensions and weight specifications provided by the manufacturer may vary slightly. The description states 670 grams for weight, while specifications list 9g. Please refer to the product packaging for the most accurate information.
9. Waarborg en Ondersteuning
Lenco products are designed for reliability and performance. This product typically comes with a 24-month manufacturer's warranty from the date of purchase, covering defects in materials and workmanship. Please retain your proof of purchase for warranty claims.
For technical support, service, or warranty inquiries, please refer to the contact information provided on the Lenco official website or your local retailer. Do not attempt to repair the device yourself.
Vir meer inligting kan u die Lenco Store on Amazon.