1. Produk verbyview
This Mopar OEM Roof Cab Clearance Lamps Light Kit is designed to provide additional visibility and a distinct appearance for your Dodge Ram truck. The kit includes all necessary components for installation, ensuring a factory-like fit and finish.
1.1. Kit komponente
Die kit sluit tipies in:
- Five (5) Roof Cab Clearance Lamp Samestellings
- Bedradingsharnas
- Bolle
- Mounting Hardware (grommets, screws, zip ties)
- Installasie sjabloon
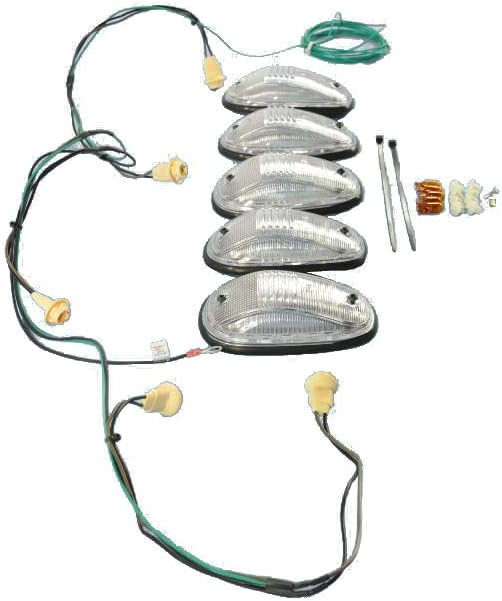
Image 1.1: Contents of the Mopar OEM Roof Cab Clearance Lamps Light Kit, including five lamp assemblies, wiring harness, bulbs, and mounting hardware.
2. Veiligheidsinligting
Read all instructions carefully before beginning installation. Improper installation can lead to vehicle damage, electrical issues, or personal injury. If you are not confident in your ability to perform this installation, it is recommended to seek professional assistance from a certified automotive technician.
- Ontkoppel altyd die voertuig se battery voordat u enige elektriese werk uitvoer.
- Dra gepaste persoonlike beskermende toerusting, insluitend veiligheidsbril en handskoene.
- Maak seker dat alle bedradingverbindings stewig en behoorlik geïsoleer is om kortsluitings te voorkom.
- Use the correct tools for each step to avoid damage to components or the vehicle.
- Verify proper sealing after installation to prevent water leaks into the vehicle's cabin.
3. Opstelling en installering
This section outlines the steps for installing the Mopar OEM Roof Cab Clearance Lamps. The process involves drilling into the vehicle's roof, so precision and care are essential.
3.1. Vereiste gereedskap
- Boor
- Small drill bit (e.g., 1/8 inch for pilot holes)
- Drill bit for grommets (e.g., 15/64 inch or size specified by template)
- Step bit (7/8 inch for wiring holes)
- Spring-loaded center punch
- Maatband
- Maskeerband
- Automotive-grade sealant (e.g., silicone or RTV)
- Draadstroppers/krimpers
- Elektriese band of krimpkous
- Double-sided tape (optional, for grommets)
- Torx bit or screwdriver set
- Clean cloths and rubbing alcohol for surface preparation
3.2. Voorinstallasiestappe
- Review Instruksies: Read the entire manual and the included Mopar instructions thoroughly before starting.
- Voertuigvoorbereiding: Parkeer die voertuig op 'n gelyke oppervlak en aktiveer die parkeerrem. Ontkoppel die negatiewe terminaal van die voertuig se battery.
- Clean Roof Surface: Thoroughly clean the area of the roof where the lights will be installed. Ensure it is free of dirt, dust, and wax.
- Berei sjabloon voor: Carefully cut out the provided installation template.
3.3. Drilling and Mounting
- Posisiesjabloon: Carefully position the template on the roof according to the vehicle's specifications. Use masking tape to secure it in place. Double-check measurements to ensure proper alignment.
- Merk gate: Use a spring-loaded center punch to mark the center of all drilling locations indicated on the template.
- Boor loodsgate: Using a small drill bit, drill pilot holes at each marked location.
- Drill Grommet Holes: Enlarge the pilot holes for the lamp mounting screws to the size specified for the grommets (e.g., 15/64 inch). Ensure these holes allow the grommets to fit snugly.
- Drill Wiring Holes: Use a 7/8 inch step bit to drill the larger holes for the wiring harness. Place a protective material (e.g., an old cloth or cardboard) underneath the drilling area inside the cabin to catch debris and prevent damage.
- Deburr Holes: Carefully deburr all drilled holes to remove any sharp edges.
- Clean Holes: Clean around the drilled holes with rubbing alcohol to ensure proper sealant adhesion.
- Install Grommets: Insert the grommets into the smaller mounting holes. If grommets spin, apply a small piece of double-sided tape to the underside of the grommet flange before inserting.
- Dien seëlmiddel toe: Apply a bead of automotive-grade sealant around the edge of each drilled hole and around the base of each lamp assembly before mounting.
- Berg Lamps: Carefully place each lamp assembly over its respective holes, ensuring the wiring passes through the larger hole. Secure the lamps with the provided screws, tightening them gently to compress the sealant without overtightening.
3.4. Bedradingsverbindings
- Roete bedrading: Route the wiring harness from the roof lamps down the passenger side A-pillar into the vehicle's cabin.
- Identify Power Source: For 2010-2018 Dodge Ram models, locate the white wire with a green stripe in the passenger side A-pillar or near the clearance light fuse. This wire typically provides power for the clearance lights. Consult your vehicle's specific wiring diagram if unsure.
- Koppel krag: Using appropriate wire connectors (e.g., T-taps or solder connections with heat shrink), connect the positive wire from the lamp harness to the identified power source wire.
- Verbind grond: Connect the ground wire from the lamp harness to a suitable chassis ground point within the vehicle. Ensure a clean, secure connection.
- Toetsfunksionaliteit: Reconnect the vehicle's battery. Turn on the vehicle's parking lights or headlights to test if the new roof cab clearance lamps illuminate correctly.
- Veilige bedrading: Once tested, secure all wiring with zip ties to prevent rattling or interference with other vehicle components.
4. Bedryfsinstruksies
The Mopar OEM Roof Cab Clearance Lamps are designed to operate in conjunction with your vehicle's existing lighting system. Once properly installed and wired, they will illuminate automatically when your vehicle's parking lights or headlights are activated.
- Outomatiese aktivering: Die lamps will turn on when the vehicle's exterior lights (parking lights, low beams, or high beams) are switched on.
- Geen handmatige beheer: There is no separate switch for these lamps; their operation is integrated with the vehicle's lighting system.
5. Onderhoud
Regular maintenance ensures the longevity and proper function of your roof cab clearance lamps.
- Skoonmaak: Maak die l skoonamp lenses periodically with a soft cloth and mild automotive soap. Avoid abrasive cleaners that can scratch the lens material.
- Gloeilamp vervanging: Indien alamp stops illuminating, check the bulb. Replace with a compatible bulb type. Some users opt for LED bulbs for increased brightness and lifespan; ensure any replacement bulbs are compatible with your vehicle's electrical system.
- Seëlmiddel inspeksie: Periodically inspect the sealant around the lamp bases for any signs of cracking or degradation. Reapply sealant as necessary to prevent water intrusion.
- Bedradingskontrole: Occasionally check visible wiring for any signs of wear, fraying, or loose connections.
6. Probleemoplossing
If you encounter issues with your roof cab clearance lamps, refer to the following troubleshooting guide:
- Lamps Not Illuminating:
- Check vehicle's parking lights/headlights to ensure they are on.
- Verify all wiring connections are secure and properly made (power and ground).
- Inspect bulbs for damage or burnout. Replace if necessary.
- Check relevant fuses in the vehicle's fuse box.
- Waterlekkasies:
- Inspect the sealant around each lamp base. Ensure there are no gaps or cracks.
- Verify that the grommets are properly seated and not damaged.
- Reapply automotive-grade sealant if any breaches are found.
- Flikkerende ligte:
- Kyk vir los bedrading verbindings.
- Verseker behoorlike aarding.
- If using aftermarket LED bulbs, ensure they are compatible and do not require additional resistors.
7. Spesifikasies
| Kenmerk | Spesifikasie |
|---|---|
| Handelsmerk | Mopar |
| Modelnommer | 82211190AB.0 |
| Versoenbare Voertuigdiens Tipe | Dodge Ram 1500, 2500, 3500 |
| Versoenbare Jare | 2010-2018 |
| Spesiale kenmerk | Waterdig |
| Wattage | 35 watt |
| Voltage | 12 Volt |
| Auto Part Posisie | Rear (refers to position on vehicle, not light direction) |
| Lens kleur | Duidelik |
| Lens materiaal | Polikarbonaat |
| Itemafmetings (L x B x H) | 9 x 6.5 x 5 duim |
| Item gewig | 2.55 pond |
| Vervaardiger se deelnommer | 82211190AB.0 |
8. Waarborginligting
For detailed warranty information regarding your Mopar OEM Roof Cab Clearance Lamps Light Kit, please refer to the official documentation provided with your purchase or visit the official Mopar webwebwerf. Waarborgbepalings en -voorwaardes kan wissel.
9. Ondersteuning
If you require technical assistance, have questions about installation, or need to report a product issue, please contact Mopar customer service. You can typically find contact information on the Mopar official website or through your authorized Mopar dealer.
Mopar Official Webwebwerf: www.mopar.com


