1. Belangrike veiligheidsinstruksies
Wanneer elektriese toestelle gebruik word, moet basiese veiligheidsmaatreëls gevolg word, insluitend die volgende:
- Lees alle instruksies voordat u die toestel gebruik.
- Moenie probeer om hierdie oond met die deur oop te gebruik nie, aangesien dit kan lei tot skadelike blootstelling aan mikrogolfenergie.
- Moenie enige voorwerp tussen die oondvoorkant en die deur plaas nie, of toelaat dat grond of skoonmakerreste op verseëlingsoppervlaktes ophoop.
- Gebruik die oond nie as dit beskadig is nie. Dit is veral belangrik dat die oonddeur behoorlik toemaak en dat daar geen skade is aan: (1) deur (gebuig), (2) skarniere en grendels (gebreek of losgemaak), (3) deur seëls en seëloppervlakke.
- Die oond moet deur niemand verstel of herstel word nie, behalwe behoorlik gekwalifiseerde dienspersoneel.
- Maak seker dat die toestel behoorlik geaard is.
- Moenie die koord of prop in water dompel nie.
- Noukeurige toesig is nodig wanneer die toestel deur of naby kinders gebruik word.
- Do not use the oven for purposes other than heating food.
2. Produk verbyview
2.1. Microwave Oven Components

Figuur 1: Voorkant view of the Sharp R-369T Microwave Oven, showcasing its 33L capacity, 6 microwave power levels, and various cooking functions.
The Sharp R-369T is a 33-liter solo microwave oven designed for efficient food preparation. It features a sleek silver finish and a black glass door. Key components include the oven cavity, glass turntable, control panel, and door with a push-open mechanism.

Figuur 2: Binne view of the microwave oven, showing the spacious 33L cavity and the removable glass turntable for even cooking.
The interior includes a 272mm glass turntable that rotates during operation to ensure food is heated evenly. The oven door opens with a simple push mechanism.
2.2. Beheerpaneel
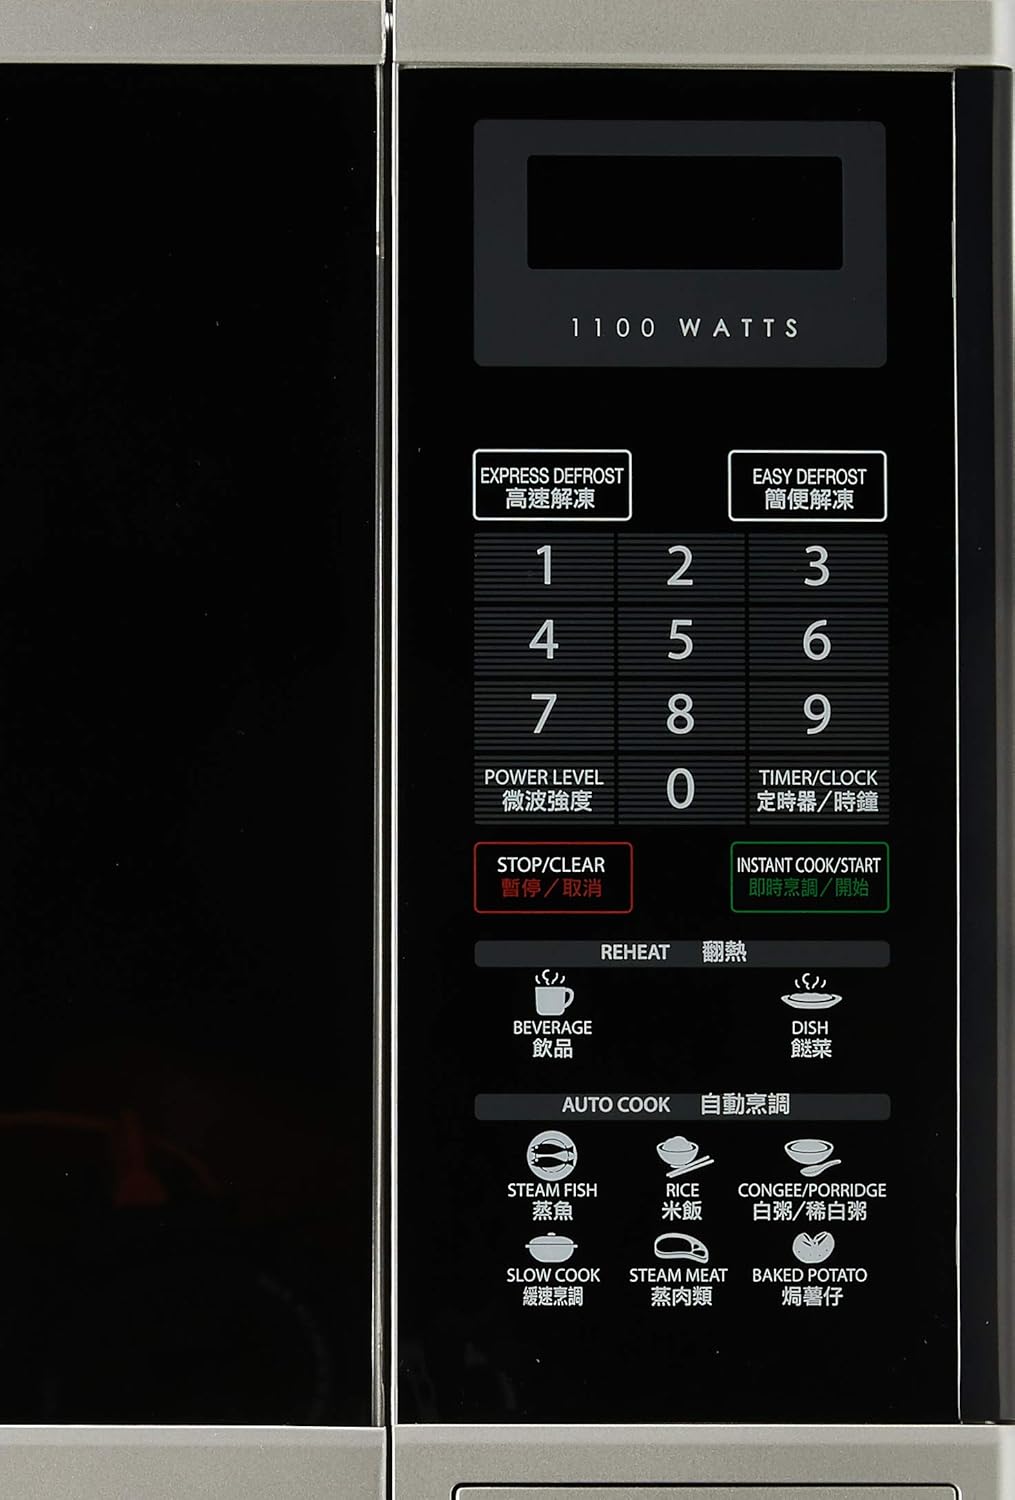
Figuur 3: Gedetailleerd view of the control panel, featuring numerical keys, function buttons, and the digital display.
The control panel is located on the right side of the oven and features a digital display, numerical keypad (0-9), and various function buttons:
- EXPRESS DEFROST / EASY DEFROST: For quick and convenient defrosting.
- KRAG VLAK: Pas mikrogolfkraguitset aan.
- TIMER/KLOK: Sets the cooking timer or the current time.
- STOP/VEER: Stop huidige werking of vee instellings uit.
- INSTANT COOK/START: Starts cooking immediately or confirms settings.
- VERWARMING: Dedicated buttons for reheating beverages and dishes.
- AUTO COOK: Pre-programmed settings for various food types like Steam Fish, Rice, Congee/Porridge, Slow Cook, Steam Meat, and Baked Potato.
3. Opstelling en installering
3.1. Uitpak
Carefully remove the microwave oven and all packing materials from the carton. Check the oven for any damage, such as dents or a misaligned door. Do not operate the oven if it is damaged. Contact your dealer or authorized service center.
3.2. plasing
- Place the oven on a flat, stable surface strong enough to hold its weight (approximately 17kg).
- Ensure adequate ventilation. Leave a minimum of 10 cm (4 inches) clearance at the rear, 20 cm (8 inches) at the top, and 5 cm (2 inches) on each side for proper airflow.
- Moenie luggate blokkeer nie.
- Hou die oond weg van hittebronne, stoom of spatende vloeistowwe.
- Moenie die oond naby 'n radio of TV plaas nie, aangesien dit steuring kan veroorsaak.
3.3. Elektriese aansluiting

Figuur 4: Agter view of the microwave oven, illustrating the power cord connection and important safety warnings regarding microwave energy.
- Plug the oven into a properly grounded 220V, 50Hz AC outlet with a dedicated circuit.
- Moenie verlengkoorde of adapters gebruik nie.
- Maak seker dat die kragkabel nie beskadig of geknyp is nie.
4. Bedryfsinstruksies
4.1. Stel die klok in
- Druk die TIMER/KLOK knoppie een keer.
- Use the numerical keypad to enter the current time (e.g., 12:30 for 12:30 PM).
- Druk die TIMER/KLOK knoppie weer om te bevestig.
4.2. Basiese Mikrogolfkook
- Plaas kos in 'n mikrogolf-veilige houer op die glas draaitafel.
- Maak die oonddeur stewig toe.
- Druk die KRAG VLAK button repeatedly to select the desired power level (e.g., P100 for 100% power, P80 for 80% power). The oven offers 6 microwave power levels.
- Use the numerical keypad to enter the cooking time.
- Druk INSTANT COOK/START om te begin kook.
4.3. Ontdooiing
The oven offers two defrost functions:
- EXPRESS DEFROST: For quick defrosting of smaller items. Follow on-screen prompts or manual for specific weight settings.
- EASY DEFROST: For more controlled defrosting. Refer to the manual for weight and food type guidelines.
- Plaas bevrore kos op die draaitafel.
- Druk óf UITDRUKLIKE ONTDOOIING or EASY DEFROST.
- Enter the weight of the food using the numerical keypad.
- Druk INSTANT COOK/START.
4.4. Reheat Functions
The oven includes 2 Reheat Menu keys for common items:
- DRANKIE: For reheating drinks.
- DISH: For reheating prepared meals.
- Place the item to be reheated on the turntable.
- Druk die toepaslike VERWARMING button (BEVERAGE or DISH).
- The oven will automatically set the time. Press INSTANT COOK/START om te begin.
4.5. Auto Cook Functions
Die MOTO KOOK menu provides pre-programmed settings for various foods:
- STOOMVIS
- RYS
- CONGEE/PORRIDGE
- STADIGE KOOK
- STOOM VLEIS
- GEBAKTE AARTAPPEL
- Place the food in a suitable container on the turntable.
- Druk die verlangde MOTO KOOK knoppie.
- Select the quantity or weight if prompted (refer to the full manual for specific auto cook settings).
- Druk INSTANT COOK/START.
5. Onderhoud en Skoonmaak
Gereelde skoonmaak van jou mikrogolfoond sal die lang lewensduur en doeltreffende werking daarvan verseker.
5.1. Buite Skoonmaak
- Vee die buite-oppervlaktes af met 'n sagte, damp lap.
- Moenie skuur skoonmaakmiddels of harde chemikalieë gebruik nie.
5.2. Interior Cleaning
- Clean the oven cavity after each use with a mild detergent and a soft cloth.
- Vir hardnekkige kosspatsels, plaas 'n bak water met suurlemoenskyfies binne en mikrogolf dit vir 2-3 minute op hoog. Die stoom sal die oorskot losmaak, wat dit makliker maak om skoon te vee.
- Ensure the door seals and sealing surfaces are clean to maintain proper operation.
5.3. Glas Draaitafel
- Die glas draaitafel en rolring kan verwyder word vir skoonmaak.
- Was hulle in warm seepwater of in die skottelgoedwasser.
- Maak seker dat hulle heeltemal droog is voordat jy hulle terug in die oond sit.
6. Probleemoplossing
Voordat u die diens kontak, kyk na die volgende algemene probleme:
| Probleem | Moontlike oorsaak | Oplossing |
|---|---|---|
| Oond begin nie | Kragkabel nie ingeprop nie; Deur nie behoorlik toe nie; Sekering deurgeblaas of stroombreker het geaktiveer. | Steek die kragkabel in; Maak die deur stewig toe; Kontroleer die sekering of herstel die stroombreker. |
| Kos word nie verhit nie | Verkeerde kooktyd of kragvlak ingestel; Deur nie behoorlik toe nie. | Adjust time/power; Ensure door is latched. |
| Draaitafel draai nie | Draaitafel nie behoorlik geplaas nie; Obstruksie onder draaitafel. | Herposisioneer draaitafel en rolring; Verwyder enige obstruksies. |
| Vonking binne die oond | Metal or foil in oven; Food splatters. | Verwyder metaalvoorwerpe; Maak die binnekant van die oond deeglik skoon. |
If the problem persists after checking these points, please contact an authorized service technician.
7. Spesifikasies
| Handelsmerk | Skerp |
| Model | R-369T |
| Kapasiteit | 33 liter |
| Uitset krag | 800W (mikrogolf) |
| Wattage | 1100 watts (Input) |
| Draaitafel deursnee | 272 mm |
| Buite afmetings (B x H x D) | 520 x 310 x 448 mm |
| Gewig | 16.96 kg |
| Voltage | 220 Volt |
| Frekwensie | 50 Hz |
| Materiaal | Staal |
| Spesiale kenmerke | Programmable, 6 Microwave Power Levels, 2 Reheat Menu Keys, Easy Defrost, Slow Cook Key, Black Glass Door |

Figure 5: Dimensional drawing of the Sharp R-369T Microwave Oven, illustrating its width (520 mm / 52 cm), height (310 mm / 31 cm), and depth (448 mm / 44.8 cm).
8. Waarborg en Ondersteuning
For warranty information and customer support, please refer to the warranty card included with your product or visit the official Sharp webwebwerf vir u streek. Bewaar u aankoopbewys as bewys van aankoop vir enige waarborgeise.
For technical assistance or service inquiries, please contact Sharp customer service.