1. Inleiding en oorview
Thank you for choosing the TRUPER ROTO-1/2NX2 Hammer Drill/Screwdriver. This powerful 1200W tool is designed for various drilling and screwdriving tasks, offering versatility with its three functions: hammer drill, drill, and screwdriver. It features 2 variable reversible speeds, a robust double gear system, and an ergonomic non-slip handle for enhanced control and comfort. Please read this manual carefully before operating the tool to ensure safe and efficient use.

Figuur 1.1: Voorkant view of the TRUPER ROTO-1/2NX2 Hammer Drill. This image shows the overall design of the tool, including the chuck, auxiliary handle, and main body.
2. Produkkenmerke en -komponente
The TRUPER ROTO-1/2NX2 is equipped with several features designed for performance and user convenience. Familiarize yourself with the components shown below.
- Funksiekieser: Easily switch between drill, hammer drill, and screwdriver modes.
- Mechanical Speed Selector: Control for high or low speed settings.
- Depth Control Rod: For precise drilling depth adjustments.
- 360° Auxiliary Handle: Provides enhanced control and comfort for the operator.
- Veranderlike spoedbeheer: Allows for precise speed adjustment during operation.
- Reversible Mode Lever: Changes the rotation direction for screwdriving or bit removal.
- Continuous Use Button: Locks the trigger for extended operation.
- Non-slip Grip: Ensures comfortable and secure handling.
- Ball Bearing Mounted Motor: Designed for increased durability and lifespan.
- LED lig: Verlig die werkarea vir beter sigbaarheid.
- Heavy-duty Cable: Durable power cable for reliable connection.

Figuur 2.1: Kant view of the TRUPER ROTO-1/2NX2 Hammer Drill, illustrating the general location of the function selector, speed selector, depth rod, auxiliary handle, variable speed control, reversible lever, continuous use button, non-slip grip, and LED light.
3. Algemene Veiligheidsinstruksies
WAARSKUWING: Lees alle veiligheidswaarskuwings, instruksies, illustrasies en spesifikasies wat by hierdie elektriese gereedskap voorsien word. Versuim om alle instruksies hieronder gelys te volg, kan elektriese skok, brand en/of ernstige beserings tot gevolg hê.
Werksarea Veiligheid
- Hou die werkarea skoon en goed belig. Deurmekaar of donker areas nooi ongelukke uit.
- Moenie elektriese gereedskap in plofbare atmosfeer gebruik nie, soos in die teenwoordigheid van vlambare vloeistowwe, gasse of stof. Elektriese gereedskap skep vonke wat die stof of dampe kan aansteek.
- Hou kinders en omstanders weg terwyl 'n elektriese gereedskap gebruik word. Afleidings kan veroorsaak dat jy beheer verloor.
Elektriese veiligheid
- Kraggereedskapproppe moet by die uitlaat pas. Moet nooit die prop op enige manier verander nie.
- Vermy liggaamskontak met geaarde of geaarde oppervlaktes, soos pype, verkoelers, reekse en yskaste. Daar is 'n verhoogde risiko van elektriese skok as jou liggaam geaard of geaard is.
- Moenie elektriese gereedskap aan reën of nat toestande blootstel nie. Water wat 'n elektriese gereedskap binnedring, sal die risiko van elektriese skok verhoog.
- Moenie die koord misbruik nie. Moet nooit die koord gebruik om die kraggereedskap te dra, te trek of te ontkoppel nie. Hou koord weg van hitte, olie, skerp kante of bewegende dele.
Persoonlike veiligheid
- Dra altyd oogbeskerming. Gebruik veiligheidsbril, 'n veiligheidsbril of 'n gesigskerm.
- Wear appropriate personal protective equipment (PPE) such as hearing protection, dust mask, non-skid safety shoes, and work gloves.
- Bly wakker, kyk wat jy doen en gebruik gesonde verstand wanneer jy 'n elektriese gereedskap gebruik.
- Moenie oorreik nie. Hou te alle tye behoorlike voet en balans.
4. Opstelling
Before starting any work, ensure the tool is unplugged from the power source.
4.1 Bevestig die hulphandvatsel
- Maak die hulphandvatsel los deur dit antikloksgewys te draai.
- Skuif die handvatsel oor die voorkant van die boorliggaam.
- Adjust the handle to a comfortable and secure position (it can rotate 360°).
- Draai die handvatsel vas deur dit kloksgewys te draai totdat dit stewig vas is.
4.2 Inserting Drill Bits/Accessories
- Maak die klauwplaatkake oop deur die klauwplaatsleutel antikloksgewys te draai.
- Steek die boorpunt of bykomstigheid volledig in die boorkop.
- Tighten the chuck jaws firmly using the chuck key by rotating it clockwise. Ensure the bit is centered and secure.
- Verwyder die klauwplaatsleutel onmiddellik na vasdraai om beserings te voorkom.
4.3 Adjusting the Depth Control Rod
- Loosen the screw or lever that secures the depth control rod on the auxiliary handle.
- Adjust the rod to the desired drilling depth. The tip of the rod should indicate the maximum depth.
- Tighten the screw or lever to secure the depth control rod in place.

Figuur 4.1: The TRUPER ROTO-1/2NX2 Hammer Drill in operation, illustrating proper grip and the use of the auxiliary handle and depth rod during a drilling task.
5. Bedryfsinstruksies
Always wear appropriate safety gear, including eye protection and hearing protection, before operating the tool.
5.1 Selecting Operating Mode (Function Selector)
The tool offers three operating modes:
- Boormodus: Vir boorwerk in hout, metaal en plastiek.
- Hamerboormodus: Vir die boor van messelwerk, beton en baksteen.
- Skroewedraaiermodus: Vir die in- en uitdraai van skroewe.
To select a mode, rotate the function selector switch located on the top of the tool to the desired icon. Ensure the selector clicks into place.
5.2 Adjusting Speed (Mechanical Speed Selector and Variable Speed Control)
- Mechanical Speed Selector: Use the switch on the top of the tool to select between high (II) and low (I) mechanical speed ranges. Low speed provides higher torque, suitable for larger holes or screwdriving. High speed is for smaller holes and faster drilling.
- Veranderlike spoed sneller: The trigger allows for fine-tuning the speed within the selected mechanical range. Pressing the trigger lightly results in lower speed, while pressing it fully increases the speed.
5.3 Omkeerbare Funksie
The reversible lever, located near the trigger, controls the direction of rotation.
- Push the lever to the left for forward (clockwise) rotation, used for drilling and driving screws.
- Push the lever to the right for reverse (counter-clockwise) rotation, used for removing screws or freeing jammed drill bits.
Let wel: Always ensure the tool has come to a complete stop before changing the direction of rotation.
5.4 Continuous Use Button
For extended drilling or screwdriving tasks, the continuous use button can lock the trigger in the "ON" position.
- Press the trigger fully to start the tool.
- While the trigger is pressed, push the continuous use button.
- Release the trigger; the tool will continue to operate.
- To turn off the tool, press the trigger again and release it.
6. Onderhoud
Regular maintenance ensures the longevity and optimal performance of your TRUPER ROTO-1/2NX2. Always unplug the tool before performing any maintenance.
6.1 Skoonmaak
- Keep the ventilation openings clean to prevent motor overheating. Use a soft brush or compressed air to clear dust and debris.
- Vee die buitekant van die gereedskap af met advertensiemateriaalamp lap. Moenie harde chemikalieë of skuur skoonmaakmiddels gebruik nie.
- Maak die klauwplaatkake gereeld skoon om behoorlike greep op die boorstukke te verseker.
6.2 Koolstofborsels
The carbon brushes are wear parts. If the motor performance decreases or sparks become excessive, the carbon brushes may need replacement. This should ideally be done by a qualified service technician.
6.3 Berging
Store the tool in a dry, secure place, out of reach of children. Protect it from direct sunlight and extreme temperatures.
7. Probleemoplossing
If you encounter issues with your TRUPER ROTO-1/2NX2, refer to the following common problems and solutions. If the problem persists, contact authorized service personnel.
| Probleem | Moontlike oorsaak | Oplossing |
|---|---|---|
| Gereedskap begin nie. | No power supply, faulty switch, worn carbon brushes. | Check power connection. Ensure switch is not locked. Inspect/replace carbon brushes (professional service recommended). |
| Verlies van krag tydens werking. | Overload, worn carbon brushes, damaged motor. | Reduce load. Inspect/replace carbon brushes. Seek professional service for motor inspection. |
| Oormatige vonke van die motor. | Worn carbon brushes, dirty commutator. | Replace carbon brushes. Clean commutator (professional service recommended). |
| Gereedskap oorverhit. | Blocked ventilation, continuous heavy load. | Clear ventilation openings. Allow tool to cool down. Reduce load or operating time. |
| Drill bit jams. | Incorrect bit for material, excessive pressure, hitting rebar. | Use appropriate bit. Apply steady, not excessive, pressure. Use reverse function to free bit. |
8. Spesifikasies
Technical specifications for the TRUPER ROTO-1/2NX2 Hammer Drill/Screwdriver.
| Spesifikasie | Waarde |
|---|---|
| Handelsmerk | TRUPER |
| Kragbron | Elektries |
| Maksimum rotasiespoed | 3300 RPM |
| Voltage | 120 Volt |
| Amperageer | 9 Amperes |
| Kleur | Swart |
| Spesiale kenmerk | Veranderlike spoed |
| Produkafmetings (L x B x H) | 40l. x 9.4w. x 26.8h. centimeters |
| Aantal snelhede | 2 |
| Maksimum krag | 1200 Watt |
| Tipe boor | Hamerboor |
| Item gewig | 3.35 kilogram |
| Modelnommer | ROTO-1/2NX2 |
| Vervaardiger | Truper SA de CV |
| Land van oorsprong | China |
| ASIN | B013R4PUD2 |
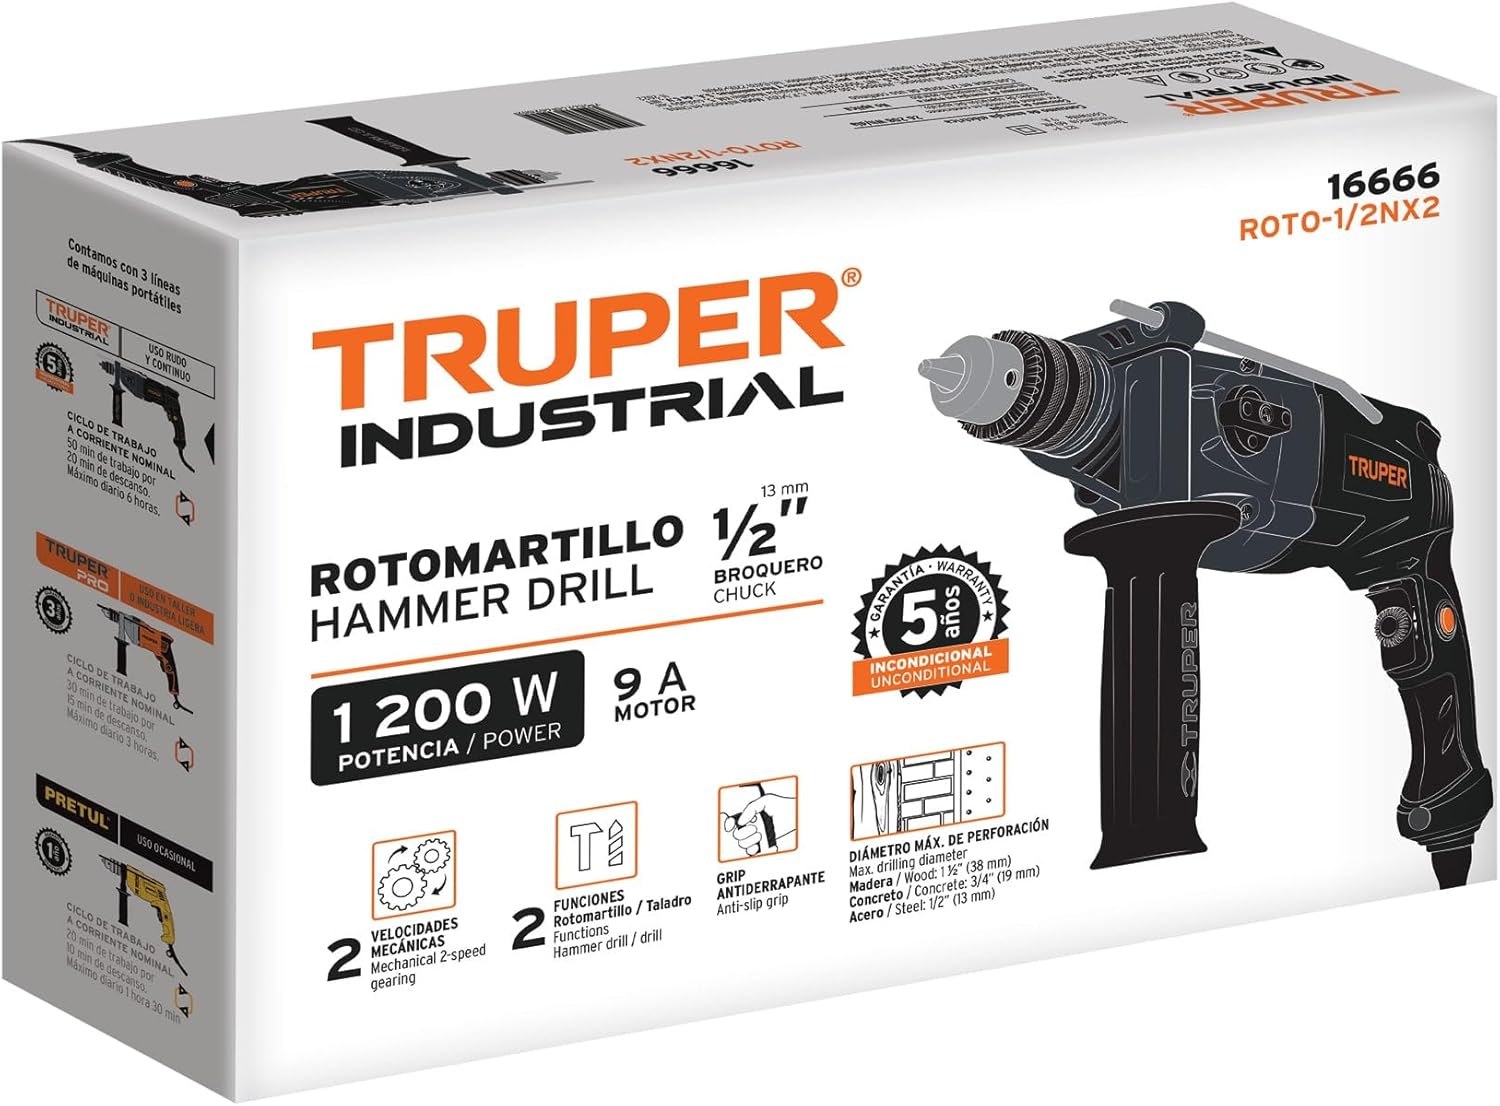
Figuur 8.1: Product packaging for the TRUPER ROTO-1/2NX2, displaying key specifications and features.
9. Waarborg en Ondersteuning
The TRUPER ROTO-1/2NX2 Hammer Drill/Screwdriver comes with a 3 jaar waarborg from the manufacturer, Truper SA de CV. This warranty covers defects in materials and workmanship under normal use.
For warranty claims, technical support, or service inquiries, please contact your retailer or the manufacturer directly. Keep your proof of purchase for warranty validation.
You can find more information about TRUPER products and support on their official webwebwerf of deur gemagtigde verspreiders.