1. Inleiding
This manual provides detailed instructions for the installation, operation, maintenance, and troubleshooting of the ASRock H81M-HDS R2.0 Micro ATX Motherboard. Please read this manual thoroughly before installing or using your motherboard to ensure proper functionality and to prevent damage.
The ASRock H81M-HDS R2.0 is designed for Intel LGA 1150 processors, supporting DDR3 memory and offering essential connectivity for a reliable computing experience.
2. Produk verbyview
The ASRock H81M-HDS R2.0 motherboard features the Intel H81 chipset, providing a stable platform for your system. Key features include:
- Sok tipe: LGA 1150
- Chipset: Intel H81
- Geheue: 2x DDR3/DDR3L-1600/1333/1066 DIMM Slots, Dual Channel, Non-ECC, Unbuffered, Max Capacity of 16GB
- Uitbreidingsgleuwe: 1x PCI Express 2.0 x16 Slot, 1x PCI Express 2.0 x1 Slot
- Berging: 2x SATA3 Ports, 2x SATA2 Ports
- Oudio: Realtek ALC662 5.1-kanaal hoëdefinisie-klankkodek
- USB-poorte: 4x USB 3.0 Ports (2 rear, 2 via header), 8x USB 2.0 Ports (4 rear, 4 via headers)
- Video-uitsette: 1x VGA Port, 1x DVI-D Port, 1x HDMI Port
- Netwerk: 1x RJ45 LAN Port
- Vormfaktor: MikroATX
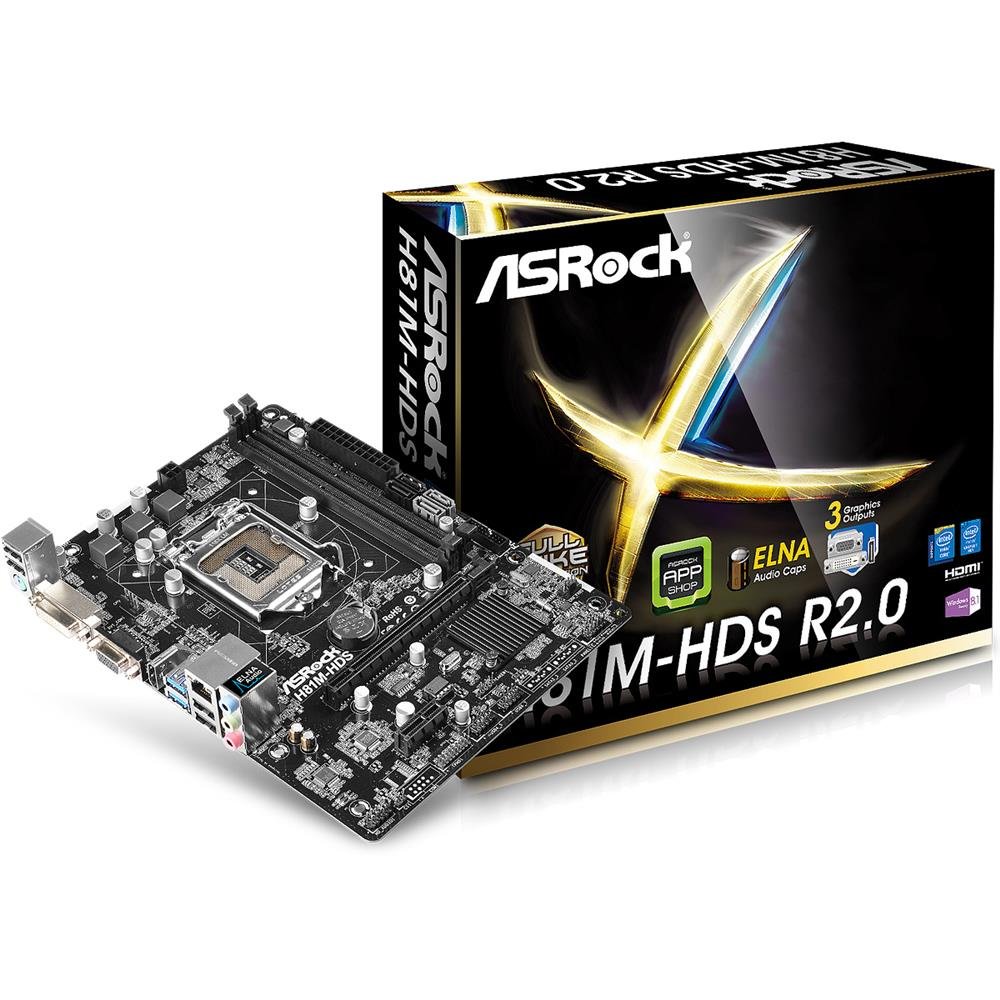
Figuur 2.1: ASRock H81M-HDS R2.0 Micro ATX Motherboard. This image displays the overall layout of the motherboard, including the CPU socket, RAM slots, PCIe slots, and various connectors.
3. Opstelling en installering
Voordat u met die installasie begin, maak seker dat u stelsel afgeskakel en uit die muurprop ontkoppel is. Dra 'n antistatiese polsband om skade aan komponente deur elektrostatiese ontlading (ESD) te voorkom.
3.1. Installering van die SVE
- Vind die LGA 1150 CPU-sok op die moederbord.
- Gently push down the load lever and pull it out to open the CPU socket cover.
- Rig die driehoekige merk op die SVE met die merk op die sok. Plaas die SVE versigtig in die sok sonder om dit te forseer.
- Maak die laaiplaat toe en druk die laaihefboom terug in plek totdat dit klik.
3.2. Installering van die SVE-verkoeler
Follow the instructions provided with your CPU cooler for proper installation. Ensure thermal paste is applied correctly between the CPU and the cooler's base.
3.3. Installeer geheue (RAM)
- Maak die knippies aan beide kante van die DDR3 DIMM-gleuwe oop.
- Rig die kerf op die geheuemodule met die sleutel in die DIMM-gleuf.
- Insert the memory module firmly into the slot until the clips snap into place. For dual-channel operation, install modules in matching colored slots (if applicable, refer to motherboard diagram for specific slots).
3.4. Montering van die moederbord
- Installeer die I/O-skerm in die agterste opening van jou rekenaarkas.
- Place the motherboard into the case, aligning the screw holes with the standoffs.
- Bevestig die moederbord met skroewe en maak seker dat dit stewig vas is, maar nie te styf vasgedraai is nie.
3.5. Aansluitkrag
- Connect the 24-pin ATX power connector from your power supply to the corresponding header on the motherboard.
- Connect the 4-pin ATX 12V power connector (CPU power) to its header.
3.6. Connecting Storage Devices
Connect your SATA hard drives or SSDs to the SATA3 (6Gb/s) or SATA2 (3Gb/s) ports using SATA data cables. Connect power cables from the power supply to each drive.
3.7. Connecting Front Panel and USB Headers
Connect the front panel connectors (power button, reset button, HDD LED, power LED) and USB headers from your case to the corresponding pins on the motherboard. Refer to the motherboard's detailed diagram for correct pin assignments.
4. Bedryfsinstruksies
4.1. BIOS/UEFI-opstelling
Upon initial boot, press Del or F2 during the POST (Power-On Self-Test) to enter the UEFI Setup Utility. Here you can configure system settings such as boot order, date/time, and hardware parameters. The ASRock UEFI is designed to be user-friendly.
4.2. Bestuurder Installasie
After installing your operating system, install the necessary drivers for the motherboard's components (chipset, audio, LAN, graphics if using integrated) from the ASRock support website or the provided driver CD (if applicable). Ensure all drivers are up-to-date for optimal performance and stability.
5. Onderhoud
Gereelde onderhoud help om die lang lewensduur en stabiele werking van jou moederbord en stelsel te verseker.
- Stofverwydering: Periodically clean dust from inside your computer case, especially from CPU coolers, case fans, and heatsinks, using compressed air. Ensure the system is powered off and unplugged before cleaning.
- Kabelbestuur: Ensure internal cables are neatly routed to improve airflow and prevent obstruction of components.
- BIOS/UEFI-opdaterings: Gaan die ASRock na website for BIOS/UEFI updates. Updates can improve compatibility, stability, and performance. Follow ASRock's specific instructions for BIOS flashing carefully to avoid damaging the motherboard.
- Bestuurderopdaterings: Hou jou stelseldrywers opgedateer om versoenbaarheid en optimale werkverrigting met jou bedryfstelsel en toepassings te verseker.
6. Probleemoplossing
If you encounter issues with your ASRock H81M-HDS R2.0 motherboard, refer to the following common troubleshooting steps:
6.1. Geen krag / Geen opstart nie
- Verifieer dat alle kragkabels (24-pen ATX, 4-pen ATX 12V) stewig aan die moederbord en kragtoevoer gekoppel is.
- Maak seker dat die kragtoevoerskakelaar in die 'AAN'-posisie is.
- Kontroleer die aan/uit-knoppie se verbindings met die moederbord op die voorpaneel.
- Toets met 'n ander kragbron indien moontlik.
6.2. Geen skermuitvoer nie
- Ensure your monitor is connected to the correct video output (VGA, DVI-D, or HDMI) on the motherboard or discrete graphics card.
- Verifieer dat die monitor aangeskakel is en op die korrekte invoerbron gestel is.
- Reseat the RAM modules. Faulty or improperly seated RAM is a common cause of no display.
- If using a discrete graphics card, ensure it is properly seated in the PCIe slot and has adequate power connected.
6.3. RAM Issues (e.g., one slot not working)
- Maak seker dat RAM-modules volledig in hul gleuwe geplaas is.
- Test each RAM module individually in each slot to identify a potentially faulty module or slot.
- Check the motherboard's QVL (Qualified Vendor List) for compatible memory modules.
6.4. System Instability / Random Crashes
- Kontroleer die SVE- en GPU-temperature om te verseker dat hulle binne veilige bedryfslimiete is.
- Verify all drivers are correctly installed and up-to-date.
- Voer geheuediagnostiese gereedskap uit om RAM-foute na te gaan.
- Maak seker dat jou kragtoevoer voldoende en stabiele krag aan alle komponente verskaf.
7. Spesifikasies
Detailed technical specifications for the ASRock H81M-HDS R2.0 Motherboard:
| Handelsmerk | ASRock |
| Modelnommer | H81M-HDS R2.0 |
| CPU-sok | LGA 1150 |
| Chipset Tipe | Intel H81 |
| RAM geheue tegnologie | DDR3 |
| Geheuegleuwe beskikbaar | 2 |
| RAM Geheue Maksimum Grootte | 16 GB |
| Geheue Klokspoed | 1333 MHz (Supports up to 1600 MHz) |
| Grafiese kaart koppelvlak | PCI Express |
| SATA-poorte | 2x SATA3, 2x SATA2 |
| USB-poorte | 4x USB 3.0 (2 rear, 2 via header), 8x USB 2.0 (4 rear, 4 via headers) |
| Video-uitsette | 1x VGA, 1x DVI-D, 1x HDMI |
| Oudio | Realtek ALC662 5.1-kanaal HD-oudio |
| LAN | Gigabit Ethernet |
| Vormfaktor | MikroATX |
| Item gewig | 0.6 kilogram |
8. Waarborg en Ondersteuning
ASRock provides a limited warranty for its products. For specific warranty terms and conditions, please refer to the warranty card included with your product or visit the official ASRock webwebwerf. Bewaar u bewys van aankoop vir waarborgeise.
For technical support, driver downloads, and BIOS updates, please visit the official ASRock support webwebwerf:
ASRock Amptelike Ondersteuning
When contacting support, please have your motherboard model (H81M-HDS R2.0) and serial number ready.