1. Inleiding
Dankie vir die aankoopasing the Mastech MS8230B Digital Multimeter. This device is a compact, battery-operated, handheld digital multimeter designed for measuring DC and AC voltage, DC current, resistance, diode, and transistor (hFE) tests. It features a large LCD display for easy reading and is built to international safety standards.
Please read this instruction manual thoroughly before using the multimeter to ensure safe and proper operation. Keep this manual for future reference.
2. Veiligheidsinligting
This multimeter is designed according to IEC 1010-1 international safety standards for electronic measuring instruments. It complies with CAT III 600V and CAT II 1000V overvoltage categories. Always adhere to the following safety precautions:
- Never exceed the maximum input limits for any function.
- Do not use the meter if the case is damaged or open.
- Ensure the test leads are in good condition, without any damaged insulation.
- Skakel altyd die stroombaan se krag af en ontlaai alle hoëvolume.tage capacitors before measuring resistance, diodes, or hFE.
- Wees uiters versigtig wanneer u met voltagbo 60V GS of 30V GS RMS, aangesien dit 'n skokgevaar inhou.
- Verwyder toetsdrade van die stroombaan voordat funksies of reekse verander word.
- Vervang die battery onmiddellik wanneer die lae battery-aanwyser verskyn om akkurate lesings te verseker.
- Moenie die meter in plofbare gas-, damp- of stofomgewings gebruik nie.
3. Pakketinhoud
Verifieer dat al die items wat hieronder gelys word, teenwoordig en onbeskadig is:
- Mastech MS8230B Digital Multimeter
- Test Leads (one pair)
- 9V-battery (vooraf geïnstalleer of apart ingesluit)
- Gebruikershandleiding
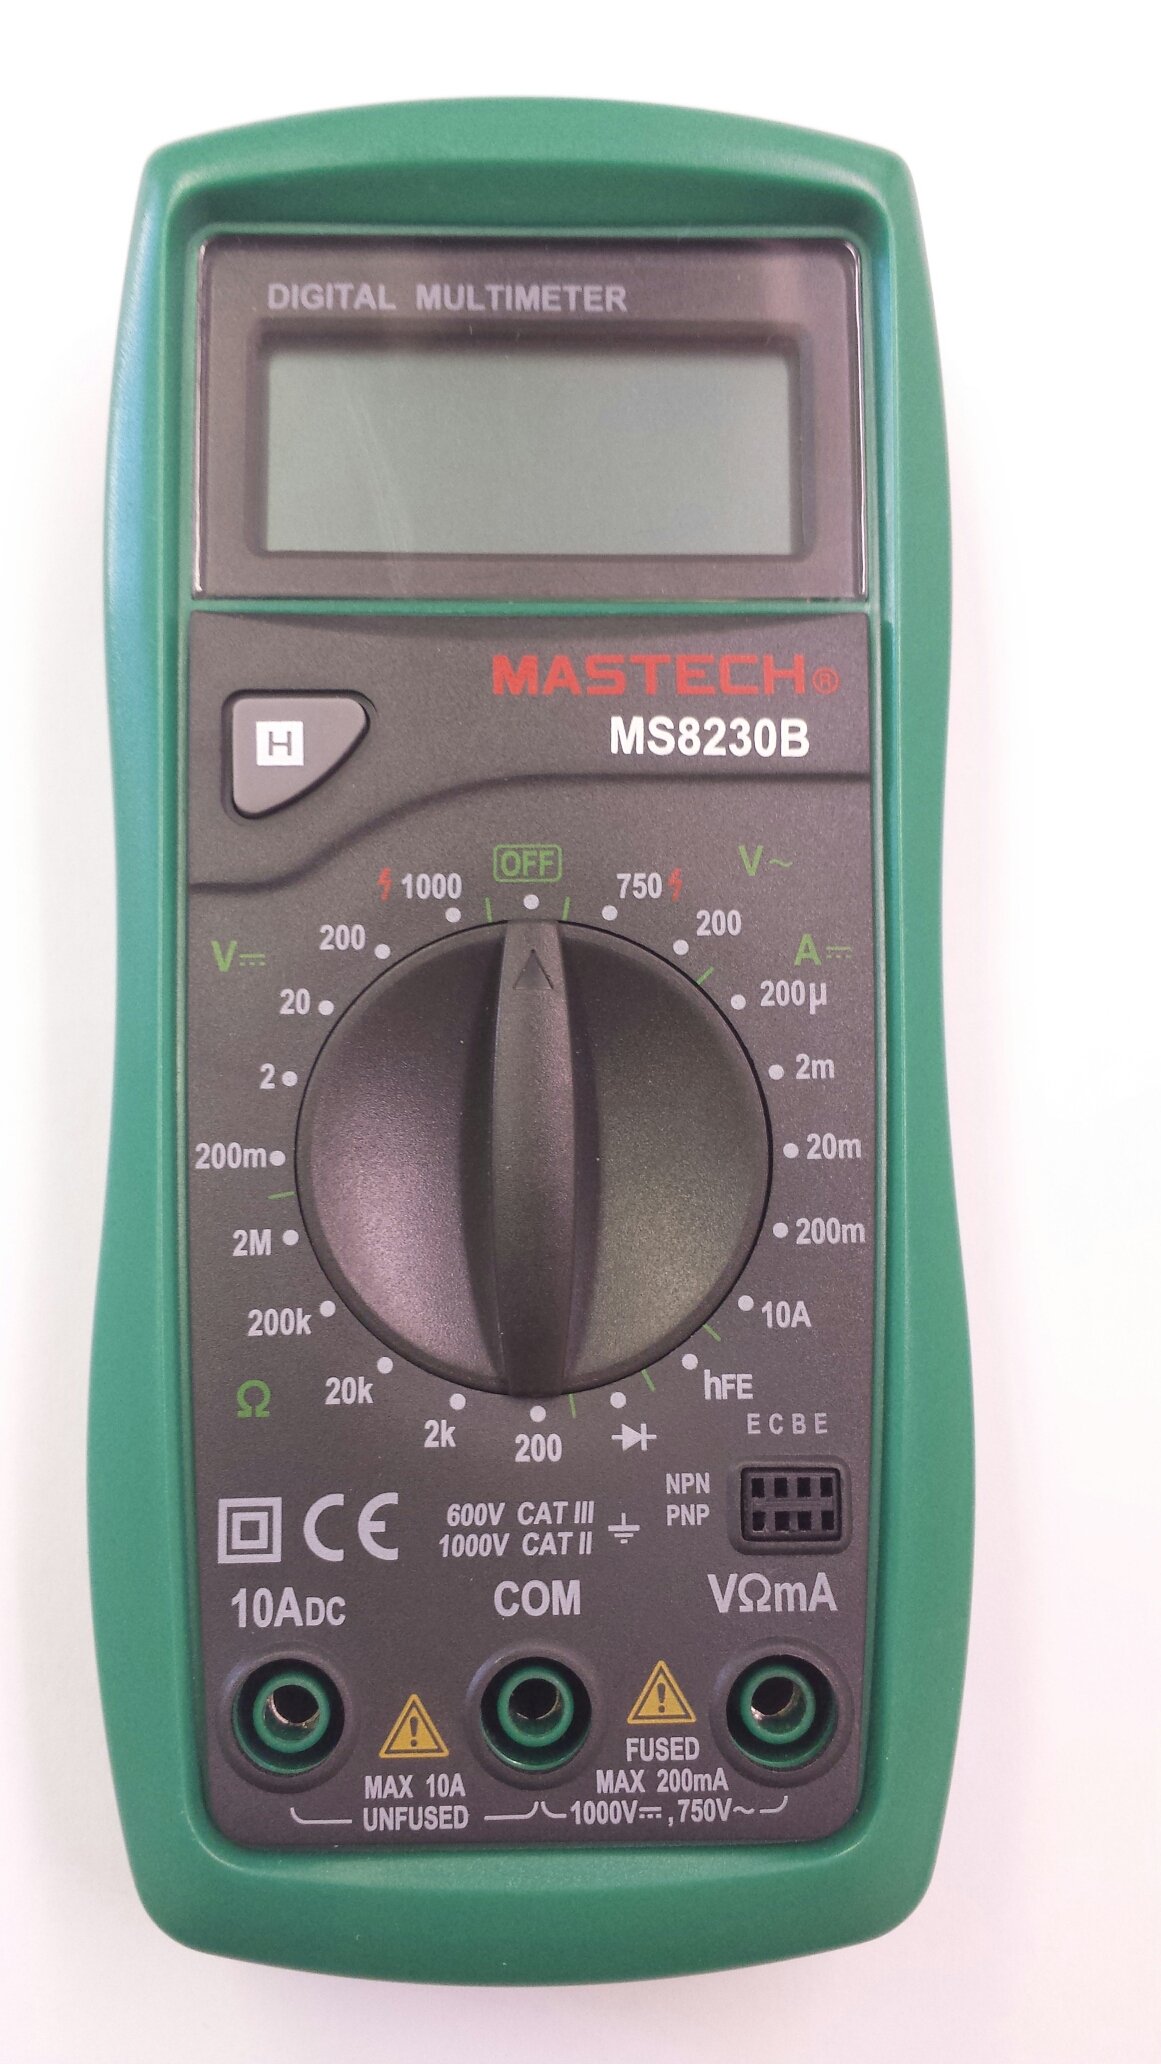
Image 1: Contents of the Mastech MS8230B package, including the multimeter, test leads, batteries, and user manual.
4. Opstelling
4.1 Battery installasie
The MS8230B multimeter requires one 9V battery for operation. If the battery is not pre-installed or needs replacement:
- Maak seker dat die multimeter AFGESKAKEL is en ontkoppel alle toetsdrade.
- Vind die batteryklepdeksel aan die agterkant van die eenheid.
- Loosen the screw(s) on the battery cover and remove the cover.
- Koppel die 9V-battery aan die batterykonnektor en let op die korrekte polariteit.
- Plaas die battery in die kompartement en plaas die deksel terug en maak dit vas met die skroef(e).
4.2 Verbinding van toetsdrade
Always connect the test leads correctly for the desired measurement:
- Insert the red test lead into the "VΩmA" jack for voltage, weerstand en lae stroommetings.
- Insert the red test lead into the "10ADC" jack for high DC current measurements (up to 10A).
- Always insert the black test lead into the "COM" (common) jack.
5. Bedryfsinstruksies
Before taking any measurement, ensure the test leads are correctly connected and the function switch is set to the appropriate range.
5.1 DC Voltage Meting (DCV)
- Connect the red test lead to the "VΩmA" jack and the black test lead to the "COM" jack.
- Set the rotary switch to the desired DCV range (e.g., 200mV, 2V, 20V, 200V, 1000V). If the voltage onbekend is, begin met die hoogste reeks en verlaag soos nodig.
- Verbind die toetsdrade oor die komponent of stroombaan wat gemeet moet word.
- Lees die voltage value on the LCD display. Observe the polarity indication.
5.2 AC Voltage Meting (ACV)
- Connect the red test lead to the "VΩmA" jack and the black test lead to the "COM" jack.
- Set the rotary switch to the desired ACV range (e.g., 200V, 750V). Start with the highest range if the voltage is onbekend.
- Verbind die toetsdrade oor die komponent of stroombaan wat gemeet moet word.
- Lees die voltage -waarde op die LCD -skerm.
5.3 DC Current Measurement (DCA)
Waarskuwing: Never attempt to measure current on a circuit with voltage present by connecting the meter in parallel. Always connect the meter in series with the load.
- Determine the expected current. For currents up to 200mA, connect the red lead to "VΩmA". For currents up to 10A, connect the red lead to "10ADC". The black lead always goes to "COM".
- Set the rotary switch to the appropriate DCA range (e.g., 200µA, 2mA, 20mA, 200mA, 10A).
- Turn off the power to the circuit. Open the circuit where the current is to be measured.
- Verbind die multimeter in serie met die stroombaan.
- Apply power to the circuit and read the current value on the LCD display.
5.4 Weerstandmeting
Waarskuwing: Ensure the circuit under test is completely de-energized and all capacitors are discharged before measuring resistance.
- Connect the red test lead to the "VΩmA" jack and the black test lead to the "COM" jack.
- Set the rotary switch to the desired Resistance (Ω) range (e.g., 200Ω, 2kΩ, 20kΩ, 200kΩ, 2MΩ).
- Verbind die toetsdrade oor die komponent wat gemeet moet word.
- Lees die weerstandswaarde op die LCD-skerm.
5.5 Diode-toets
Waarskuwing: Ensure the circuit under test is completely de-energized and all capacitors are discharged before performing a diode test.
- Connect the red test lead to the "VΩmA" jack and the black test lead to the "COM" jack.
- Set the rotary switch to the Diode symbol (→|).
- Connect the red test lead to the anode and the black test lead to the cathode of the diode. The display will show the forward voltage drop (typically 0.5V to 0.8V for silicon diodes).
- Reverse the test leads. The display should show "OL" (Open Loop) for a good diode. A reading in both directions or "0" indicates a shorted diode.
5.6 Transistor hFE Test
Waarskuwing: Ensure the transistor is not connected to a live circuit.
- Stel die draaiskakelaar na die "hFE"-posisie.
- Identifiseer of die transistor NPN of PNP is.
- Insert the transistor's emitter, base, and collector leads into the corresponding holes in the hFE socket on the multimeter.
- Read the hFE (DC current gain) value on the LCD display.
5.7 Data Vashou Funksie
Press the "H" button to hold the current reading on the display. Press it again to release the hold function and resume live readings.
6. Onderhoud
6.1 Skoonmaak
Vee die omhulsel af met advertensieamp cloth and mild detergent. Do not use abrasives or solvents. Keep the jacks free of dust and debris.
6.2 Batteryvervanging
When the battery symbol appears on the LCD, the 9V battery needs to be replaced. Refer to section 4.1 for battery installation instructions.
6.3 Sekeringvervanging
The multimeter is protected by a fuse. If the current measurement function stops working, the fuse may need replacement. This should only be performed by qualified personnel. The fuse specifications are typically printed near the fuse holder or in the specifications section.
7. Probleemoplossing
If the multimeter does not function correctly, check the following:
- Geen vertoon of dowwe vertoon: Kontroleer die battery. Vervang indien nodig.
- Verkeerde lesings: Ensure the test leads are properly connected, the function switch is on the correct range, and the battery is not low.
- "OL" (Oorlading) word vertoon: The measured value exceeds the selected range. Switch to a higher range.
- Current measurement not working: Gaan die lont na.
As probleme voortduur, kontak kliëntediens.
8. Spesifikasies
The Mastech MS8230B Digital Multimeter offers the following technical specifications:

Image 2: Detailed specifications for the Mastech MS8230B Multimeter, including display, range, and accuracy.
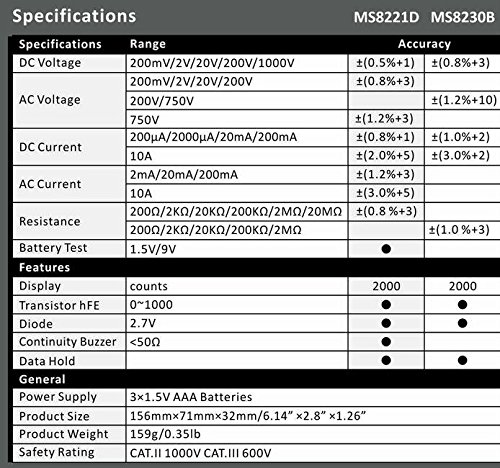
Image 3: Comparison table of specifications for Mastech MS8230B and MS8221D multimeters.
| Spesifikasie | Waarde |
|---|---|
| Vertoon | 1999 counts, 15mm digit height |
| DC Voltage (DCV) | 200mV, 2V, 20V, 200V, 1000V (Accuracy: 0.5% to 0.8%) |
| AC Voltage (ACV) | 200V, 750V (Accuracy: 1.2%) |
| DC-stroom (DCA) | 200µA, 2mA, 20mA, 200mA, 10A (Accuracy: 1.0% to 2.0%) |
| Weerstand (Ω) | 200Ω, 2kΩ, 20kΩ, 200kΩ, 2MΩ (Accuracy: 0.8% to 1.0%) |
| Diodetoets | Voorwaarts voltage druppel |
| Transistor hFE-toets | 1 tot 1000 |
| Data hou | Ja |
| Lae battery aanduiding | Ja |
| Oorladingsbeskerming | Ja |
| Kragbron | 1 x 9V battery |
| Afmetings (L x B x H) | 15.2 x 7.6 x 2.5 cm (ongeveer 6 x 3 x 1 duim) |
| Gewig | Ongeveer. 158.76 g (5.6 onse) |
| Veiligheidsgradering | IEC 1010-1 CAT III 600V, CAT II 1000V |
| Bedryfstemperatuur | 0°C tot 40°C (32°F tot 104°F) |
| Bergingstemperatuur | -10°C tot 50°C (14°F tot 122°F) |
9. Waarborg en Ondersteuning
Mastech products are designed for reliability and performance. For specific warranty details, please refer to the warranty card included with your product or contact your local Mastech distributor.
For technical support or service inquiries, please contact Mastech customer service through their official webwebwerf of die kontakinligting wat saam met u aankoopdokumentasie verskaf is.


