1. Inleiding
Dankie vir die aankoopasing the SINGER monami Delight SP-70P Computer Sewing Machine. This manual provides essential information for the safe and efficient operation, maintenance, and troubleshooting of your new sewing machine. Please read this manual thoroughly before using the machine and keep it in a safe place for future reference.
The monami Delight SP-70P is designed for ease of use, featuring large, intuitive buttons and a wide sewing base, making it suitable for various sewing projects.
2. Veiligheidsinstruksies
Om veilige werking te verseker, volg altyd hierdie basiese veiligheidsmaatreëls:
- Always unplug the machine from the electrical outlet when cleaning, lubricating, or when the machine is not in use.
- Hou vingers weg van alle bewegende dele. Spesiale versigtigheid is nodig rondom die naaimasjiennaald.
- Use the correct needle plate. The wrong plate can cause the needle to break.
- Moenie gebuigde naalde gebruik nie.
- Moenie aan die materiaal trek of stoot terwyl jy stik nie. Dit kan die naald afbuig en veroorsaak dat dit breek.
- Dra veiligheidsbril wanneer die masjien gebruik word.
- Moet nooit die masjien gebruik met enige lugopeninge wat geblokkeer is nie. Hou die ventilasieopeninge van die naaimasjien en voetpedaal vry van die ophoping van pluis, stof en los lap.
- Hierdie toestel is nie bedoel vir gebruik deur persone (insluitend kinders) met verminderde fisiese, sensoriese of geestelike vermoëns, of 'n gebrek aan ervaring en kennis nie, tensy hulle toesig of instruksies oor die gebruik van die toestel gegee is deur 'n persoon wat verantwoordelik is vir hul veiligheid.
3. Produk verbyview
The SINGER monami Delight SP-70P is a versatile computer sewing machine designed for various sewing tasks. It features a user-friendly interface and robust construction.
Sleutel kenmerke:
- 12 Stitch Patterns: Offers a variety of practical stitches for different sewing needs.
- Outomatiese naaldryger: Simplifies the threading process.
- Automatic Thread Tension: Adjusts tension automatically for various fabric types.
- 7-Point Feed Dog: Ensures smooth fabric feeding.
- Horizontal Full Rotary Hook: Prevents thread tangles and allows easy bobbin setting.
- Vrye arm: Convenient for sewing cylindrical items like sleeves and pant hems.
- LED Hand Lamp: Provides bright, long-lasting illumination of the sewing area.
- Stil Ontwerp: Equipped with a small, powerful magnet motor for reduced noise.
Masjien komponente:
Refer to the image below for a visual guide to the main components of your sewing machine.

Figuur 3.1: Voorkant view of the SINGER monami Delight SP-70P sewing machine, showcasing sy ontwerp en beheerpaneel.

Figuur 3.2: oorview of the SINGER monami Delight SP-70P, highlighting key operational areas and design elements.
4. Opstelling
4.1 Uitpak en plasing
- Verwyder die masjien versigtig uit sy verpakking.
- Plaas die masjien op 'n stabiele, plat oppervlak.
- Ensure there is adequate space around the machine for comfortable operation and fabric handling.
4.2 Kragverbinding
- Connect the power cord to the machine and then to a 100V (50/60Hz) electrical outlet.
- Turn on the power switch, usually located on the side of the machine. The LED hand lamp moet verlig.
4.3 Spoelwikkeling
The machine features an easy bobbin winding system:
- Plaas 'n leë spoel op die spoelwinder se as.
- Follow the numbered guide on the machine for threading the bobbin winding path.
- Druk die spoelwindspil na regs.
- Press the foot controller or start button to begin winding. The machine will automatically stop when the bobbin is full.
- Cut the thread and return the bobbin winder spindle to the left.
4.4 Die boonste draad inryg
The New Threading System makes upper threading simple:
- Lig die persvoethefboom op.
- Plaas 'n klos draad op die klospen.
- Follow the numbered threading path indicated on the machine, ensuring the thread passes through all guides and the take-up lever.
- Use the automatic needle threader by lowering the lever and engaging it with the needle eye.
- Pull the thread loop through the needle eye.
5. Bedryfsinstruksies
5.1 Steekkeuse
The monami Delight SP-70P offers 12 practical stitch patterns. Use the direct pattern selection buttons on the control panel to choose your desired stitch.

Figure 5.1: Visual representation of the 12 practical stitch patterns available on the SP-70P.
5.2 Basic Sewing
- Select your desired stitch pattern.
- Plaas die stof onder die drukvoet.
- Laat sak die persvoet.
- Press the foot controller or start button to begin sewing.
- Use the lock stitch function at the beginning and end of your seam to prevent unraveling.
5.3 Gevorderde kenmerke
- Fully Automatic Buttonhole: Select the buttonhole stitch, place your button in the buttonhole foot, and the machine will automatically sew a buttonhole to the correct size.
- One-Touch Slow Button: Press this button during sewing to reduce the speed, which is useful for intricate details, curves, and corners.
- Needle Up/Down: Control the needle's stopping position (up or down) for easy pivoting or continuous sewing.
- Drop Feed: Lower the feed dog for free-motion sewing, such as quilting or embroidery.
- Leveling Presser Foot Button: Use this button to keep the presser foot level when starting to sew on thick fabrics or multiple layers.
- Stitch Length and Width Adjustment: Adjust the stitch length and width according to your fabric and desired pattern.
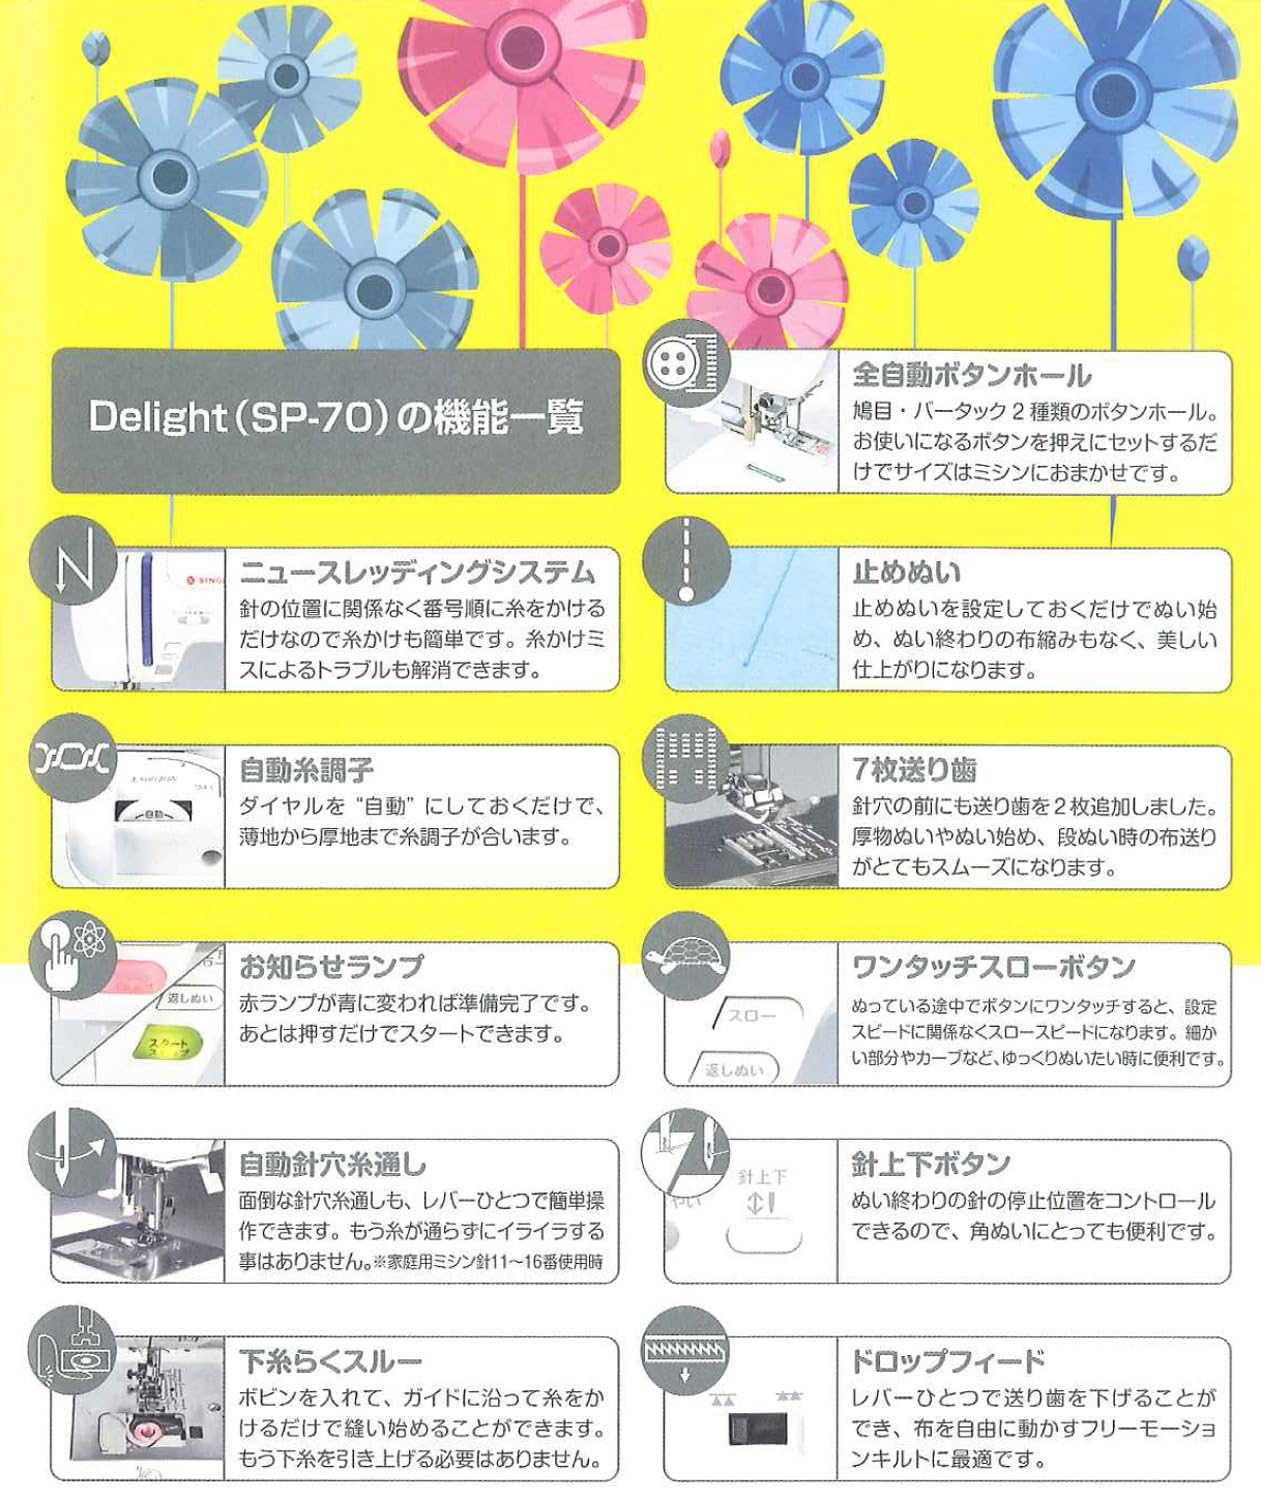
Figure 5.2: Detailed list of functions and features of the SINGER monami Delight SP-70P.

Figuur 5.3: oorview of additional useful features of the SINGER monami Delight SP-70P.
6. Onderhoud
Gereelde onderhoud verseker die lang lewensduur en optimale werkverrigting van u naaimasjien.
6.1 Skoonmaak
- Ontkoppel altyd die masjien voordat dit skoongemaak word.
- Use the provided brush to remove lint and dust from the bobbin case area and feed dogs.
- Vee die buitekant van die masjien af met 'n sagte, droë lap. Moenie harde chemikalieë of skuurmiddels gebruik nie.
6.2 Naaldvervanging
- Replace needles regularly, especially if they become bent or dull, to prevent skipped stitches or fabric damage.
- Use the screwdriver to loosen the needle clamp screw, remove the old needle, and insert a new one with the flat side facing the back.
- Draai die naald styf clamp skroef stewig vas.
7. Probleemoplossing
If you encounter issues with your sewing machine, refer to the following common problems and solutions:
| Probleem | Moontlike oorsaak | Oplossing |
|---|---|---|
| Steke oorgeslaan | Verkeerde naald, gebuigde naald, verkeerde inryging. | Replace needle with correct type/size, re-thread the machine correctly. |
| Draadbreuk | Incorrect threading, thread tension too high, burr on needle plate, poor quality thread. | Re-thread, adjust tension, check for burrs, use good quality thread. |
| Stofplooiing | Thread tension too high, incorrect stitch length, wrong presser foot. | Adjust tension, increase stitch length, use appropriate presser foot. |
| Masjien begin nie | Power cord not plugged in, power switch off, bobbin winder engaged. | Check power connection, turn on switch, disengage bobbin winder. |
Indien die probleem voortduur nadat u hierdie oplossings probeer het, kontak asseblief kliëntediens.
8. Spesifikasies
| Kenmerk | Spesifikasie |
|---|---|
| Modelnommer | SP-70P |
| Vervaardiger | SINGER |
| Body Size (W x D x H) | 43.9 x 19.5 x 28.7 cm |
| Liggaamsgewig | 8.2 kg |
| Kragtoevoer | 100V (50/60Hz) |
| Kragverbruik | 45 W |
| Steek patrone | 12 tipes |
| Kleur | Candy Berry Pink |
| Bykomstighede | Soft cover, needle set (No. 11 x 1, No. 14 x 2), bobbins (3 pcs), brush, screwdriver, seam ripper, overcasting foot, zipper foot, buttonhole foot, zigzag foot, spool cap, power cord. |
9. Waarborg en Ondersteuning
For warranty information, please refer to the warranty card included with your product or visit the official SINGER webwebwerf. Bewaar u bewys van aankoop vir waarborgeise.
For technical support, spare parts, or service, please contact your local SINGER authorized dealer or customer service center. Contact details can typically be found on the SINGER official webwebwerf of in jou produkverpakking.