1. Inleiding
Dankie vir die aankoopasing the Fonestar AS-170RU Hi-Fi Amplifier. This device is designed to provide high-fidelity stereo audio amplification, featuring a built-in USB/MP3 player, AM/FM digital tuner, and multiple audio inputs. This manual provides detailed instructions for safe installation, operation, and maintenance of your amplifier. Please read this manual thoroughly before use and retain it for future reference.
2. Veiligheidsinstruksies
- Kragtoevoer: Verseker die amplifier is connected to a power supply matching the voltage specified on the unit. Disconnect the power cord from the outlet if the unit will not be used for an extended period.
- Ventilasie: Moenie ventilasie-openinge blokkeer nie. Maak seker dat daar voldoende spasie rondom die eenheid is vir behoorlike lugvloei om oorverhitting te voorkom.
- Water en vog: Moenie die eenheid blootstel aan reën, vog of druppende/spattende vloeistowwe nie. Moenie voorwerpe gevul met vloeistowwe, soos vase, op die eenheid plaas nie.
- Hittebronne: Hou die eenheid weg van hittebronne soos verkoelers, hitteregisters, stowe of ander apparaat (insluitend ampversterkers) wat hitte produseer.
- Skoonmaak: Maak slegs skoon met 'n droë lap. Moenie vloeibare skoonmaakmiddels of aërosolskoonmakers gebruik nie.
- Diens: Moenie probeer om hierdie produk self te onderhou nie. Verwys alle diens na gekwalifiseerde dienspersoneel.
- Plasing: Place the unit on a stable, flat surface. Avoid placing it in direct sunlight or near strong magnetic fields.
3. Pakketinhoud
Maak asseblief seker dat die volgende items in u pakket ingesluit is:
- Fonestar AS-170RU Hi-Fi Amplewendiger
- Afstandbeheer
- AM-antenne
- FM-antenne
- Gebruikershandleiding (hierdie dokument)
4. Produk verbyview
4.1 Voorpaneel
The front panel provides access to essential controls and the display.
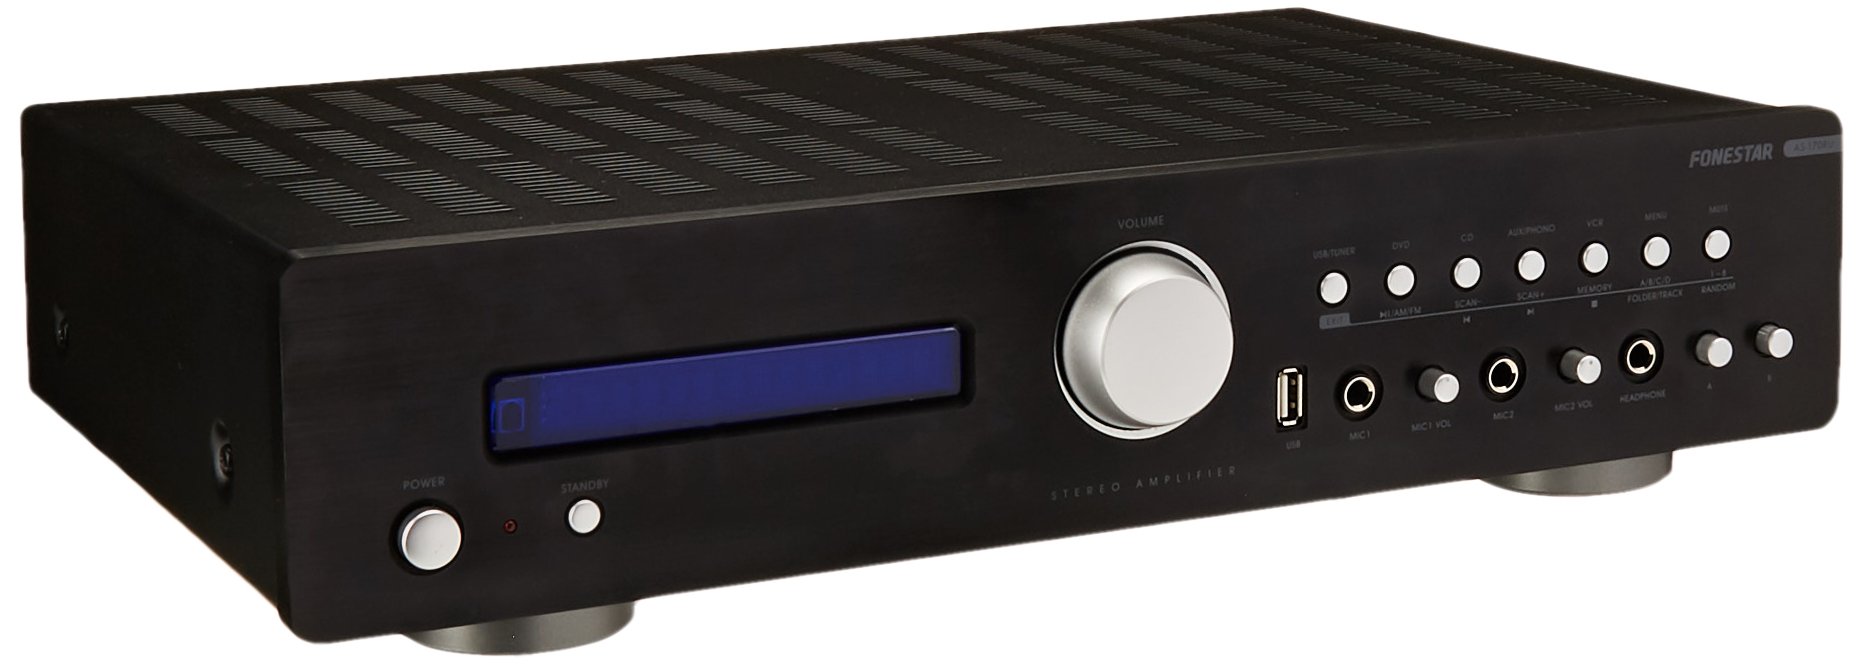
Image: Fonestar AS-170RU Front Panel. Hierdie beeld wys die voorkant view van die amplifier, showing the VFD display, USB port, headphone output, input selectors, volume knob, and other control buttons.
- Kragknoppie: Draai die amplewendiger aan of af.
- VFD Display: Shows current input, volume level, tuner information (frequency, RDS), and USB/MP3 track details (ID3 tag).
- USB-poort: For connecting USB storage devices to play MP3 files.
- Koptelefoon uitset: 6.3 mm-aansluiting om oorfone aan te sluit.
- Invoerkiesers: Buttons for choosing audio sources (CD, DVD, VCR, AUX/Phono, USB/Tuner).
- Volumebeheer: Rotary knob to adjust the master volume level.
- Mikrofoon-insette: Two 6.3mm microphone jacks with independent volume control.
- Toonkontroles: Buttons or menu options for adjusting Bass, Treble, and Balance.
4.2 Agterpaneel
The rear panel contains all the necessary connections for your audio sources, speakers, and antennas.

Image: Fonestar AS-170RU Rear Panel. This image illustrates the rear connections of the amplifier, including speaker terminals (A/B), various RCA input jacks (CD, DVD, VCR, AUX/Phono), REC OUT, PRE OUT, AMP IN, and antenna connections (FM COAX, AM LOOP ANT).
- Speaker Outputs (A/B): Terminals for connecting two pairs of speakers. Supports 4-16 ohms for A or B, or 8-16 ohms for A+B.
- Audio Inputs (RCA):
- CD-invoer: Vir die koppeling van 'n CD-speler.
- DVD Input: For connecting a DVD player or other audio source.
- VCR Input: For connecting a VCR or other audio source.
- AUX/PHONO Input: For connecting auxiliary devices or a turntable (Phono input may require a pre-amplifier if your turntable does not have one built-in).
- REC UIT: RCA output for connecting to a recording device.
- VOORUIT: RCA output for connecting to an external power amplewendiger.
- AMP IN: RCA input for connecting an external pre-amplewendiger.
- Antenna verbindings:
- FM COAX 75Ω: For connecting an FM antenna.
- AM LOOP ANT: For connecting the supplied AM loop antenna.
4.3 afstandbeheer
The included remote control allows convenient operation of the ampverligter van 'n afstand af.

Image: Fonestar AS-170RU Remote Control. This image shows the remote control unit with various buttons for power, input selection, volume, mute, tuner functions, USB playback controls, and tone adjustments.
- STAAN BY: Skakel aan / af.
- Invoerkiesers: Buttons for CD, DVD, VCR, AUX/PHONO, USB/TUNER.
- Volume op/af (VOL +/-): Pas die hoofvolume aan.
- DEMPEL: Maak die klankuitvoer stil.
- AM/FM: Switches between AM and FM tuner modes.
- SKANDEER: Scans for radio stations.
- MEMORY: Stores radio station presets.
- USB-terugspeelkontroles: Play/Pause, Stop, Skip Track, Folder/Track navigation.
- EQ OFF / BASS / TREBLE: Access tone controls.
- RDS / ID3: Displays RDS information for radio or ID3 tag vir MP3 files.
5. Opstelling
5.1 Koppel luidsprekers
- Verseker die ampDie verligter is afgeskakel en uit die kragtoevoer ontkoppel.
- Connect your speakers to the "SPEAKERS OUTPUT" terminals on the rear panel.
- Match the positive (+) terminal of the amplifier (red) to the positive (+) terminal of your speaker, and the negative (-) terminal (black) to the negative (-) terminal.
- The AS-170RU supports two groups of speakers (A and B). You can connect one pair to "SPEAKERS A" and another to "SPEAKERS B".
- Ensure your speakers' impedance matches the amplifier's specifications: 4-16 ohms for A or B, or 8-16 ohms for A+B.
5.2 Verbinding van klankbronne
Use RCA cables to connect your audio components to the corresponding input jacks on the rear panel.
- CD-speler: Koppel aan die "CD"-ingang.
- DVD-speler: Connect to the "DVD" input.
- Video: Connect to the "VCR" input.
- Auxiliary Device (e.g., smartphone, tablet): Connect to the "AUX/PHONO" input.
- draaitafel: Connect to the "AUX/PHONO" input. If your turntable does not have a built-in pre-amplifier, you may need an external phono pre-amplewendiger.
5.3 Koppelantennas
- FM-antenne: Connect the supplied FM wire antenna to the "FM COAX 75Ω" terminal. Extend the wire for optimal reception.
- AM-antenne: Connect the supplied AM loop antenna to the "AM LOOP ANT" terminals. Position the loop for best reception.
5.4 Kragverbinding
Once all audio and speaker connections are made, plug the amplifier's power cord into a suitable AC power outlet.
6. Bedryfsinstruksies
6.1 Basiese werking
- Krag aan/af: Press the Power button on the front panel or the STANDBY button on the remote control to turn the amplewendiger aan of af.
- Kies invoerbron: Press the desired input selector button on the front panel (CD, DVD, VCR, AUX/PHONO) or the remote control (CD, DVD, VCR, AUX/PHONO, USB/TUNER).
- Pas volume aan: Draai die volumeknop op die voorpaneel of gebruik die VOL +/- knoppies op die afstandbeheerder om die klankvlak aan te pas.
- Demp: Press the MUTE button on the remote control to temporarily silence the audio. Press it again to restore sound.
6.2 USB/MP3 Playback
- Insert a USB storage device (flash drive) into the USB port on the front panel.
- Select "USB/TUNER" as the input source. The amplifier will automatically detect and begin playing MP3 files.
- Use the playback controls on the remote control (Play/Pause, Stop, Skip Track, Folder/Track) to navigate and control your music.
- The VFD display will show track information, including ID3 tags indien beskikbaar.
- Die amplifier supports up to 65,000 indexable folders and files, with a maximum of 8 folder levels.
6.3 AM/FM Tuner Operation
- Select "USB/TUNER" as the input source, then press the AM/FM button on the remote control to switch between AM and FM bands.
- Outomatiese skandering: Press the SCAN button on the remote control to automatically search for and store available radio stations.
- Handmatige instelling: Use the tuning buttons (usually arrow keys) on the remote control to manually adjust the frequency.
- Vooraf ingestelde stasies: Die amplifier supports 64 presets. Use the MEMORY button to store and recall your favorite stations.
- RDS-funksie: If available, press the RDS button on the remote control to display Radio Data System information (e.g., station name, program type).
6.4 mikrofoon insette
- Connect microphones to the 6.3mm MIC 1 and MIC 2 jacks on the front panel.
- Adjust the independent volume controls for each microphone to achieve the desired level.
6.5 Tone and Balance Control
Die amplifier allows adjustment of bass, treble, and balance through its menu system or dedicated buttons on the remote control. Refer to the remote control section for specific buttons like EQ OFF, BASS, TREBLE.
7. Onderhoud
- Skoonmaak: Ontkoppel die krag voor skoonmaak. Gebruik 'n sagte, droë lap om die buite-oppervlaktes af te vee. Moenie skuurmiddels, wasse of oplosmiddels gebruik nie.
- Ventilasie: Kontroleer gereeld dat die ventilasie-openinge vry van stof en puin is.
- Berging: If storing the unit for an extended period, unplug it from the power outlet and store it in a cool, dry place, away from direct sunlight and extreme temperatures.
8. Probleemoplossing
If you encounter problems with your ampverligter, verwys na die volgende tabel vir moontlike oplossings.
| Probleem | Moontlike oorsaak | Oplossing |
|---|---|---|
| Geen krag nie | Kragkabel nie gekoppel nie; Kragaansluiting foutief; Ampverligter in bystandmodus. | Ensure power cord is securely plugged in. Test the outlet with another device. Press the Power/STANDBY button. |
| Geen klank nie | Verkeerde invoer gekies; Volume te laag; Luidsprekers nie behoorlik gekoppel nie; Dempfunksie aktief. | Select the correct input source. Increase volume. Check speaker connections. Deactivate MUTE. |
| Swak radio-ontvangs | Antenna not connected or poorly positioned; Interference. | Connect and adjust the position of the AM/FM antennas. Move the amplifier away from other electronic devices. |
| USB-terugspeel werk nie | USB-toestel nie korrek ingevoeg nie; Onversoenbaar file format; USB device faulty. | Ensure USB device is fully inserted. Check if files are MP3 format. Try a different USB device. |
| Amplifier turns off unexpectedly or cycles power | Overheating; Short circuit in speaker wiring; Internal fault. | Ensure adequate ventilation. Check speaker wires for frayed strands causing short circuits. If the problem persists, disconnect power and contact qualified service personnel. |
9. Spesifikasies
- Model: AS-170RU
- Kraguitset: 80 + 80 W RMS at 4 Ω
- Luidspreker impedansie: 4-16 Ω (A or B), 8-16 Ω (A+B)
- Beskerming: 3 circuits (short circuits, overload, overvoltage)
- USB-speler: MP3 file playback, ID3 tag support. Max 65,000 indexable folders/files, max 8 folder levels.
- Tuner: Digital AM/FM, 64 presets, RDS.
- Insette: 2 x Microphone (6.3mm), 4 x RCA (CD, DVD, VCR, AUX/Phono), 1 x RCA (AMP In).
- Uitsette: 1 x RCA (REC OUT), 1 x RCA (PRE OUT), Headphone (6.3mm).
- Vertoon: Blue VFD.
- Toonbeheer: Bass, Treble, Balance (via menu/remote).
- Afmetings: 40 x 40 x 60 cm (ongeveer 15.7 x 15.7 x 23.6 duim)
- Gewig: 7.2 kg (ongeveer 15.87 lbs)
10. Waarborg en Ondersteuning
For warranty information and technical support, please refer to the warranty card included with your product or contact your authorized Fonestar dealer. Do not attempt to repair the unit yourself, as this may void your warranty.