Inleiding
Dankie vir die aankoopasing the GPX Weatherx WR282B Weather and Alert Radio. This portable radio is designed to provide you with AM/FM radio reception and access to all 7 NOAA weatherband channels, ensuring you stay informed during various conditions. It offers flexible power options, operating on either AC power or D-size batteries, making it suitable for both indoor and outdoor use.
Lees asseblief hierdie handleiding deeglik deur voordat u die toestel gebruik om behoorlike gebruik te verseker en die werkverrigting en lewensduur daarvan te maksimeer.
Belangrike veiligheidsinligting
- Lees instruksies: Alle veiligheids- en bedryfsinstruksies moet gelees word voordat die produk gebruik word.
- Behou instruksies: Die veiligheids- en bedryfsinstruksies moet bewaar word vir toekomstige verwysing.
- Let op waarskuwings: Alle waarskuwings op die produk en in die gebruiksinstruksies moet nagekom word.
- Volg instruksies: Alle gebruiks- en gebruiksinstruksies moet gevolg word.
- Water en vog: Moenie hierdie produk naby water gebruik nie (bv. naby 'n bad, wasbak, kombuiswasbak, wasbak, in 'n nat kelder of naby 'n swembad).
- Skoonmaak: Maak slegs skoon met 'n droë lap.
- Ventilasie: Moenie enige ventilasie-openinge blokkeer nie. Installeer volgens die vervaardiger se instruksies.
- Hitte: Moenie naby enige hittebronne soos verkoelers, hitteregisters, stowe of ander toerusting (insluitend ampversterkers) wat hitte produseer.
- Kragkoordbeskerming: Beskerm die kragkoord teen geloop of vasgeknyp, veral by proppe, geriefshouers en die punt waar dit uit die apparaat kom.
- Weerlig: Ontkoppel hierdie apparaat tydens weerligstorms of wanneer dit vir lang tye ongebruik word.
- Diens: Verwys alle diens na gekwalifiseerde dienspersoneel. Versorging word vereis wanneer die apparaat op enige manier beskadig is, soos kragtoevoerkoord of prop beskadig is, vloeistof gemors is of voorwerpe in die apparaat geval het, die apparaat aan reën of vog blootgestel is, nie normaal werk nie. , of laat vaar is.
Kenmerke
- AM/FM-radio-ontvanger
- Weatherband - All 7 NOAA Channels
- Swivel Telescopic Antenna
- Volumebeheer
- Audio Line Input (Auxiliary Input)
- Geïntegreerde drahandvatsel
- Dual Power Options: AC/DC Adapter or 3 x 'D' Batteries
Pakketinhoud
- GPX Weatherx WR282B Weather and Alert Radio
- AC/DC kragadapter
- Gebruikershandleiding (hierdie dokument)
Kontroles en aanwysers
Familiarize yourself with the various controls and indicators on your WR282B radio.
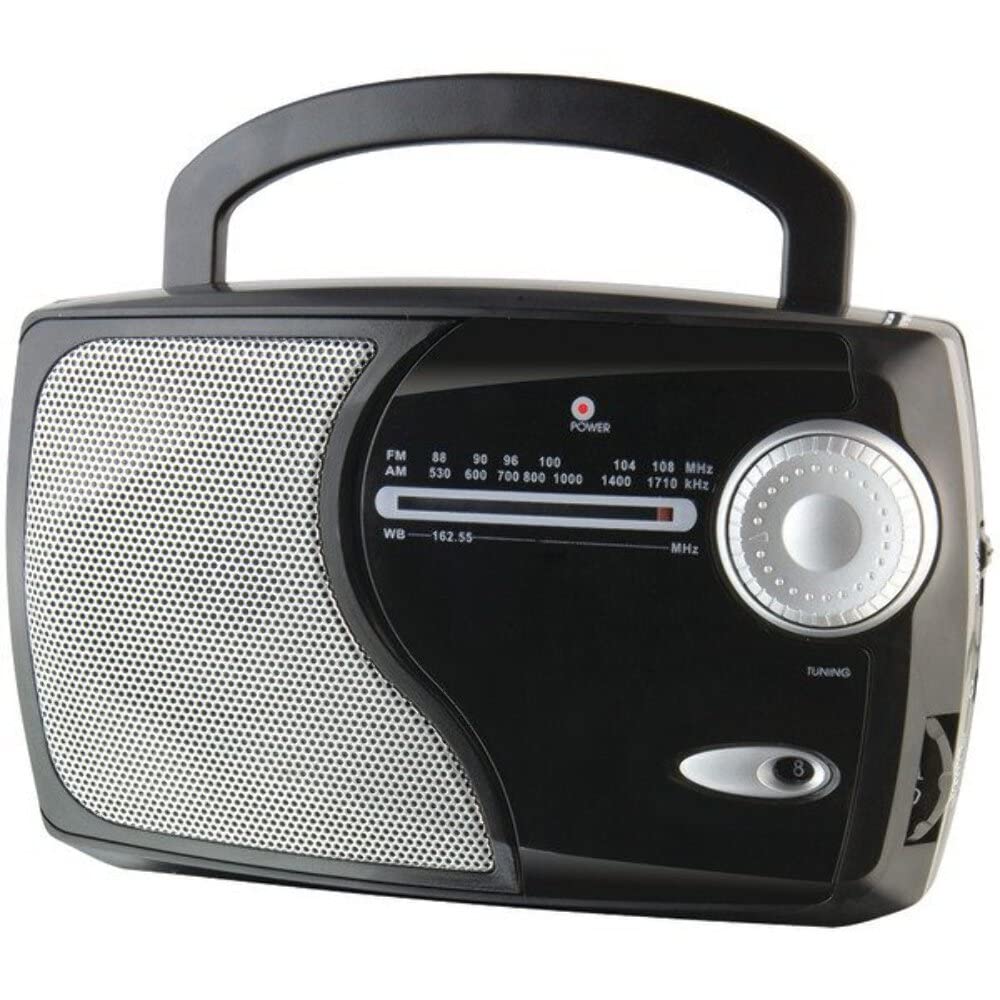
Beeld: Voorkant view of the GPX Weatherx WR282B radio, showing the speaker, tuning dial, and control knobs.
- Krag/volumeknop: Turns the radio on/off and adjusts the audio output level.
- Bandkieserskakelaar: Selects between AM, FM, and Weatherband (WB) modes.
- Stemknop: Adjusts the frequency to tune into desired radio stations or weather channels.
- Tuning Indicator: Illuminates when a strong signal is received.
- Frekwensieskakel: Wys die huidige radiofrekwensie.
- Teleskopiese antenna: Extendable antenna for improved FM and Weatherband reception.
- Hulpinvoer (AUX IN): 3.5 mm-aansluiting vir die koppeling van eksterne klanktoestelle.
- Wisselstroominset: Jack for connecting the included AC/DC power adapter.
- Battery kompartement: Located on the back, holds 3 'D' size batteries.
- Dra handvatsel: Vir maklike draagbaarheid.
Opstelling
Die krag van die radio
The WR282B radio can be powered using either the included AC/DC power adapter or three 'D' size batteries.
1. AC Power Operation
- Ensure the radio is turned off by rotating the Power/Volume knob counter-clockwise until it clicks.
- Insert the small plug of the AC/DC power adapter into the AC Power Input jack on the radio.
- Plug the other end of the AC/DC power adapter into a standard wall outlet (AC 120V~60Hz).
- The radio is now ready for use with AC power.
Let wel: When the AC adapter is connected, battery power is automatically disconnected.
2. Battery Power Operation
- Maak seker dat die radio afgeskakel is.
- Vind die battery kompartement op die agterkant van die radio.
- Maak die batteryvakdeksel oop.
- Insert three (3) 'D' size batteries (not included) into the compartment, observing the correct polarity (+/-) as indicated inside the compartment.
- Maak die batterykompartement se deksel stewig toe.
- The radio is now ready for use with battery power.
Belangrik: Remove batteries if the radio will not be used for an extended period to prevent leakage and damage.
Bedryfsinstruksies
1. Turning On and Adjusting Volume
- Draai die Krag/volumeknop clockwise to turn on the radio. Continue rotating to increase the volume to a comfortable listening level.
- Draai die. Om die radio af te skakel Krag/volumeknop counter-clockwise until it clicks.
2. Selecting a Radio Band (AM/FM/Weatherband)
- Gebruik die Bandkieserskakelaar to choose your desired listening mode:
- AM: Vir Amplitude Modulation radio stations.
- FM: For Frequency Modulation radio stations.
- WB: For NOAA Weatherband channels.
3. Tuning to a Station or Channel
- Verleng die Teleskopiese antenna fully for optimal FM and Weatherband reception. For AM reception, the radio has a built-in antenna, and adjusting the radio's position may improve reception.
- Draai die Stemknop to scan through frequencies on the Frekwensie skakel.
- When a strong signal is received, the Tuning aanwyser lig sal verlig.
- For Weatherband (WB) mode, tune to one of the 7 NOAA weather channels (162.400 MHz to 162.550 MHz).
4. Using the Auxiliary Input (AUX IN)
- Connect a 3.5mm audio cable (not included) from your external audio device (e.g., MP3 player, smartphone) to the Hulpinvoer (AUX IN) jack on the radio.
- Ensure the radio is turned on and the volume is adjusted.
- The audio from your external device will now play through the radio's speaker. Control playback and track selection from your external device.
Onderhoud
- Skoonmaak: Wipe the exterior of the radio with a soft, dry cloth. Do not use abrasive cleaners, waxes, or solvents.
- Battery vervanging: Replace all three 'D' batteries when the radio's performance diminishes or if the unit will not be used for an extended period. Always replace with new batteries of the same type.
- Berging: When storing the radio for a long time, remove the batteries to prevent leakage. Store in a cool, dry place away from direct sunlight and extreme temperatures.
- Antenna sorg: Hanteer die teleskopiese antenna versigtig om te verhoed dat dit buig of breek.
Probleemoplossing
| Probleem | Moontlike oorsaak | Oplossing |
|---|---|---|
| Geen krag nie |
|
|
| Swak radio-ontvangs |
|
|
| Geen klank van AUX IN nie |
|
|
Spesifikasies
- Model: WR282B
- Radio Bands: AM, FM, Weatherband (7 NOAA channels)
- Kragbron: AC 120V~60Hz (via included adapter) or 3 x 'D' Batteries (not included)
- Verbinding: 3.5 mm hulpinvoer
- Antenna: Telescopic (FM/WB), Built-in Ferrite Bar (AM)
- Produk afmetings: 8.86" L x 2.76" W x 5.51" H (approximately)
- Item gewig: 1.06 pond (sonder batterye)
Waarborg en Ondersteuning
For detailed warranty information and customer support, please refer to the warranty card included with your product or visit the official GPX webwebwerf. Bewaar u aankoopbewys as bewys van aankoop vir enige waarborgeise.
If you experience issues not covered in the troubleshooting section, please contact GPX customer service for assistance.