Inleiding
Thank you for choosing the Oster Rechargeable and Cordless Electric Wine Opener. This device is designed for effortless cork removal and includes a thermal wine chiller and a foil cutter for a complete wine experience. Please read this manual thoroughly before use to ensure proper operation and maintenance.
Belangrike voorsorgmaatreëls
Wanneer elektriese toestelle gebruik word, moet basiese veiligheidsmaatreëls altyd gevolg word om die risiko van brand, elektriese skok en/of besering aan persone te verminder, insluitend die volgende:
- Lees alle instruksies voordat u hierdie produk gebruik.
- To protect against electrical hazards, do not immerse the charging base, power adapter, or electric wine opener in water or other liquids.
- Hierdie toestel is nie bedoel vir gebruik deur persone (insluitend kinders) met verminderde fisiese, sensoriese of geestelike vermoëns, of 'n gebrek aan ervaring en kennis nie, tensy hulle toesig of instruksies oor die gebruik van die toestel gegee is deur 'n persoon wat verantwoordelik is vir hul veiligheid. .
- Noukeurige toesig is nodig wanneer enige toestel deur of naby kinders gebruik word. Kinders moet onder toesig wees om te verseker dat hulle nie met die toestel speel nie.
- Trek die prop uit die stopcontact wanneer dit nie gebruik word nie, voordat jy onderdele aan- of afhaal, en voor skoonmaak.
- Vermy kontak met bewegende dele.
- Moenie enige toestel gebruik met 'n beskadigde koord of prop, of nadat die toestel wanfunksioneer of op enige manier laat val of beskadig is nie. Stuur toestel terug na die naaste gemagtigde diensfasiliteit vir ondersoek, herstel of elektriese of meganiese verstelling.
- Die gebruik van aanhegsels wat nie deur die vervaardiger aanbeveel of verkoop word nie, kan brand, elektriese skok of beserings veroorsaak.
- Moenie buite gebruik nie.
- Moenie dat koord oor die rand van tafel of toonbank hang, of aan warm oppervlaktes raak nie.
- Moenie op of naby 'n warm gas- of elektriese brander, of in 'n verhitte oond plaas nie.
- Koppel altyd eers die prop aan die toestel, en steek dan die koord in die muursok. Om te ontkoppel, draai enige beheer na "af" en verwyder dan die prop uit die muursok.
- Moenie die toestel vir ander as die bedoeling gebruik nie.
- The foil cutter blades are sharp. Exercise caution when handling.
- The corkscrew is sharp. Keep fingers away from the corkscrew mechanism during operation.
Produkkomponente
The Oster Electric Wine Opener set includes the following components:
- Elektriese wynopener
- Herlaaibasis
- Kragadapter
- Foelie snyer
- Thermal Stainless Steel Wine Chiller

Prent: The Oster Electric Wine Opener showing its power indicator light, soft grip handle, foil cutter, and compact recharging base.

Prent: The complete Oster Electric Wine Opener set, including the opener, charging base, and thermal wine chiller.
Opstelling en laai
- Place the recharging base on a flat, stable surface.
- Connect the power adapter to the recharging base and plug it into a standard electrical outlet.
- Place the electric wine opener onto the recharging base. Ensure it is seated correctly. The power indicator light on the opener will illuminate, indicating it is charging.
- Allow the wine opener to charge for at least 8-10 hours before its first use. A full charge can open up to 30 bottles.
Bedryfsinstruksies
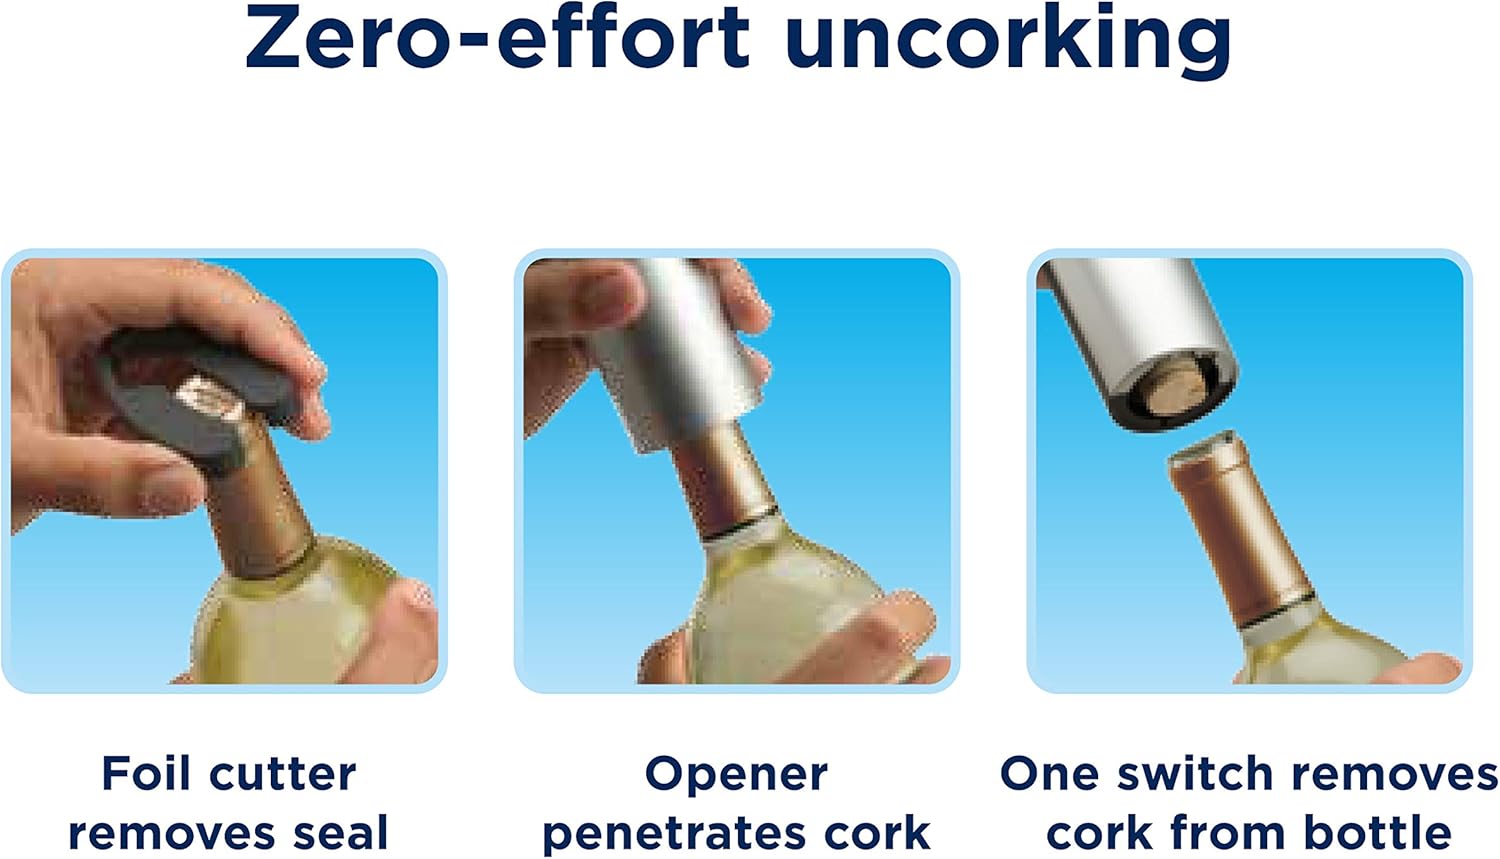
Using the Foil Cutter
- Place the foil cutter on top of the wine bottle, gripping it firmly.
- Rotate the foil cutter around the bottle neck to cut and remove the foil seal.
- Carefully remove the foil.
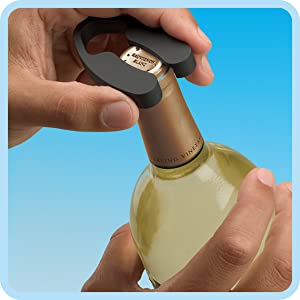
Prent: The foil cutter being used to remove the seal from a wine bottle.
Using the Electric Wine Opener
- After removing the foil, place the electric wine opener vertically on top of the wine bottle, ensuring it is centered over the cork.
- Hold the bottle firmly with one hand and the wine opener with the other.
- Press and hold the "down" button. The corkscrew will automatically rotate to penetrate the cork and pull it out of the bottle. The opener will stop automatically once the cork is fully extracted.
- Lift the opener away from the bottle.
- To release the cork from the opener, press and hold the "up" button. The cork will be ejected.

Prent: A three-step visual guide showing the foil cutter removing the seal, the opener penetrating the cork, and the cork being removed from the bottle.
Using the Thermal Stainless Steel Wine Chiller
The double-walled thermal wine chiller is designed to keep your wine cool for extended periods without the need for ice, preventing condensation and maintaining the bottle's label integrity.
- For best results, pre-chill the wine chiller in a refrigerator or freezer for at least 30 minutes before use.
- Place your pre-chilled wine bottle directly into the chiller.
- The double-wall insulation will help maintain the wine's temperature for hours.

Prent: ’n Nabyskoot view of the double-walled, thermal stainless steel wine chiller.
Skoonmaak en Onderhoud
- Always unplug the charging base from the electrical outlet before cleaning.
- Wipe the exterior of the electric wine opener and charging base with a soft, damp lap. Moenie hulle in water of enige ander vloeistof dompel nie.
- The foil cutter can be rinsed under warm water. Ensure it is completely dry before storing.
- The thermal stainless steel wine chiller can be washed with warm, soapy water and rinsed thoroughly. Dry immediately to prevent water spots.
- Moenie skuurmiddels of skuursponse gebruik nie, aangesien dit die oppervlaktes kan krap.
- Berg die toestel op 'n droë plek wanneer dit nie gebruik word nie.
Probleemoplossing
| Probleem | Moontlike oorsaak | Oplossing |
|---|---|---|
| Wine opener does not operate. | Battery is nie gelaai nie. | Place the opener on the charging base and allow it to charge for 8-10 hours. |
| Cork does not come out easily. | Opener not centered on the bottle; cork is synthetic or very tight. | Ensure the opener is perfectly vertical and centered. Apply gentle downward pressure while pressing the "down" button. For synthetic corks, the process might take slightly longer. |
| Kurk sit vas in die oopmaker. | Cork did not fully eject. | Press and hold the "up" button until the cork is fully released. If it remains stuck, gently pull it out manually. |
| Wine chiller does not keep wine cold. | Chiller was not pre-chilled; wine bottle was not pre-chilled. | Pre-chill the chiller and the wine bottle for optimal performance. The chiller is designed to maintain temperature, not rapidly cool warm wine. |
Spesifikasies
- Handelsmerk: Oster
- Modelnommer: 004208-FFP-000
- Materiaal: Vlekvrye staal
- Kleur: Vlekvrye staal
- Voltooi tipe: Geborsel
- Item gewig: 3.45 pond
- Produk afmetings: Opener: 10.25" H; Base: 2.25" W. Overall footprint: 5.9"L x 6.1"W.
- UPC: 034264452923
- Ingesluit komponente: Electric Wine Opener, Recharging Base, Power Adapter, Foil Cutter, Thermal Stainless Steel Wine Chiller
Prent: The Oster Electric Wine Opener on its charging base, illustrating its approximate height of 10.25 inches and base width of 2.25 inches.
Waarborg en Ondersteuning
This Oster product comes with a 1-jaar beperkte waarborg vanaf die aankoopdatum. Hierdie waarborg dek vervaardigingsdefekte in materiale en vakmanskap onder normale gebruik.
For warranty claims, technical support, or product inquiries, please contact Oster customer service. Keep your purchase receipt as proof of purchase for warranty validation.
Please refer to the official Oster webwebwerf of u produkverpakking vir die mees onlangse kontakinligting en gedetailleerde waarborgvoorwaardes.