PeakTech P 3131
PeakTech True RMS P 3131 Clamp Meter with Multimeter User Manual
Model: P 3131 | Brand: PeakTech
1. Inleiding
This manual provides comprehensive instructions for the safe and effective use of the PeakTech True RMS P 3131 Clamp Meter with Multimeter. This device is designed for measuring AC/DC currents without circuit interruption, as well as AC/DC voltage and resistance, with continuity testing capabilities. It features a 3 3/4 digit LCD display with True RMS measurement for accurate readings.
Lees asseblief hierdie handleiding deeglik deur voordat u die toestel gebruik en bewaar dit vir toekomstige verwysing.
2. Veiligheidsinligting
WARNING: Improper use of this meter can cause damage, shock, injury, or death. Always follow all safety precautions.
- Hou altyd by plaaslike en nasionale veiligheidskodes.
- Do not use the meter if it appears damaged or if the insulation on test leads is compromised.
- Maak seker dat die meter op die korrekte funksie en bereik gestel is voordat u metings doen.
- Vermy kontak met lewendige stroombane. Gebruik gepaste persoonlike beskermende toerusting (PPE).
- The device is rated for CAT II 600V. Do not exceed these limits.
- Vervang batterye dadelik wanneer die lae battery-aanwyser verskyn.
- Do not operate the meter in explosive atmospheres.
3. Produk verbyview en komponente
The PeakTech P 3131 is a robust and reliable clamp meter. Familiarize yourself with its main components:

Figuur 1: Voorkant view of the PeakTech P 3131 Clamp Meter, showing the clamp jaw, function selector, LCD display, and input terminals.
- Clamp Kaak: For non-contact AC/DC current measurement.
- Function Selector Dial: To select measurement modes (A~, A=, V~, V=, Ω/Continuity, OFF).
- LCD-skerm: Toon metingslesings, eenhede en aanwysers.
- Knoppies: AC/DC, ZERO, H/MAX (Data Hold/Max Hold).
- Invoerterminale: COM (common) and VΩ (voltage/resistance) for test leads.
- Handbeskermer: Provides protection against accidental contact.
4. Opstelling
4.1 Battery installasie
The PeakTech P 3131 requires two 1.5V AAA batteries (included). To install or replace batteries:
- Maak seker dat die toestel AF geskakel is.
- Vind die batteryklepdeksel aan die agterkant van die meter.
- Gebruik 'n skroewedraaier om die kompartement oop te maak.
- Insert the two AAA batteries, observing correct polarity (+ and -).
- Plaas die deksel van die batterykompartement terug en maak dit met die skroef vas.
When the low battery indicator appears on the display, replace the batteries immediately to ensure accurate measurements.
4.2 Verbinding van toetsdrade
Vir voltage, resistance, and continuity measurements, connect the supplied test leads:
- Plaas die swart toetsdraad in die COM (common) input terminal.
- Plaas die rooi toetsdraad in die VΩ invoerterminaal.

Figure 2: PeakTech P 3131 Clamp Meter shown with its carrying case, test leads, batteries, and user manual.
5. Bedryfsinstruksies
5.1 Krag aan/af
Rotate the function selector dial from the "OFF" position to any desired measurement function to power on the meter. To power off, rotate the dial back to "OFF". The meter features an automatic power-off function (can be deactivated) to conserve battery life.
5.2 WS/GS-stroommeting (Clamp)
To measure current without breaking the circuit:
- Draai die funksiekieser na die A~ (WS-stroom) of A= (GS-stroom) posisie.
- Druk die AC/DC button if you need to switch between AC and DC current modes (if the dial position combines them).
- Druk die NUL button to zero the display before measuring DC current, especially for small currents, to compensate for residual magnetism.
- Maak die cl oopamp kakebeen deur die sneller te druk.
- Slegs insluit een conductor with the clamp kaak. Maak seker dat die kaak heeltemal toe is.
- Lees die huidige waarde op die LCD-skerm.
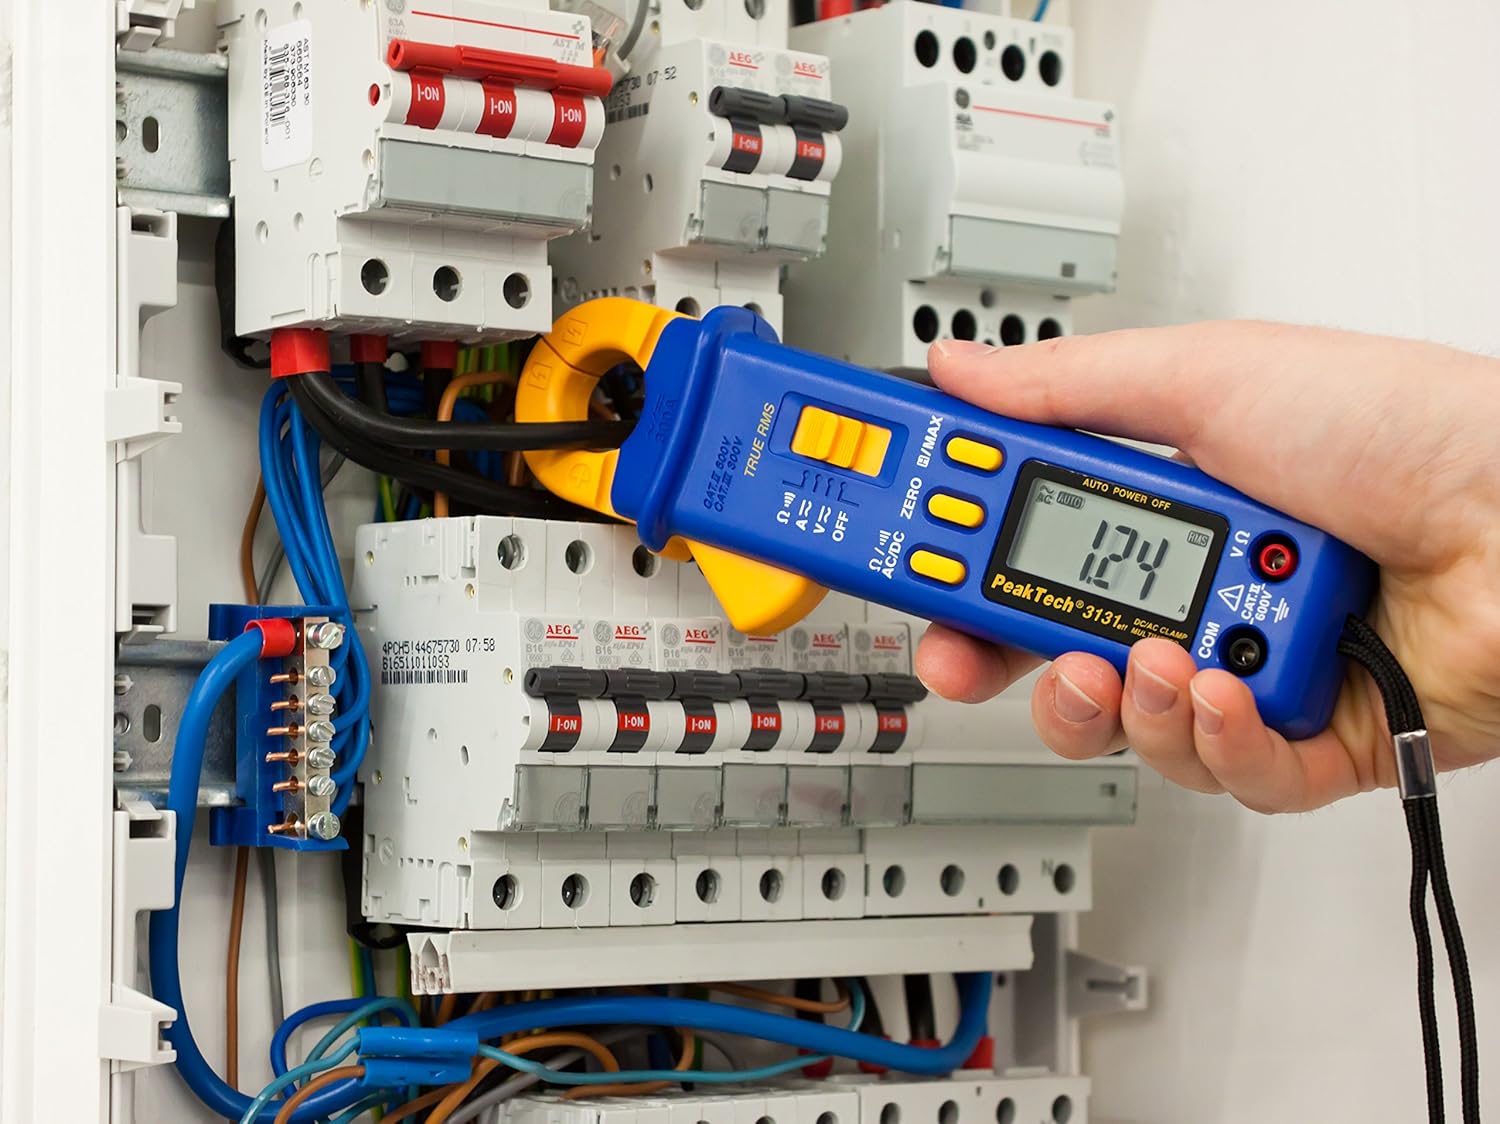
Figure 3: The PeakTech P 3131 Clamp Meter in use, measuring current on a single conductor within an electrical panel.
5.3 AC/DC Voltage Meting
Om voltage:
- Verbind die toetsdrade soos beskryf in Afdeling 4.2.
- Draai die funksiekieser na die V~ (WS-volumetage) of V= (DC Voltage) posisie.
- Koppel die toetsprobes parallel aan die stroombaan of komponent wat jy wil meet.
- Lees die voltage -waarde op die LCD -skerm.
5.4 Resistance and Continuity Measurement
To measure resistance or check for continuity:
- Verbind die toetsdrade soos beskryf in Afdeling 4.2.
- Draai die funksiekieser na die Ω/))) (Resistance/Continuity) position.
- For resistance: Connect the test probes across the component. Ensure the circuit is de-energized.
- For continuity: Touch the test probes to the two points you want to check. A continuous beep indicates a low-resistance path (continuity).
- Lees die weerstandswaarde op die LCD-skerm.
5.5 Spesiale Funksies
- Ware RMS: The meter measures True Root Mean Square values for AC voltage and current, providing accurate readings for non-sinusoidal waveforms.
- Data Hold (H): Druk die H/MAX knoppie kortliks om die huidige lesing op die skerm te vries. Druk weer om los te laat.
- Maximum Value Hold (MAX): Druk en hou die H/MAX button to capture and display the maximum measured value. Press again to exit.
- ZERO Function: Used to zero the display for DC current measurements to eliminate offset errors.
- Outomatiese Reikwydtebepaling: The meter automatically selects the appropriate measurement range.
- Outo-afskakeling: The meter automatically turns off after a period of inactivity to save battery. This feature can typically be disabled by holding a specific button during power-on (refer to the device's on-screen indicators or a more detailed manual if available).
6. Onderhoud
6.1 Skoonmaak
Vee die meter se kas af met advertensiemateriaalamp lap en 'n sagte skoonmaakmiddel. Moenie skuurmiddels of oplosmiddels gebruik nie. Maak seker dat die meter heeltemal droog is voor gebruik.
6.2 Batteryvervanging
Refer to Section 4.1 for instructions on battery replacement. Always use two fresh 1.5V AAA batteries. Remove batteries if the meter is not used for an extended period to prevent leakage.
6.3 Berging
Store the meter in a cool, dry place, away from direct sunlight and extreme temperatures. Use the provided carrying case for protection.
7. Probleemoplossing
| Probleem | Moontlike oorsaak | Oplossing |
|---|---|---|
| Meter skakel nie aan nie. | Dooie of verkeerd geïnstalleerde batterye. | Kontroleer batterypolariteit; vervang batterye. |
| "OL" or "OVER" displayed. | Meting oorskry gekose reeks of meter se maksimum kapasiteit. | Select a higher range (if manual ranging) or ensure measurement is within meter's limits. |
| Inaccurate DC current reading. | Residual magnetism in clamp kaak. | Druk die NUL button before measurement. |
| Geen kontinuïteitspiep nie. | Open circuit or high resistance. | Check connections; ensure circuit is complete. |
If problems persist, contact PeakTech customer support or a qualified service technician.
8. Tegniese spesifikasies
| Parameter | Spesifikasie |
|---|---|
| Vertoon | 3 3/4 digit LCD, max. 3999 counts |
| DC Voltage (DCV) | 0.1 mV to 600 V (Accuracy: 0.5% + 2 digits) |
| AC Voltage (ACV) | 1 mV to 600 V (Accuracy: 1.5% + 5 digits) |
| DC-stroom (DCA) | 10 mA to 300 A (Accuracy: 1% + 2 digits) |
| AC Current (ACA) | 10 mA to 300 A (Accuracy: 1% + 3 digits) |
| Weerstand (Ω) | 0.1 Ω to 40 MΩ (Accuracy: 0.9% + 2 digits) |
| Kontinuïteitstoets | Buzzer funksie |
| Ware RMS | Yes, for AC measurements |
| Kaakopening | 22 mm max. conductor diameter |
| Veiligheidsgradering | EN 61010-1, CAT II 600 V |
| Kragtoevoer | 2 x 1.5V AAA-batterye |
| Afmetings (L x B x H) | 192 x 66 x 27 mm (ongeveer 7.56 x 2.6 x 1.06 duim) |
| Gewig | 205 g (ongeveer 0.45 lbs) |
9. Waarborg en Ondersteuning
PeakTech products are manufactured under strict quality control. This product is covered by a standard manufacturer's warranty against defects in materials and workmanship. Please refer to the warranty card included with your product or visit the official PeakTech webwebwerf vir gedetailleerde waarborgbepalings en -voorwaardes.
For technical support, service, or calibration inquiries, please contact your local PeakTech distributor or the PeakTech customer service department. Contact information can typically be found on the PeakTech webwebwerf of in die produkverpakking.