Inleiding
Dankie vir die aankoopasing the Edifier Tick Tock Retro Multifunctional Alarm Clock. This device combines a retro design with modern functionality, offering an alarm clock, FM radio, and media playback from SD cards, USB drives, and auxiliary input. This manual provides detailed instructions for setup, operation, and maintenance to ensure optimal performance and longevity of your device.
Produk Kenmerke
- SD card reader and USB input port for media playback.
- LCD display screen for time, date, alarm status, and input mode (SD/USB/FM/AUX).
- Alarm clock function with customizable audio sources: SD card, USB drive, FM radio, or Auxiliary input.
- Auxiliary 3.5mm input jack for connecting external audio devices.
- FM radio function with 24 preset channels for easy access to your favorite stations.
- Two 360° omni-directional full-range speakers for rich, multi-directional sound.
Kontroles en poorte
Agterpaneelpoorte
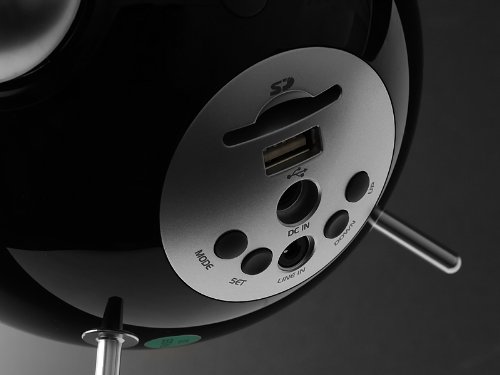
This image displays the rear panel of the Edifier Tick Tock alarm clock. Visible ports and buttons include:
- SD-kaartgleuf: Insert an SD card for music playback.
- USB-poort: Koppel 'n USB-geheuestokkie vir musiekweergawe.
- DC IN: Power input for the included AC adapter.
- LINE IN (AUX): 3.5 mm-klankinvoer vir eksterne toestelle.
- MODUS-knoppie: Cycles through input modes (SD, USB, FM, AUX).
- SET -knoppie: Used for entering settings menus (e.g., time, alarm).
- OP/AF-knoppies: Navigate menus, adjust volume, or change settings.
Kontroles op die boonste paneel

This image shows the top panel controls of the Edifier Tick Tock alarm clock. These include:
- Speel/Pause-knoppie: Begin of onderbreek mediaterugspeel.
- Vorige/Volgende Snit-knoppies: Skips to the previous or next track during media playback. Also used for tuning FM radio.
- Volume op / af knoppies: Verstel die klankuitvoervolume.
- SNOOZE/LIGHT Button: Aktiveer snooze tydens 'n alarm of verstel die helderheid van die skerm.
Opstelling
- Uitpak: Carefully remove the alarm clock and all accessories from the packaging. Ensure all components are present: the alarm clock unit, AC power adapter, and this user manual.
- Kragverbinding: Connect the AC power adapter to the "DC IN" port on the rear of the alarm clock. Plug the adapter into a standard wall outlet. The display should illuminate.
- Aanvanklike krag aan: The unit should power on automatically. If not, press the power button (if available, otherwise it's always on when plugged in).
- Antenna (FM Radio): Extend the FM antenna located at the back of the unit for optimal radio reception.
Bedryfsinstruksies
Stel tyd en datum in
- Druk en hou die STEL knoppie totdat die tydvertoning begin flikker.
- Gebruik die UP en AF knoppies om die uur aan te pas. Druk STEL om te bevestig en na minute oor te skakel.
- Pas minute aan met behulp van UP en AF. Druk STEL te bevestig.
- Continue this process to set the year, month, and day. Press STEL om die tyd/datum-instellingsmodus te verlaat.
Stel die alarm
- Druk die STEL button once (do not hold) to enter alarm setting mode. The alarm time will flash.
- Gebruik die UP en AF knoppies om die alarmuur aan te pas. Druk STEL om te bevestig en na minute oor te skakel.
- Pas minute aan met behulp van UP en AF. Druk STEL te bevestig.
- Next, select the alarm source (FM, SD, USB, AUX). Use UP en AF to cycle through options. Press STEL te bevestig.
- If FM is selected, use UP en AF to select a preset FM station (P01-P24).
- If SD or USB is selected, ensure a card/drive with audio is inserted. The alarm will play the first track.
- If AUX is selected, ensure an external device is connected and playing audio.
- Druk STEL again to activate the alarm. An alarm icon will appear on the display.
- To deactivate the alarm, press STEL until the alarm icon disappears.
- As die alarm klink, druk die SNOOZE / LIG button to activate snooze (typically 9 minutes). To turn off the alarm completely, press any other button.
FM-radio werking
- Druk die MODUS knoppie herhaaldelik totdat "FM" op die skerm verskyn.
- Outomatiese skandering en voorafinstelling: Druk en hou die SPEEL/POUSEER button. The radio will automatically scan for available stations and save them to presets (P01-P24).
- Handmatige instelling: Gebruik die VORIGE/VOLGENDE SNIET knoppies om die frekwensie fyn in te stel.
- Voorinstellings kies: In FM mode, briefly press the VORIGE/VOLGENDE SNIET buttons to cycle through saved preset stations.
- Verstel die volume met die UP en AF buttons on the rear panel.
SD Card / USB Playback
- Insert an SD card into the SD card slot or a USB flash drive into the USB port on the rear panel.
- Druk die MODUS button repeatedly until "SD" or "USB" appears on the display. The device will automatically start playing audio files.
- Gebruik die SPEEL/POUSEER knoppie om afspeel te onderbreek of te hervat.
- Gebruik die VORIGE/VOLGENDE SNIET buttons on the top panel to skip tracks.
- Verstel die volume met die UP en AF buttons on the rear panel.
Hulpinvoer (LYNIN)
- Connect an external audio device (e.g., smartphone, MP3 player) to the "LINE IN" (3.5mm) port on the rear panel using an audio cable (not included).
- Druk die MODUS knoppie herhaaldelik totdat "AUX" op die skerm verskyn.
- Start playback on your connected external device.
- Verstel die volume met die UP en AF buttons on the rear panel, and also control volume from your external device.
Vertoon helderheid
Druk kortliks die SNOOZE / LIG button on the top panel to cycle through different display brightness levels.
Onderhoud
- Skoonmaak: Use a soft, dry cloth to clean the surface of the alarm clock. Do not use abrasive cleaners, waxes, or solvents.
- Plasing: Place the unit on a stable, flat surface. Avoid direct sunlight, high temperatures, humidity, or dusty environments.
- Krag: Ontkoppel die kragadapter van die muursok as die eenheid nie vir 'n lang tydperk gebruik gaan word nie.
Probleemoplossing
| Probleem | Moontlike oorsaak/oplossing |
|---|---|
| Geen krag / Skerm af |
|
| Geen geluid van luidsprekers nie |
|
| Swak FM radio ontvangs |
|
| Alarm does not sound or plays static |
|
| Display is too bright at night |
|
Spesifikasies
| Handelsmerk | Opbouer |
| Modelnommer | MF240Reto |
| Tipe vertoon | LCD |
| Verbindingstegnologie | AUX, USB |
| Spesiale kenmerke | Alarm, Radio, SD Card Reader, USB Playback |
| Kragbron | Elektries met koord |
| Materiaal | Plastiek |
| Item gewig | 0.74 pond (ongeveer 0.34 kg) |
| Vervaardiger | Edifier USA |
Waarborg en Ondersteuning
This Edifier product comes with a 2-jaar vervaardigerswaarborg. For warranty claims, technical support, or further assistance, please contact Edifier USA customer service. Please retain your proof of purchase for warranty validation.
For the most up-to-date support information, please visit the official Edifier webwebwerf.