1. Inleiding
The AAXA P300 Pico Projector is a compact, high-definition projector designed for portability and versatility. It features a native 1280x800 HD resolution, 500 LED lumens, and a rechargeable battery, making it suitable for various applications including business presentations, home entertainment, and travel. This manual provides essential information for the proper setup, operation, and maintenance of your P300 projector.
2. Pakketinhoud
Verifieer asseblief dat al die items wat hieronder gelys word, in u pakket ingesluit is:
- AAXA P300 Pico Projector
- Kragadapter
- Afstandbeheer
- Mini driepoot
- Gebruikershandleiding
3. Produk verbyview
Familiarize yourself with the physical components and ports of your P300 projector.

Figuur 3.1: Voor en bo view of the AAXA P300 Pico Projector, illustrating its compact size and dimensions (5.9 x 3.8 x 1.5 inches).
3.1 Agter- en sypanele
The projector features various input and output ports for connectivity.

Figuur 3.2: Agter/Syte view of the projector, showing the USB port for media playback and the Mini VGA port for computer connections.
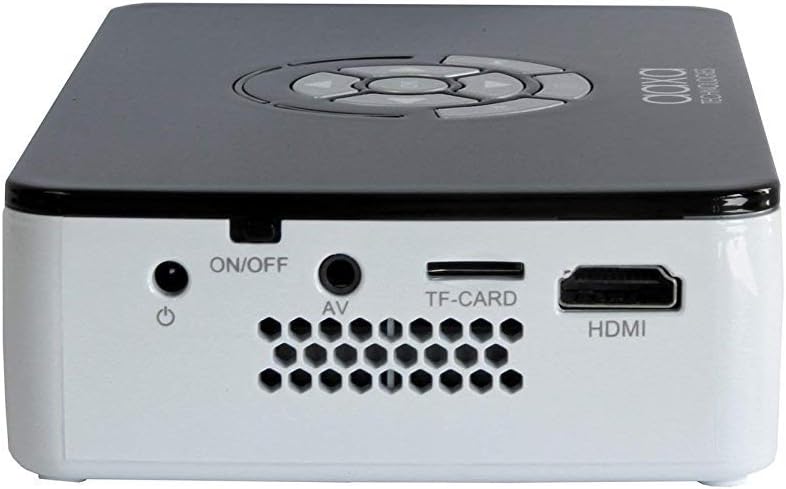
Figuur 3.3: Right side panel, featuring the HDMI input, AV (composite) input, TF-CARD slot, and the power ON/OFF button.

Figuur 3.4: Left side panel, highlighting the focus adjustment wheel for image clarity.
4. Opstelling
4.1 Aan-/afskakel
- Connect the power adapter to the projector's DC input and then to a power outlet.
- Druk en hou die AAN/AF button located on the side panel until the projector powers on.
- Druk en hou die. In om uit te skakel AAN/AF button again until the projector shuts down.
4.2 Koppel toestelle
The P300 supports multiple input sources:
- HDMI: Connect an HDMI cable from your device (laptop, gaming console, streaming stick) to the projector's HDMI port.
- Mini VGA: Use a Mini VGA to VGA cable (sold separately) to connect to a computer's VGA output.
- Composite A/V: Use a 3.5mm to RCA composite A/V cable (sold separately) to connect to devices with RCA outputs.
- USB: Insert a USB flash drive into the USB port for direct media playback.
- TF-CARD: Insert a MicroSD card into the TF-CARD slot for direct media playback.
4.3 Fokusverstelling
To achieve a clear image, adjust the focus wheel on the side of the projector until the projected image is sharp.
4.4 Positioning and Projection Size
Place the projector on a stable, flat surface. The included mini tripod can be used for angle adjustments. The P300 can project an image up to 120 inches diagonally in low-light conditions.

Figuur 4.1: The AAXA P300 projector mounted on its mini tripod, demonstrating flexible positioning options.
5. Bedryfsinstruksies
5.1 Spyskaartnavigasie
Use the directional buttons on the projector or the remote control to navigate through the on-screen menu. Press the OK/Enter knoppie om opsies te kies.
5.2 Media-terugspeel
When a USB drive or TF-CARD is inserted, the projector's onboard media player can be accessed through the main menu. Select the desired file type (video, photo, music, text) and navigate to your content for playback.
5.3 Batterygebruik
The P300 features a built-in rechargeable lithium-ion battery providing approximately 60 minutes of operation. The battery charges automatically when the projector is connected to the power adapter. For optimal battery life, fully charge the projector before first use and avoid completely draining the battery frequently.
6. Onderhoud
6.1 Skoonmaak
- Lens: Use a soft, lint-free cloth or lens cleaning wipes specifically designed for optical surfaces. Avoid abrasive materials.
- Casing: Vee die buitekant van die projektor af met 'n sagte, droë lap. Moenie vloeibare skoonmaakmiddels of oplosmiddels gebruik nie.
- Ventilasies: Ensure the ventilation openings are clear of dust and debris to prevent overheating. Use compressed air if necessary.
6.2 Batterysorg
- Berg die projektor op 'n koel, droë plek wanneer dit nie gebruik word nie.
- If storing for extended periods, charge the battery to approximately 50% every few months to maintain battery health.
7. Probleemoplossing
-
Geen Beeld/Sein:
Ensure the correct input source is selected in the projector's menu. Verify all cables are securely connected. Test with a different source device or cable if possible. -
Wasige prent:
Adjust the focus wheel on the side of the projector. Ensure the projection surface is flat and the projector is at an appropriate distance. -
Geen klank:
Check the volume settings on both the projector and the source device. Ensure external speakers are connected correctly if used. The internal speaker may have limited output. -
Projektor Oorverhitting:
Ensure ventilation vents are not blocked. Operate the projector in a well-ventilated area. -
Battery laai nie:
Verifieer dat die kragadapter korrek gekoppel is en dat die kragaansluiting funksioneel is.
8. Spesifikasies
| Kenmerk | Spesifikasie |
|---|---|
| Vertoon resolusie | 1280 x 800 (Oorspronklike) |
| Helderheid | 500 LED Lumen |
| Verbindingstegnologie | HDMI, Mini VGA, Composite A/V (3.5mm Jack), 5 Pin Mini USB 2.0 |
| Produk afmetings | 5.9 x 3.8 x 1.5 duim |
| Item gewig | 15.5 onse |
| Batterye | 2 Lithium Ion batteries (included, internal) |
| Vervaardiger | AAXA |
| Modelnommer | KP-600-01 |
9. Waarborg en Ondersteuning
For warranty information, technical support, or service inquiries, please refer to the official AAXA Technologies webwebwerf of kontak hul kliëntediens direk. Bewaar u aankoopbewys as bewys van aankoop vir waarborgeise.
AAXA Technologies Contact Information:
Besoek gerus www.aaxatech.com for the most current support resources and contact details.