1. Inleiding
Dankie vir die aankoopasing the Caliber RMD 068-2 Car Radio USB/SD Player. This manual provides detailed instructions for the installation, operation, and maintenance of your new car radio. Please read this manual thoroughly before using the product to ensure proper functionality and safety. Keep this manual for future reference.
2. Veiligheidsinligting
- Installasie: Ensure the unit is installed by a qualified technician to prevent damage to the vehicle's electrical system. Incorrect wiring can cause fire or electrical shock.
- Kragtoevoer: Koppel die eenheid slegs aan 'n 12V GS-motorbattery met 'n negatiewe grond.
- Sekerings: Always replace fuses with new ones of the specified rating. Using an incorrect fuse can cause damage to the unit or vehicle.
- Volumevlak: Do not operate the unit at excessively high volume levels, as this may impair your ability to hear external traffic sounds and could be dangerous.
- Skoonmaak: Gebruik 'n sagte, droë lap vir skoonmaak. Moenie skuur skoonmaakmiddels of oplosmiddels gebruik nie.
- Vog: Moenie die eenheid aan vog of water blootstel nie.
3. Pakketinhoud
Kontroleer asseblief dat alle items teenwoordig is:
- Caliber RMD 068-2 Car Radio Unit
- Afneembare voorpaneel
- ISO-bedradingskabel
- Montage raam
- Disassembly Keys (2 pcs)
- Gebruikershandleiding (hierdie dokument)
4. Produk verbyview
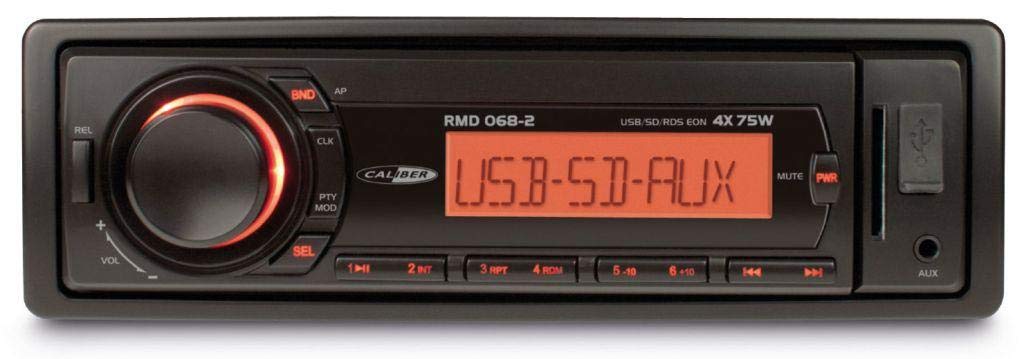
Figuur 1: Voorkant view of the Caliber RMD 068-2 Car Radio. This image shows the main unit with its detachable front panel, including the display, control buttons, USB port, and SD card slot.
4.1 Voorpaneelkontroles
- POWER/MODE Button: Press to turn on/off. Short press to switch between Radio, USB, SD, AUX modes.
- VOLUME knop: Rotate to adjust volume. Press to access audio settings (Bass, Treble, Balance, Fader).
- UITSTALLING: Shows current time, radio frequency, track information, etc.
- USB-poort: Koppel USB-flash drives vir mediaweergawe.
- SD-kaartgleuf: Plaas SD-kaarte in vir mediaweergawe.
- AUX-invoer (3.5 mm-aansluiting): Koppel eksterne oudiotoestelle.
- BAND/AMS Button: In radio mode, press to select radio band (FM1, FM2, FM3). Long press for Automatic Memory Store.
- VOORAFSTELLINGSknoppies (1-6): Store and recall radio stations. In USB/SD mode, use for direct track selection.
- SPEEL/PAUSE -knoppie: Speel of onderbreek mediaterugspeel.
- FORWARD/BACKWARD Buttons: Skip tracks or tune radio frequency.
- UITWIS-knoppie: Release the detachable front panel.
4.2 Agterste verbindings
The rear of the unit features standard ISO connectors for power and speakers, along with an antenna input.
- ISO Power Connector: For connecting to the vehicle's power supply (constant 12V, ignition 12V, ground).
- ISO Speaker Connector: For connecting to the vehicle's speakers (Front Left, Front Right, Rear Left, Rear Right).
- Antenna-invoer: For connecting the car's radio antenna.
5. Opstelling
5.1 Installasie
- Ontkoppel battery: Before starting, disconnect the negative terminal of your car battery to prevent short circuits.
- Verwyder ou eenheid: Carefully remove your existing car radio from the dashboard.
- Install Mounting Frame: Insert the supplied mounting frame into the dashboard opening and bend the tabs to secure it.
- Koppel bedrading: Refer to the wiring diagram in section 5.2. Connect the ISO wiring harness to the car's wiring and then to the Caliber RMD 068-2 unit. Connect the antenna cable.
- Slide Unit In: Carefully slide the Caliber RMD 068-2 unit into the mounting frame until it clicks into place.
- Herkoppel battery: Koppel die negatiewe terminaal van jou motorbattery weer aan.
- Heg voorpaneel aan: Attach the detachable front panel to the main unit.
5.2 Bedradingsdiagram
The Caliber RMD 068-2 uses standard ISO connectors. Ensure correct connections as shown below. If your vehicle does not have ISO connectors, an adapter may be required.
| Speldnr. | Wire Color (Typical) | Funksie |
|---|---|---|
| 4 | Geel | Konstante 12V (Battery) |
| 7 | Rooi | Geskakelde 12V (ontsteking) |
| 8 | Swart | Grond |
| 5 | Blou | Antenna Remote Out |
| Speldnr. | Wire Color (Typical) | Funksie |
|---|---|---|
| 1 | Pers | Regs agter (+) |
| 2 | Pers/Swart | Regs agter (-) |
| 3 | Groen | Links agter (+) |
| 4 | Groen/Swart | Links agter (-) |
| 5 | Grys | Regs voor (+) |
| 6 | Grys/swart | Regs voor (-) |
| 7 | Wit | Links voor (+) |
| 8 | Wit/Swart | Links voor (-) |
Note: Wire colors may vary depending on vehicle manufacturer. Always consult your vehicle's wiring diagram.
6. Bedryfsinstruksies
6.1 Basiese Funksies
- Krag aan/af: Druk die KRAG / MODUS knoppie om die eenheid aan of af te skakel.
- Volumebeheer: Draai die VOLUME draai die knoppie kloksgewys om die volume te verhoog, antikloksgewys om te verlaag.
- Moduskeuse: Druk kort op die KRAG / MODUS button to cycle through available modes: Radio (FM), USB, SD, AUX.
- Oudio-instellings: Druk die VOLUME knob to enter audio settings. Rotate the knob to select settings like BASS, TREBLE, BALANCE, FADER. Press the knob again to confirm or move to the next setting.
6.2 Radiowerking
- Bandkeuse: In radiomodus, druk die BAND/AMS knoppie om tussen FM1-, FM2- en FM3-bande te wissel.
- Handmatige instelling: Druk kort op die VORENTOE/AGTERUIT knoppies om die frekwensie fyn in te stel.
- Outomatiese soektog: Druk lank op die VORENTOE/AGTERUIT knoppies om outomaties na die volgende sterk stasie te soek.
- Winkelvoorinstellings: Tune to your desired station. Long press one of the PRESET (1-6) buttons until you hear a beep. The station is now stored.
- Herroep voorafinstellings: Short press one of the PRESET (1-6) buttons to recall a stored station.
- Automatic Memory Store (AMS): Druk lank op die BAND/AMS button to automatically scan and store the strongest stations into the current band's presets.
6.3 USB/SD-terugspeel
- Voeg media in: Steek 'n USB-geheuestokkie in die USB-poort of 'n SD-kaart in die SD-kaartgleuf. Die eenheid sal outomaties na USB/SD-modus oorskakel en begin met terugspeel.
- Speel/pouse: Druk die SPEEL/POUSEER knoppie om afspeel te onderbreek of te hervat.
- Slaan oor: Druk kort op die VORENTOE/AGTERUIT knoppies om na die volgende of vorige snit oor te slaan.
- Snel vorentoe/terugspoel: Druk lank op die VORENTOE/AGTERUIT buttons to fast forward or rewind within a track.
- Vouernavigasie: Gebruik die VOORINSTELLING 5 en VOORINSTELLING 6 buttons to navigate between folders on your USB/SD media.
6.4 AUX-invoer
- Koppel toestel: Koppel jou eksterne klanktoestel (bv. slimfoon, MP3-speler) aan die 3.5 mm AUX-insetaansluiting op die voorpaneel met behulp van 'n klankkabel.
- Kies AUX-modus: Druk die KRAG / MODUS button repeatedly until "AUX" is displayed.
- Beheer afspeel: Control playback (play, pause, skip) directly from your connected external device. The car radio will control the volume.
7. Onderhoud
- Maak die eenheid skoon: Use a soft, dry cloth to wipe the front panel and display. Do not use harsh chemicals, cleaning sprays, or abrasive cloths, as these can damage the surface.
- Detachable Front Panel: When detaching the front panel, handle it carefully. Store it in a protective case (if supplied) to prevent scratches or damage.
- USB/SD-poorte: Hou die USB-poort en SD-kaartgleuf vry van stof en puin.
8. Probleemoplossing
| Probleem | Moontlike oorsaak | Oplossing |
|---|---|---|
| Geen krag nie | Deurgeblaasde sekering; Verkeerde bedrading; Los verbinding | Check and replace fuse; Verify wiring connections (Yellow to constant 12V, Red to ignition 12V, Black to ground); Ensure front panel is securely attached. |
| Geen klank nie | Volume too low; Mute activated; Incorrect speaker wiring; Damaged speakers | Increase volume; Check if mute is active; Verify speaker connections; Test with known good speakers. |
| Swak radio-ontvangs | Antenna not connected; Damaged antenna; Weak signal area | Ensure antenna is securely connected; Check antenna for damage; Try tuning to a stronger station or move to a different location. |
| USB/SD speel nie | Ongesteun file format; Corrupted media; Incorrectly inserted media; Max capacity exceeded | Verseker files are MP3/WMA format; Try a different USB/SD card; Reinsert media correctly; Check media capacity (max 32GB recommended). |
| Front panel cannot be detached | Eject button not fully pressed; Mechanism jammed | Press the EJECT button firmly; Do not force the panel. |
If the problem persists after trying these solutions, please contact your dealer or a qualified service center.
9. Spesifikasies
- Model: Caliber RMD 068-2
- Kraguitset: 4 x 75 Watts Max
- Kragtoevoer: 12V DC (10.8V-15.6V), Negative Ground
- lont: 10A
- Ondersteunde oudioformate: MP3, WMA (via USB/SD)
- USB/SD Compatibility: Tot 32 GB (FAT32-formaat)
- FM-ontvanger: RDS, 18 Presets
- AUX-invoer: 3.5 mm Stereo Jack
- Detachable Front Panel: Ja
- Gewig: Ongeveer 0.95 kg (2.09 lbs)
10. Waarborg en Ondersteuning
This Caliber product is covered by a warranty in accordance with applicable European laws. For detailed warranty terms and conditions, please refer to the warranty card included with your product or visit the official Caliber website. For technical support, troubleshooting assistance, or service inquiries, please contact your authorized Caliber dealer or the customer service department in your region. Please have your product model number (RMD 068-2) and proof of purchase ready when contacting support.
Note: Specifications and design are subject to change without notice for improvement.