1. Inleiding
Welcome to the user manual for your HP EliteBook 2560p laptop. This document provides essential information for setting up, operating, maintaining, and troubleshooting your device. Please read this manual thoroughly to ensure proper use and to maximize the lifespan of your laptop.
2. Veiligheidsinligting
To prevent injury, damage to the product, or loss of data, observe the following safety precautions:
- Gebruik slegs die kragadapter wat saam met jou skootrekenaar voorsien word.
- Moenie die skootrekenaar blootstel aan uiterste temperature, humiditeit of direkte sonlig nie.
- Vermy die plasing van swaar voorwerpe op die skootrekenaar.
- Hou vloeistowwe weg van die toestel.
- Moenie probeer om die skootrekenaar self uitmekaar te haal of te herstel nie. Raadpleeg gekwalifiseerde dienspersoneel.
- Verseker behoorlike ventilasie om oorverhitting te voorkom.
3. Pakketinhoud
Verifieer dat alle items in jou pakket teenwoordig is:
- HP EliteBook 2560p Laptop
- WS-kragadapter en kragkabel
- Battery Pak
- Dokumentasie (hierdie handleiding, waarborginligting)
4. Produk verbyview
Familiarize yourself with the components of your HP EliteBook 2560p.
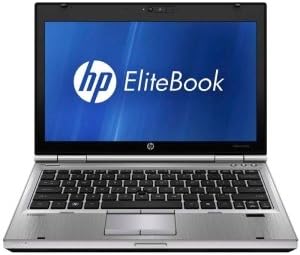
Figuur 4.1: Voorkant view of the HP EliteBook 2560p laptop. This image shows the laptop open, revealing the 12.5-inch display, keyboard, and touchpad. The screen displays the "HP EliteBook" logo.
4.1. Front and Top Components
- 12.5-inch HD Anti-Glare LED Display: For visual output.
- Sleutelbord: Standard QWERTY layout for text input.
- Raakblad: For cursor control and navigation.
- Webkamera: Integrated for video conferencing and imaging.
- Fingerprint Reader (FPR): For enhanced security.
4.2. Side and Rear Components
- USB 2.0 Poorte: For connecting peripheral devices.
- DVD+/-RW Optical Drive: For reading and writing CDs/DVDs.
- Power Connector: Vir die koppeling van die WS-adapter.
- Ethernet-poort: Vir bedrade netwerkverbinding.
- Vertoon poorte: Vir die koppeling van eksterne monitors.
- Oudio-aansluitings: Vir oorfone en mikrofoon.
5. Opstelling
5.1. Die kragadapter koppel
- Koppel die AC-kragkabel aan die AC-adapter.
- Steek die wisselstroomadapter in 'n geaarde elektriese aansluiting.
- Connect the DC output plug of the AC adapter to the power connector on your laptop.
- Allow the battery to charge fully before initial use, or use the laptop while connected to power.
5.2. Initial Boot-Up and Operating System Setup
- Maak die skootrekenaardeksel oop.
- Press the power button, typically located above the keyboard.
- Volg die instruksies op die skerm om die Windows 7 Professional-opstelling te voltooi, insluitend taalkeuse, gebruikersrekeningskepping en netwerkkonfigurasie.
6. Bedryfsinstruksies
6.1. Skakel aan en af
- Om aan te skakel: Druk die kragknoppie.
- Om af te sluit: Click the Start button, then select "Shut Down."
- Om weer te begin: Click the Start button, then select "Restart."
- Om te slaap: Close the lid or click the Start button and select "Sleep."
6.2. Gebruik die raakblad
The touchpad allows you to control the cursor on the screen.
- Tik: Enkeltik om te klik, dubbeltik om te dubbelklik.
- sleep: Tap and hold, then drag your finger across the touchpad.
- Rollees: Gebruik twee vingers om vertikaal of horisontaal te blaai.
6.3. Connecting to a Wireless Network (Wi-Fi)
- Klik die netwerkikoon in die stelselbalk (regs onder in die hoek van die skerm).
- Kies jou verlangde Wi-Fi-netwerk uit die lys.
- Click "Connect" and enter the network security key (password) if prompted.
6.4. Using the Optical Drive
The integrated DVD+/-RW drive allows you to read and write CDs and DVDs.
- Druk die uitwerpknoppie op die skyf om die skinkbord oop te maak.
- Place a disc gently onto the tray, label side up.
- Push the tray back into the laptop until it clicks shut.
7. Onderhoud
7.1. Maak jou skootrekenaar skoon
- Skakel altyd die skootrekenaar af en ontkoppel dit voordat u dit skoonmaak.
- Gebruik 'n sagte, pluisvrye lap effens dampmet water of 'n gespesialiseerde skermreiniger vir die skerm afgespoel.
- Vir die sleutelbord en onderstel, gebruik 'n sagte lap. Vermy harde chemikalieë.
- Gebruik saamgeperste lug om stof uit ventilasieopeninge en sleutelbordsplete te verwyder.
7.2. Batteryversorging
- Vermy om die battery gereeld heeltemal te ontlaai.
- Bêre die skootrekenaar op 'n koel, droë plek indien dit nie vir lang tye gebruik word nie.
- If the battery is removable, ensure it is securely seated.
7.3. Sagteware-opdaterings
Regularly check for and install operating system updates (Windows Update) and driver updates from the HP support webwebwerf om optimale werkverrigting en sekuriteit te verseker.
8. Probleemoplossing
| Probleem | Moontlike Oplossing |
|---|---|
| Skootrekenaar skakel nie aan nie. | Maak seker dat die WS-adapter stewig gekoppel is en dat die kragaansluiting funksioneel is. Kontroleer die batterylading. |
| Geen Wi-Fi-verbinding nie. | Verify Wi-Fi is enabled (check physical switch or function key). Restart router and laptop. Re-enter Wi-Fi password. |
| Die skerm is leeg. | Connect an external monitor to check if the display is faulty. Adjust brightness settings. Restart the laptop. |
| Die stelsel is stadig of reageer nie. | Close unnecessary applications. Check for malware. Ensure sufficient free disk space. Restart the laptop. |
Vir meer komplekse probleme, verwys na die HP-ondersteuning webwebwerf of kontak kliëntediens.
9. Spesifikasies
| Kenmerk | Detail |
|---|---|
| Model | HP EliteBook 2560p (LJ467UT#ABA) |
| Verwerker | Intel Core i5-2520M |
| Vertoon | 12.5-inch HD Anti-Glare LED (1366 x 768 pixels) |
| RAM | 4 GB DDR3 (1333 MHz) |
| Berging | 320 GB HDD |
| Optiese aandrywing | DVD+/-RW |
| Grafika | Geïntegreerde Intel-grafika |
| Draadloos | 802.11a/b/g/n, Bluetooth |
| Hawens | USB 2.0 (x1), DisplayPort, VGA, Ethernet, Audio Jacks |
| Bedryfstelsel | Windows 7 Professional 64-bis |
| Webnok | Geïntegreerde Webnok |
| Sekuriteit | Vingerafdrukleser |
| Batterylewe | Tot 8.5 uur (gemiddeld) |
| Afmetings (LxBxH) | 16.5 x 13.5 x 4.5 duim |
| Gewig | 6.8 pond |
10. Waarborg en Ondersteuning
For information regarding your product's warranty, please refer to the warranty document included with your purchase or visit the official HP support webwebwerf.
HP provides various support resources, including online documentation, driver downloads, and customer service contact options.
- HP Ondersteuning Webwebwerf: www.hp.com/support
- Kontak ondersteuning: Verwys na die HP website for regional contact numbers and chat options.