1. Inleiding
Dankie vir die aankoopasing the Atlanta 1669/19 Quartz Alarm Clock. This digital alarm clock features a silent movement, a light sensor for automatic display illumination, and a snooze function. This manual provides detailed instructions for setup, operation, and maintenance to ensure optimal performance and longevity of your device.
2. Veiligheidsinligting
- Hou die toestel weg van water en hoë humiditeit.
- Avoid exposing the clock to direct sunlight or extreme temperatures.
- Moenie probeer om die horlosie self uitmekaar te haal of te herstel nie. Raadpleeg gekwalifiseerde dienspersoneel.
- Gooi gebruikte batterye verantwoordelik volgens plaaslike regulasies weg.
- Moenie ou en nuwe batterye, of verskillende tipes batterye meng nie.
3. Pakketinhoud
- Atlanta 1669/19 Quartz Alarm Clock Unit
- Gebruikershandleiding (hierdie dokument)
Let wel: Batterye is nie ingesluit nie en moet afsonderlik aangekoop word.
4. Produk verbyview
The Atlanta 1669/19 features a clear digital display, intuitive controls, and a light sensor for enhanced visibility in low-light conditions.
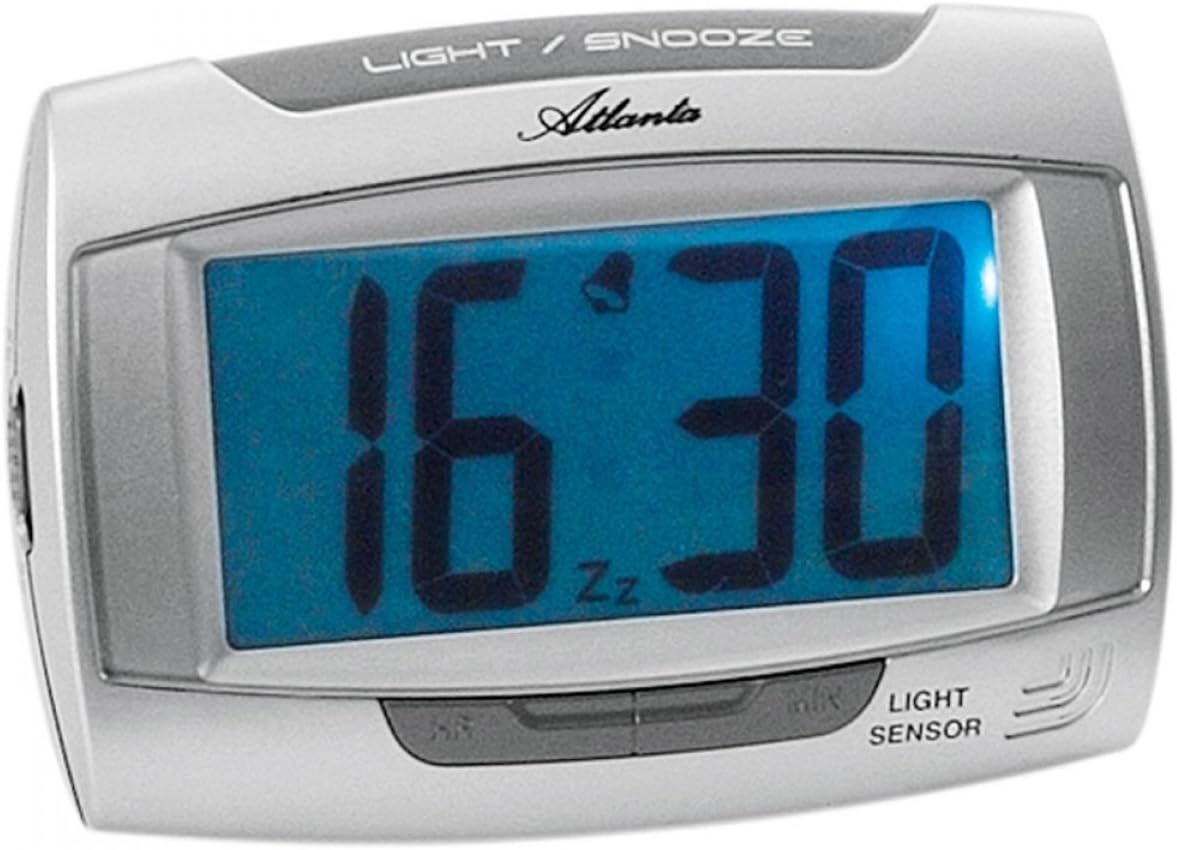
Figuur 1: Voorkant view of the Atlanta 1669/19 Quartz Alarm Clock. The clock features a large digital display, a "LIGHT / SNOOZE" button at the top, and a "LIGHT SENSOR" indicator at the bottom right. The display shows the time 16:30, with an alarm bell icon and 'Zz' indicating snooze functionality.
Sleutelkomponente:
- Digitale skerm: Shows time and alarm status.
- LIGHT / SNOOZE Button: Activates temporary backlight and snooze function.
- Ligsensor: Automatically illuminates the display in dark environments.
- Control Buttons (Rear/Side): For setting time and alarm.
- Battery Compartment (Rear): Hou die benodigde batterye.
5. Opstelling
5.1. Battery Installasie
- Vind die batteryklep aan die agterkant van die wekker.
- Verwyder die deksel deur dit te skuif of op te lig.
- Insert the required batteries (typically 1x AA, refer to compartment markings) ensuring correct polarity (+ and -).
- Plaas die batterykompartement se deksel veilig terug.
5.2. Aanvanklike tydinstelling
Upon battery installation, the display will typically show a default time. You will need to set the current time.
- Locate the time setting buttons, usually labeled "SET", "HOUR", and "MINUTE" or similar, on the back or side of the clock.
- Press the "SET" button (or equivalent) to enter time setting mode. The hour digits may start flashing.
- Use the "HOUR" button to adjust the hour.
- Press "SET" again to move to minute setting. The minute digits may start flashing.
- Use the "MINUTE" button to adjust the minutes.
- Press "SET" one more time to confirm and exit time setting mode.
6. Bedryfsinstruksies
6.1. Stel die alarm in
- Locate the alarm setting buttons, typically labeled "ALARM SET", "ALARM HOUR", and "ALARM MINUTE" or similar.
- Press the "ALARM SET" button to enter alarm setting mode. The alarm hour digits may flash.
- Use the "ALARM HOUR" button to adjust the desired alarm hour.
- Press "ALARM SET" again to move to alarm minute setting. The alarm minute digits may flash.
- Use the "ALARM MINUTE" button to adjust the desired alarm minutes.
- Press "ALARM SET" one more time to confirm and exit alarm setting mode.
6.2. Aktivering/Deaktivering van die alarm
There is usually a switch or button to turn the alarm on or off. Look for a switch labeled "ALARM ON/OFF" or an alarm icon button. When the alarm is active, an alarm icon (e.g., a bell) will typically appear on the display.
6.3. Sluimerfunksie
When the alarm sounds, press the large "LIGHT / SNOOZE" button located on the top of the clock. This will temporarily silence the alarm, and it will sound again after a few minutes (typically 5-9 minutes). The "Zz" icon on the display indicates that the snooze function is active.
6.4. Light Sensor and Display Backlight
- Automatic Backlight (Light Sensor): The clock is equipped with a light sensor. When enabled, the display will automatically illuminate with a soft, constant light in dark environments, making it easy to read the time at night without pressing any buttons. Look for a switch or button labeled "SENSOR ON/OFF" or similar to enable or disable this feature.
- Temporary Backlight: To briefly illuminate the display in any lighting condition, press the "LIGHT / SNOOZE" button on the top of the clock. The backlight will stay on for a few seconds and then turn off automatically.
7. Onderhoud
- Skoonmaak: Vee die horlosie af met 'n sagte, droë lap. Moenie skuurmiddels of oplosmiddels gebruik nie, aangesien dit die horlosie kan beskadig.asing of vertoon.
- Battery vervanging: When the display dims or the clock stops functioning correctly, it is time to replace the batteries. Follow the battery installation steps in Section 5.1.
- Berging: Indien die horlosie vir 'n lang tydperk nie gebruik gaan word nie, verwyder die batterye om lekkasie en skade te voorkom.
8. Probleemoplossing
| Probleem | Moontlike oorsaak | Oplossing |
|---|---|---|
| Die klokskerm is leeg of dof. | Lae of dooie batterye; verkeerde batteryinstallasie. | Vervang batterye met nuwes, en verseker die korrekte polariteit. |
| Die alarm lui nie. | Alarm is not activated; alarm time is incorrect; low batteries. | Ensure alarm is switched ON (bell icon visible); verify alarm time setting; replace batteries. |
| Automatic backlight not working. | Light sensor feature is disabled; insufficient darkness. | Ensure the light sensor switch is ON; test in a completely dark room. |
| Tyd is verkeerd. | Time was not set correctly; batteries were removed/replaced. | Reset the current time following Section 5.2. |
9. Spesifikasies
| Model | 1669/19 |
| Handelsmerk | Atlanta |
| Bedryfsmodus | Digitaal |
| Spesiale kenmerke | Alarm, Lighting (Light Sensor) |
| Materiaal | Plastiek |
| Raammateriaal | Plastiek |
| Montage tipe | Tafelblad |
| Kleur | Blue (display), Silver-coloured (case) |
| Batterye benodig | Yes (Type not specified, typically AA or AAA for such clocks) |
| Batterye Ingesluit | Nee |
| Afmetings (ongeveer) | 11 x 7 cm |
10. Waarborg en Ondersteuning
Vir waarborginligting of tegniese ondersteuning, verwys asseblief na die dokumentasie wat tydens aankoop verskaf is of kontak u kleinhandelaar. Bewaar u bewys van aankoop vir enige waarborgeise.