1. Inleiding
The SPL 2Control is a compact and user-friendly stereo monitor controller designed to provide comprehensive control over your digital audio workstation's (DAW) monitoring functions. It ensures high-quality audio reproduction through both studio monitors and headphones, allowing you to hear every detail of your mix. Key features include a precise speaker volume potentiometer, active circuitry for sound integrity, and a unique Crossfeed control for accurate headphone monitoring that simulates a stereo speaker image.
2. Veiligheidsinstruksies
- Lees hierdie instruksies deeglik deur voordat u die toestel gebruik.
- Bewaar hierdie handleiding vir toekomstige verwysing.
- Moenie die eenheid aan reën of vog blootstel om brand of elektriese skok te voorkom nie.
- Verseker behoorlike ventilasie; moenie enige ventilasie-openinge blokkeer nie.
- Gebruik slegs aanhegsels/bykomstighede wat deur die vervaardiger gespesifiseer word.
- Ontkoppel die kragkabel tydens weerligstorms of wanneer dit vir lang tye nie gebruik word nie.
- Verwys alle diens na gekwalifiseerde dienspersoneel.
- Vermy die plasing van die eenheid naby hittebronne soos verkoelers, hitteregisters, stowe of ander apparaat (insluitend ampversterkers) wat hitte produseer.
3. Pakketinhoud
Maak asseblief seker dat die volgende items ingesluit is wanneer u dit uitpak:
- 1 x SPL 2Control Module
- 1 x netsnoer
- Hierdie gebruikershandleiding
4. Produk verbyview
4.1 Voorpaneelkontroles en aanwysers
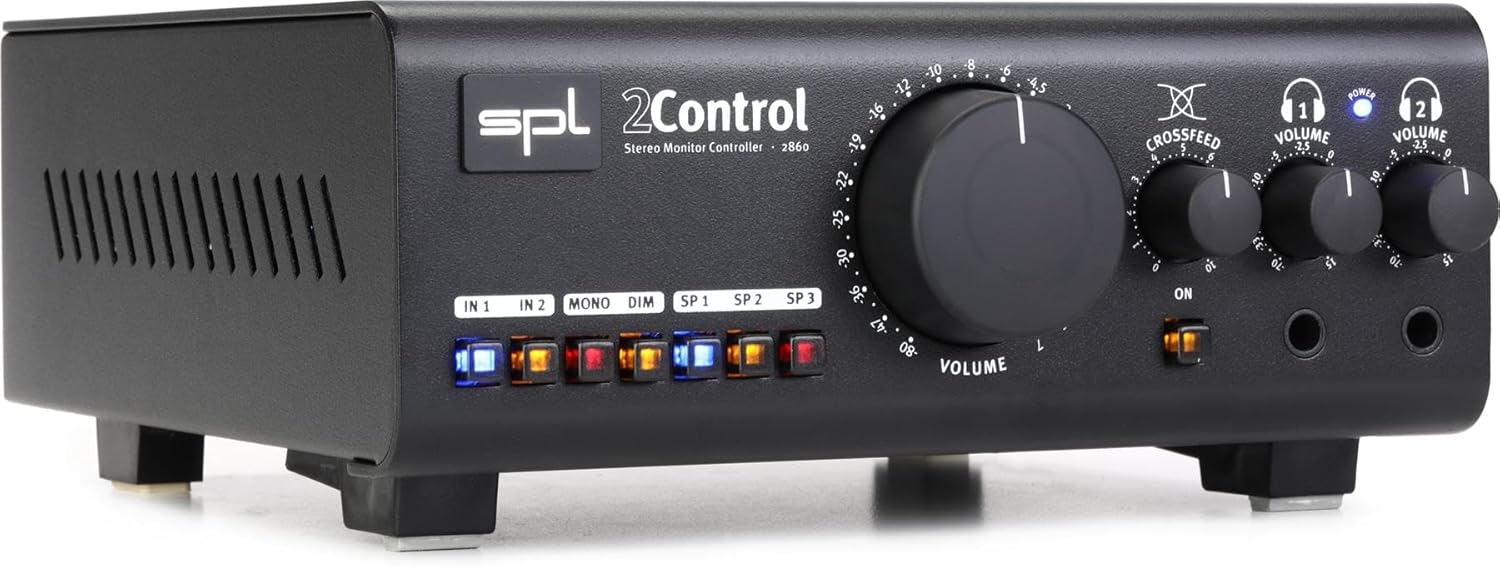
Figuur 1: Front Panel of the SPL 2Control Stereo Monitor Controller.
This image displays the front panel of the SPL 2Control. From left to right, it features input selection buttons (IN 1, IN 2), function buttons (MONO, DIM), speaker output selection buttons (SP 1, SP 2, SP 3), a large central master VOLUME knob, a CROSSFEED knob, and two individual headphone VOLUME knobs with corresponding headphone output jacks. A power indicator LED is visible above the headphone controls.
- IN 1 / IN 2 Buttons: Selects the active stereo input source.
- MONO-knoppie: Sums the stereo signal to mono for compatibility checking.
- DIM-knoppie: Reduces the output volume by a fixed amount (e.g., -20dB) for temporary level reduction.
- SP 1 / SP 2 / SP 3 Buttons: Selects the active stereo speaker output pair.
- VOLUME knop: Master volume control for selected speaker outputs.
- CROSSFEED Knob: Adjusts the stereo panorama for headphone monitoring to simulate a speaker listening environment.
- HEADPHONE VOLUME 1 / 2 Knobs: Independent volume controls for the two headphone outputs.
- HEADPHONE 1 / 2 Jacks: 1/4-inch stereo headphone outputs.
- KRAG-LED: Dui aan dat die eenheid aangeskakel is.
4.2 Rear Panel Connections (Inferred)
The rear panel typically houses the audio input and output connections, as well as the power input. Based on common audio equipment and product specifications, you can expect:
- Analoog insette: Balanced XLR or TRS inputs for connecting your audio interface or mixer.
- Luidsprekeruitsette: Multiple sets of balanced XLR or TRS outputs for connecting up to three pairs of studio monitors.
- Kragtoevoer: Connector for the included power cord.
5. Opstelling
- Plasing: Position the SPL 2Control on a stable, flat surface, ensuring adequate ventilation around the unit.
- Kragverbinding: Connect the provided power cord to the power input on the rear panel of the 2Control and then to a suitable AC power outlet.
- Invoerverbindings: Connect the stereo outputs of your audio interface, mixer, or other audio source to the IN 1 and/or IN 2 inputs on the rear panel using balanced XLR or TRS cables.
- Luidsprekerverbindings: Connect your studio monitors to the SP 1, SP 2, and/or SP 3 outputs on the rear panel using balanced XLR or TRS cables. Ensure correct left and right channel connections.
- Headphone Connections: Plug your headphones into the HEADPHONE 1 and/or HEADPHONE 2 jacks on the front panel.
- Aanvanklike krag aan: Ensure all volume controls are set to their minimum positions before powering on the unit. Then, connect the power cord to the wall outlet. The POWER LED on the front panel will illuminate.
6. Bedryfsinstruksies
- Kies 'n invoer: Druk óf die IN 1 or IN 2 button to select your desired audio source. The active button will illuminate.
- Selecting Speaker Outputs: Druk die SP 1, SP 2, of SP 3 button to route the audio to the corresponding pair of studio monitors. Only one speaker output can be active at a time.
- Aanpassing van Meestervolume: Slowly turn the large VOLUME knob clockwise to increase the listening level for the selected speaker outputs. Turn counter-clockwise to decrease.
- Mono Summing: Druk die MONO button to sum the stereo signal to mono. This is useful for checking phase compatibility and mix balance. Press again to return to stereo.
- Dimfunksie: Druk die DIM button to temporarily reduce the output volume. This is useful for quick conversations or when you need to lower the volume without losing your main volume setting. Press again to restore the original volume.
- Oorfoonmonitering:
- Plug your headphones into the desired headphone jack (HEADPHONE 1 or 2).
- Pas die individu aan HEADPHONE VOLUME 1 or 2 knob to set the listening level for your headphones.
- Gebruik die KRUISVOER knob to adjust the stereo image for headphone listening. Turning it clockwise increases the crossfeed, simulating a more natural speaker-like stereo field by blending the left and right channels slightly.
7. Onderhoud
- Skoonmaak: Gebruik 'n sagte, droë lap om die buitekant van die eenheid skoon te maak. Moenie vloeibare skoonmaakmiddels of oplosmiddels gebruik nie.
- Ventilasie: Ensure that the ventilation slots are kept clear of dust and debris to prevent overheating.
- Berging: Indien die eenheid vir 'n lang tydperk gestoor word, ontkoppel dit van die kragtoevoer en bêre dit op 'n koel, droë plek.
8. Probleemoplossing
| Probleem | Moontlike oorsaak | Oplossing |
|---|---|---|
| Geen klank van luidsprekers nie. |
|
|
| Geen geluid uit oorfone nie. |
|
|
| Verwronge klank. |
|
|
9. Spesifikasies
| Kenmerk | Detail |
|---|---|
| Model Naam | 2 Control (also known as 2860) |
| Handelsmerk | SPL |
| Tipe luidspreker | Monitor |
| Aanbevole gebruike | Control, Volume for Monitors |
| Versoenbare toestelle | Monitors, Speakers |
| Surround Sound Channel-konfigurasie | 2.0 |
| Kleur | Swart |
| Ingesluit komponente | 1 x SPL Control Module |
| Produk Afmetings (D x B x H) | 8.66" x 8.46" x 3.15" |
| Item gewig | 7.06 pond (ongeveer 3.2 kg) |
| Kragbron | Elektries met koord |
| Verbindingstegnologie | TRS, XLR |
| Klankuitvoermodus | Stereo |
| Montage tipe | Tafelblad Mount |
| Vervaardiger | Sound Performance Lab |
10. Waarborg en Ondersteuning
The SPL 2Control Monitor Controller comes with a limited warranty. For specific warranty terms, duration, and conditions, please refer to the documentation provided with your purchase or visit the official SPL website. For technical support, service, or inquiries, please contact the manufacturer, Sound Performance Lab, or your authorized dealer.
Vervaardiger: Sound Performance Lab