Inleiding
Thank you for choosing the Technoline WT 182 Radio-Controlled Alarm Clock. This manual provides detailed instructions for the setup, operation, and maintenance of your new device. Please read this manual thoroughly before use and keep it for future reference. The WT 182 is designed to provide accurate time, indoor temperature, date, and day of the week, along with a reliable alarm function.
Veiligheidsinligting
- Moenie die toestel blootstel aan uiterste temperature, direkte sonlig of hoë humiditeit nie.
- Vermy om die toestel te laat val of aan sterk impakte te onderwerp.
- Moenie ou en nuwe batterye, of verskillende tipes batterye meng nie.
- Verwyder uitgeputte batterye dadelik om lekkasie te voorkom.
- Gooi batterye weg volgens plaaslike regulasies.
- Moenie probeer om die eenheid self uitmekaar te haal of te herstel nie. Verwys alle diens na gekwalifiseerde personeel.
Pakketinhoud
Kontroleer asseblief dat alle items teenwoordig en in goeie toestand is:
- Technoline WT 182 Radio-Controlled Alarm Clock Unit
- Gebruikershandleiding (hierdie dokument)
Let wel: 2 x AA Mignon LR06 batteries are required and are not included in the package.
Produk verbyview
The Technoline WT 182 features a clear digital display showing time, date, day of the week, and indoor temperature. It includes an alarm with a snooze function and a backlight for easy viewin toestande met swak lig.

Figuur 1: Voorkant view of the Technoline WT 182 alarm clock, displaying the current time, date, day of the week, and indoor temperature. The 'RADIO CONTROLLED' text is visible at the top, and 'techno line' branding is at the bottom.

Figure 2: Top-side view of the alarm clock, highlighting the 'SNOOZE LIGHT' button located on the top edge of the device. This button is used to activate the backlight and the snooze function.

Figuur 3: Agter view of the alarm clock, showing the battery compartment cover and the product information label. The label includes manufacturer details and the model number WT 182.
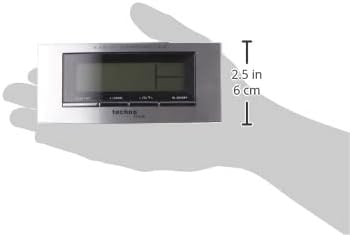
Figure 4: The alarm clock held in a hand, providing a visual reference for its compact dimensions (approximately 14 cm wide and 6 cm high).
Opstelling
1. Battery Installasie
- Open the battery compartment cover on the back of the unit (refer to Figure 3).
- Insert 2 new AA Mignon LR06 batteries, observing the correct polarity (+ and - markings).
- Maak die batterykompartement se deksel stewig toe.
2. Initial Setup and Radio Control
Upon battery insertion, the clock will automatically start searching for the DCF-77 radio signal. This process can take several minutes. During this time, the radio control icon will flash on the display. Once the signal is received, the exact time will be set automatically, and the icon will become steady.
- Plaas die horlosie naby 'n venster vir beter seinontvangs.
- Vermy die plasing daarvan naby elektroniese toestelle wat steuring kan veroorsaak.
3. Manual Time and Date Setting (if radio signal is unavailable)
If the radio signal cannot be received, or if you wish to set the time manually:
- Press and hold the 'MODE' button (usually located on the front or side) for a few seconds until the time display starts flashing.
- Use the '+' or '-' buttons (often labeled 'ADJ' or similar) to adjust the hour, then press 'MODE' to confirm and move to minutes.
- Herhaal vir minute, jaar, maand en dag.
- Press 'MODE' again to exit the setting mode.
4. Tydsone-instelling
The clock allows for a time zone adjustment of ± 12 hours. This is useful if you are in a region where the DCF-77 signal is received but the local time zone differs from Central European Time.
- In normal time display mode, press and hold the 'ADJ' or similar button until the time zone offset starts flashing.
- Use the '+' or '-' buttons to adjust the offset.
- Press the 'ADJ' button again to confirm and exit.
Bedryf
1. Time Display (12/24 Hour Format)
The clock can display time in either 12-hour (with AM/PM indicator) or 24-hour format.
- To switch between formats, briefly press the 'ADJ' or a dedicated 12/24H button.
2. Date and Day of the Week Display
The display shows the current date (Month-Day) and the day of the week. The day of the week can be displayed in 5 different languages.
- To change the day of the week language, press the 'MODE' button repeatedly until the language setting flashes, then use '+' or '-' to select.
3. Indoor Temperature Display
The clock continuously measures and displays the indoor temperature.
- The temperature is typically displayed in Celsius. There might be an option to switch to Fahrenheit by pressing a specific button (e.g., 'C/F' or 'ADJ' in temperature mode).
4. Alarminstelling
The WT 182 features a single alarm.
- Press the 'ALARM' button once to display the current alarm time.
- Press and hold the 'ALARM' button until the alarm time starts flashing.
- Use the '+' or '-' buttons to set the desired alarm hour, then press 'ALARM' to confirm and move to minutes.
- Use the '+' or '-' buttons to set the desired alarm minutes, then press 'ALARM' to confirm and exit.
- To activate/deactivate the alarm, briefly press the 'ALARM ON/OFF' or 'ALARM' button. An alarm icon will appear/disappear on the display.
5. Snooze Function and Backlight
Wanneer die alarm lui:
- Press the 'SNOOZE/LIGHT' button (located on top, refer to Figure 2) to activate the snooze function. The alarm will pause for approximately 5 minutes and then sound again.
- To stop the alarm completely, press any other button (e.g., 'ALARM' or 'MODE'). The alarm will reset for the next day.
- To activate the backlight at any time, briefly press the 'SNOOZE/LIGHT' button. The backlight will illuminate for a few seconds.
Onderhoud
Skoonmaak
Vee die toestel af met 'n sagte, damp lap. Moenie skuurmiddels of oplosmiddels gebruik nie, aangesien dit die skerm ofasing.
Battery vervanging
When the display becomes dim or the clock functions erratically, it is time to replace the batteries. Follow the battery installation steps in the 'Setup' section.
Probleemoplossing
| Probleem | Moontlike oorsaak | Oplossing |
|---|---|---|
| Geen vertoon of dowwe vertoon | Batterye is leeg of verkeerd geplaas. | Vervang batterye met nuwes, en verseker die korrekte polariteit. |
| Verkeerde tyd vertoon | Poor radio signal reception or manual setting error. | Relocate the clock to an area with better signal. Perform manual time setting if radio signal is consistently poor. Check time zone setting. |
| Alarm klink nie | Die alarm is nie geaktiveer nie of verkeerd gestel. | Maak seker dat die alarmikoon op die skerm sigbaar is. Kontroleer die alarmtydinstellings weer. |
| Agterlig werk nie | Batteries are low or exhausted. | Vervang batterye. |
Spesifikasies
- Modelnommer:
- WT 182 (SMADH)
- Afmetings (L x B x H):
- 140 x 35 x 63 mm (5.5 x 1.4 x 2.5 duim)
- Gewig:
- 150 gram
- Kragbron:
- 2 x AA Mignon LR06 batteries (not included)
- Vertoon tipe:
- Digitaal
- Tydformaat:
- 12/24 uur kiesbaar
- Temperatuur vertoon:
- Binne temperatuur
- Spesiale kenmerke:
- Radio-controlled time (DCF-77), Date and Day of Week display (5 languages), Alarm with Snooze, Backlight
- Materiaal:
- Plastiek
- Kleur:
- Silwer/Swart
- Bedryfsmodus:
- Digitaal
- Beweging tipe:
- Kwarts
- Binne/buite gebruik:
- Binneshuise
- Vervaardiger:
- PK
- Land van oorsprong:
- China
Waarborg en Ondersteuning
Technoline products are manufactured to high-quality standards. For information regarding warranty terms and conditions, please refer to the warranty card included with your purchase or visit the official Technoline website. For technical support or service inquiries, please contact your retailer or the manufacturer directly.
You can find more information and contact details on the official Technoline webwebwerf: www.technoline.de