1. Produk verbyview
The Technoline WS 6810 amber Weather Station is a sophisticated device designed to provide accurate indoor and outdoor temperature readings, precise timekeeping via DCF-77 radio control, and convenient alarm functions. Its modern design with a warm amber LED display and black high-gloss finish integrates seamlessly into any contemporary home environment. This manual provides detailed instructions for setting up, operating, and maintaining your weather station.

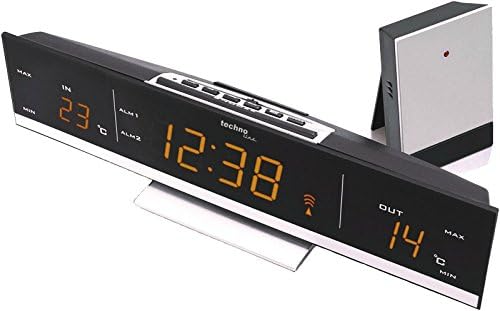
Figuur 1.1: Voorkant view of the Technoline WS 6810 Weather Station, displaying indoor and outdoor temperatures, current time, and alarm indicators.
2. Pakketinhoud
Kontroleer asseblief die inhoud van die pakket noukeurig. Indien enige items ontbreek of beskadig is, kontak u kleinhandelaar onmiddellik.
- 1 x Technoline WS 6810 Temperature Station (Main Unit)
- 1 x TX96 (TW004) Outdoor Sensor
- 1 x Power Supply Unit (220V)
- 1 x Gebruikershandleiding (hierdie dokument)
Let wel: 3 x AAA Micro LR03 batteries for main unit backup and 2 x AAA Micro LR03 batteries for the outdoor sensor are nie ingesluit nie en moet apart gekoop word.

Figure 2.1: The Technoline WS 6810 main unit alongside its TX96 outdoor sensor.
3. Sleutel kenmerke
- DCF-77 Radio-Controlled Clock: Automatic time synchronization for precise timekeeping. Includes manual setting option and time zone adjustment (± 1 hour).
- Indoor and Outdoor Temperature Display: Monitors and displays current temperatures for both indoor and outdoor environments.
- Min / maksimum temperatuurgeheue: Records and displays the highest and lowest temperatures measured.
- Dual Alarm Clocks: Two independent alarms (ALM1, ALM2) with adjustable settings.
- Sluimer-funksie: Provides a temporary pause for alarms, typically 5 minutes.
- Verstelbare skermhelderheid: Two brightness levels for optimal visibility in various lighting conditions.
- Tafelstaander: Integrated stand for convenient desktop placement.
- LED skerm: Clear, warm amber LED digits for easy readability.
4. Opstelgids
4.1. Aanskakeling van die hoofeenheid
- Connect the provided power supply unit to the DC IN port on the back of the WS 6810 main unit.
- Plug the power adapter into a standard 220V electrical outlet. The display will illuminate.
- Vir rugsteunkrag tydens uittages, insert 3 x AAA Micro LR03 batteries (not included) into the battery compartment on the back of the main unit, observing polarity (+/-).
4.2. Installing Batteries in the Outdoor Sensor (TX96)
- Open the battery compartment on the back of the TX96 outdoor sensor.
- Insert 2 x AAA Micro LR03 batteries (not included), ensuring correct polarity.
- Maak die batterykompartement stewig toe.
4.3. Initial Synchronization and Sensor Placement
- Place the outdoor sensor within effective transmission range (typically up to 30 meters in open air) of the main unit. Avoid placing it near large metal objects, electrical appliances, or direct sunlight.
- The main unit will automatically attempt to receive the DCF-77 radio signal for time synchronization and connect with the outdoor sensor. This process may take several minutes. A signal icon will appear on the display once synchronization is successful.
- If the outdoor temperature does not appear after a few minutes, press the "SENSOR" button on the main unit to manually initiate a search for the outdoor sensor.
4.4. Time Zone Setting (if required)
If you are in a region where the DCF-77 signal's standard time differs from your local time (e.g., outside Central European Time), you may need to adjust the time zone.
- In normal time display mode, press and hold the "SET" button until the time zone offset flashes.
- Use the "+" or "-" buttons to adjust the time zone offset in ±1 hour increments.
- Druk weer "SET" om te bevestig en te verlaat.
Figuur 4.1: Bo view of the WS 6810, highlighting the control buttons for setup and operation.
5. Bedryfsinstruksies
5.1. Vertoon inligting
The large LED display shows the following information:
- IN: Binne temperatuur.
- UIT: Outdoor temperature (from TX96 sensor).
- Tyd: Current time (radio-controlled).
- ALM1 / ALM2: Indicators for Alarm 1 and Alarm 2.
- Sein-ikoon: Indicates successful DCF-77 signal reception.
- MIN / MAX: Indicators for minimum and maximum temperature records.
5.2. Stel alarms in
The WS 6810 features two independent alarms (ALM1 and ALM2).
- Press the "ALARM" button repeatedly to cycle through ALM1, ALM2, and normal time display.
- When ALM1 or ALM2 is displayed, press and hold the "ALARM" button until the alarm time flashes.
- Use the "+" or "-" buttons to adjust the hour, then press "ALARM" to confirm and move to minutes.
- Use the "+" or "-" buttons to adjust the minutes, then press "ALARM" to confirm.
- To activate/deactivate an alarm, select ALM1 or ALM2 display, then press the "+" button. An alarm icon will appear/disappear.
5.3. Sluimerfunksie
When an alarm sounds, press the "SNOOZE/LIGHT" button to activate the snooze function. The alarm will temporarily stop and sound again after approximately 5 minutes.
5.4. Aanpassing van die skermhelderheid
Press the "SNOOZE/LIGHT" button (when no alarm is sounding) to toggle between the two available brightness levels for the LED display.
5.5. Viewing Min/Max Temperatures
Press the "MIN/MAX" button to cycle through the current, maximum, and minimum recorded indoor and outdoor temperatures. To reset the min/max records, press and hold the "MIN/MAX" button while the min/max values are displayed.
6. Onderhoud
- Skoonmaak: Wipe the main unit and outdoor sensor with a soft, damp lap. Moenie skuur skoonmaakmiddels of oplosmiddels gebruik nie.
- Battery vervanging: Replace batteries in the outdoor sensor and main unit (for backup) when the low battery indicator appears on the display or when performance degrades. Always replace all batteries of a set at the same time.
- Sensorplasing: Periodically check the outdoor sensor's placement to ensure it is protected from direct sunlight and heavy precipitation for accurate readings and longevity.
- Berging: Indien die toestel vir 'n lang tydperk gestoor word, verwyder alle batterye om lekkasie te voorkom.
7. Probleemoplossing
| Probleem | Moontlike oorsaak | Oplossing |
|---|---|---|
| Geen skerm op hoofeenheid nie. | Power adapter not connected or faulty; batteries (backup) are dead or incorrectly inserted. | Ensure power adapter is securely plugged in. Check and replace backup batteries, ensuring correct polarity. |
| Buitetemperatuur word nie vertoon nie of is onakkuraat. | Outdoor sensor batteries are dead; sensor out of range; interference; sensor not paired. | Replace outdoor sensor batteries. Move sensor closer to the main unit. Avoid placing near electronics. Press "SENSOR" button on main unit to re-establish connection. |
| Tyd is verkeerd of sinchroniseer nie. | Weak DCF-77 signal; interference; incorrect time zone setting. | Relocate the main unit to an area with better signal reception (e.g., near a window, away from electronics). Check time zone setting. Manual time setting is available if radio control fails. |
| Alarm klink nie. | Alarm is not activated; alarm volume too low (not applicable for this model, but common issue). | Ensure the alarm icon (ALM1 or ALM2) is displayed, indicating activation. Re-set the alarm time. |
8. Tegniese spesifikasies
| Model | WS 6810 amber |
| Afmetings van die hoofeenheid (L x B x H) | 28.5 x 7 x 5.5 cm (ongeveer 11.2 x 2.8 x 2.2 duim) |
| Hoof Eenheid Gewig | 500 g (ongeveer 1.1 lbs) |
| Outdoor Sensor (TX96) Dimensions (L x W x H) | 50 x 22 x 104 mm (ongeveer 2.0 x 0.9 x 4.1 duim) |
| Power Supply (Main Unit) | 220V AC Power Adapter (included) |
| Backup Power (Main Unit) | 3 x AAA Micro LR03 batteries (not included) |
| Kragtoevoer (Buitesensor) | 2 x AAA Micro LR03 batteries (not included) |
| Tipe vertoon | LED (Amber) |
| Tydsinchronisasie | DCF-77 Radio Controlled |
| Temperatuurreeks (binnenshuis) | (Information not provided, typical range is 0°C to 50°C) |
| Temperatuurreeks (buite) | (Information not provided, typical range is -20°C to 60°C) |
9. Waarborg en Ondersteuning
Technoline products are manufactured to high quality standards. For warranty information, technical support, or service inquiries, please contact your retailer or visit the official Technoline webwebwerf.
Amptelike produkbladsy: http://www.technoline.eu/products/en/4029665068107
Behou asseblief jou aankoopbewys vir waarborgeise.