1. Inleiding
This manual provides comprehensive instructions for the safe and effective use of the Wolfcraft 8728000 Forstner Drill Bit Set. This set is designed for precise drilling of holes for concealed hinges and eccentric connectors in woodworking applications. Please read all instructions carefully before use to ensure optimal performance and safety.
2. Produk verbyview
The Wolfcraft 8728000 set includes a 35mm Forstner drill bit and a plastic marking template. These components work together to achieve accurate and clean drilling results.
2.1 Komponente
- 1 x Forstner Drill Bit (Ø 35 mm): Features a patented cutting edge geometry designed to minimize heat generation during drilling, preventing burn marks on the workpiece and ensuring accurate holes.
- 1 x Marking Template: A plastic template for precise marking of drilling points for concealed hinges and eccentric connectors with diameters of 26 mm and 35 mm.

Image 1: The Wolfcraft 8728000 set, showing both the 35mm Forstner drill bit and the plastic marking template.

Image 2: Detailed dimensions of the 35mm Forstner drill bit, showing a cutting diameter of 35mm, shank diameter of 10mm, and overall length of 90mm.

Image 3: The plastic marking template, designed for precise placement of concealed hinges, indicating markings for 26mm and 35mm holes and various offset measurements.
3. Opstelling
Proper setup is crucial for accurate and safe drilling.
3.1 Voorbereiding van die werkstuk
- Bevestig die werkstuk: Altyd clamp your workpiece firmly to a stable surface to prevent movement during drilling.
- Marking Drilling Points:
- Place the marking template on the desired drilling location on your workpiece.
- Align the template according to your hinge or connector specifications (e.g., distance from edge).
- Use a pencil or marking tool to accurately mark the center point for the 35mm hole and any pilot holes for screws, using the template's guides.
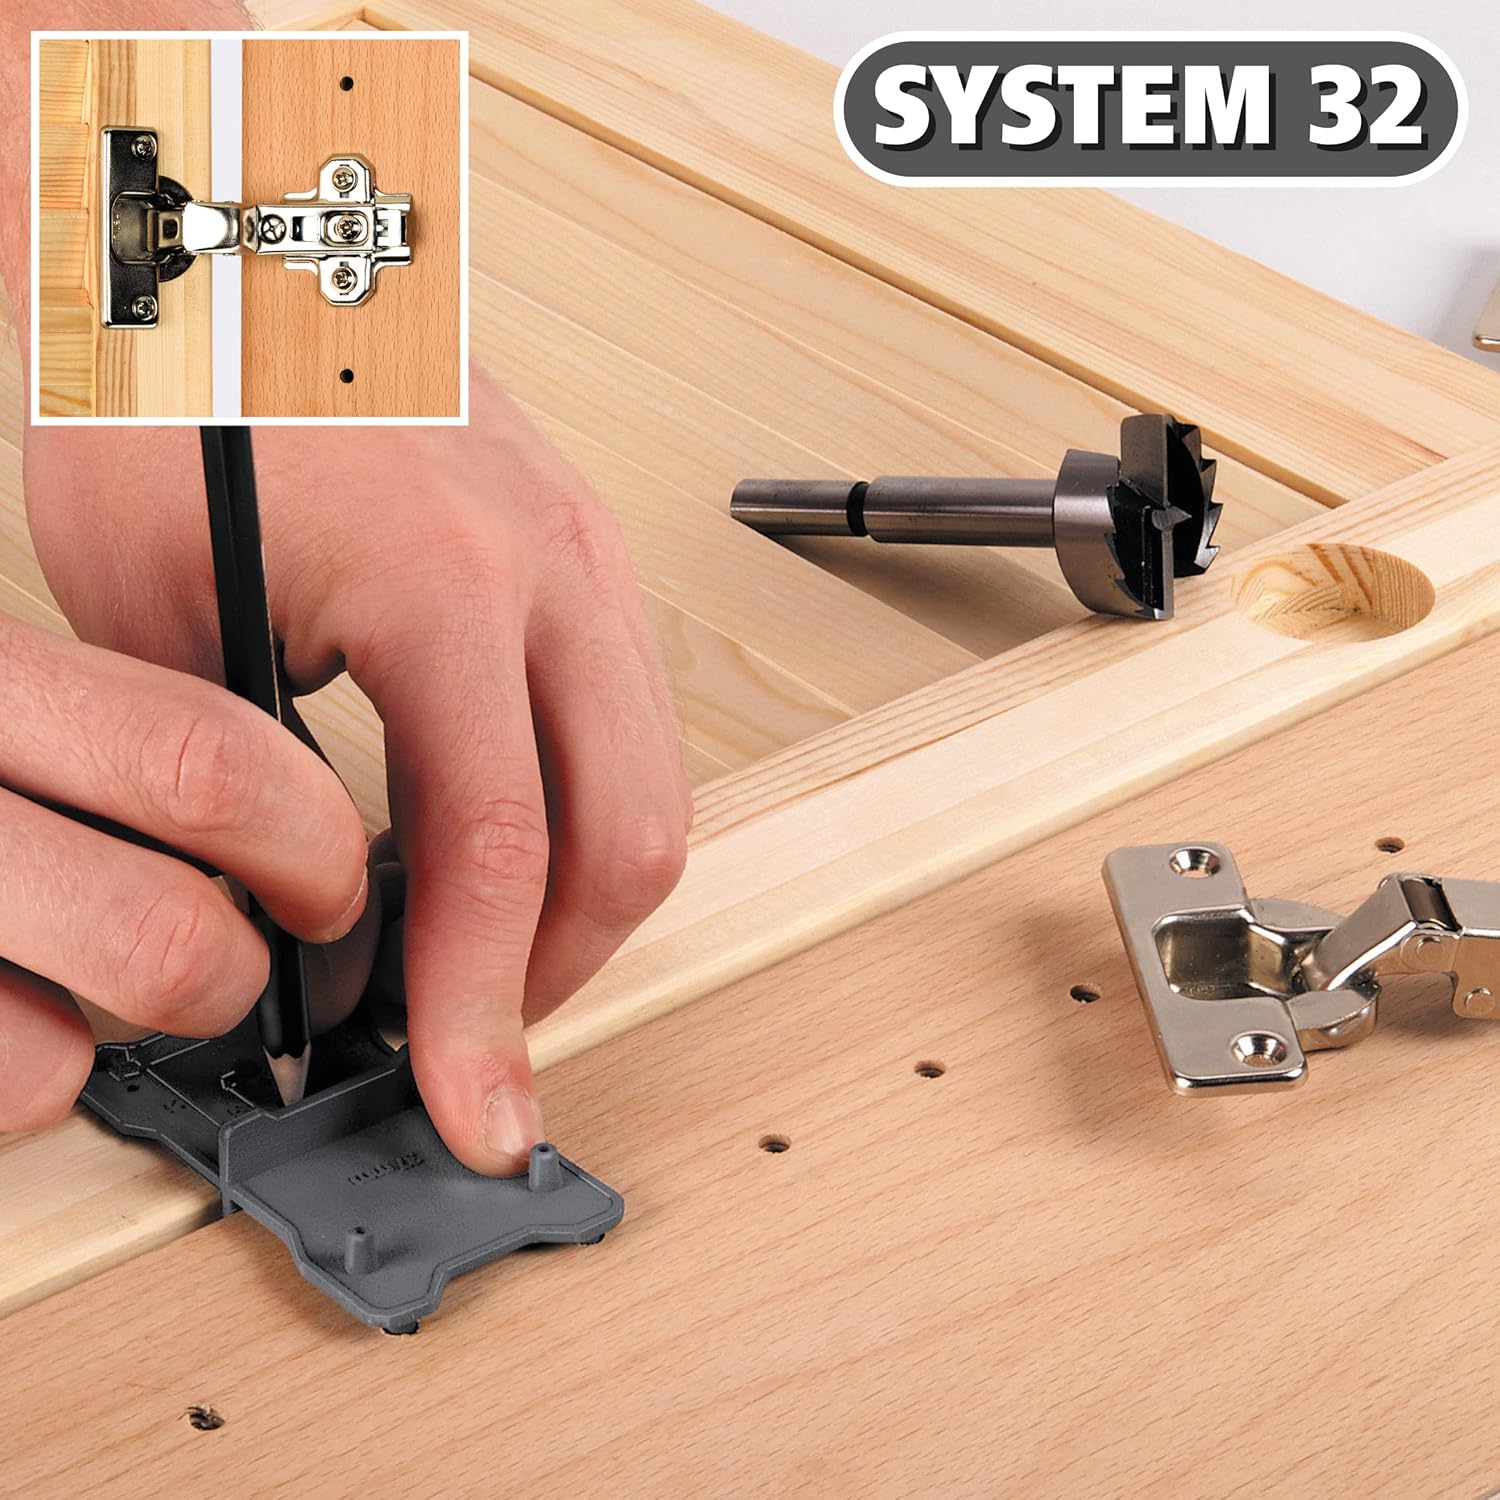
Image 4: A user demonstrating the use of the marking template to precisely mark the drilling location for a concealed hinge on a wooden panel, part of the 'System 32' method.
3.2 Installing the Drill Bit
- Ensure your drill is unplugged or its battery is removed before changing bits.
- Insert the shank of the 35mm Forstner drill bit into the chuck of your drill.
- Tighten the chuck securely to prevent the bit from slipping during operation.
- Verify that the drill bit is centered and runs true before proceeding.
4. Bedryfsinstruksies
Follow these steps for safe and effective drilling of hinge holes.
- Dra veiligheidstoerusting: Always wear appropriate safety glasses and hearing protection.
- Posisioneer die boor: Place the center point of the Forstner drill bit precisely on the marked drilling point on your workpiece.
- Begin boor: Begin drilling at a moderate speed, applying steady, even pressure. Avoid excessive force, which can lead to overheating or splintering.
- Handhaaf spoed: The patented cutting edge geometry is designed to prevent heat buildup. Maintain a consistent drilling speed appropriate for the material.
- Duidelike skyfies: Periodically withdraw the drill bit slightly to clear wood chips from the hole, especially when drilling deep holes. This helps prevent overheating and improves cutting efficiency.
- Voltooi die gat: Continue drilling until the desired depth is reached. For concealed hinges, ensure the hole depth accommodates the hinge cup fully.
- Inspekteer: After drilling, inspect the hole for cleanliness and accuracy. The design of this drill bit aims to produce clean holes without burn marks.

Image 5: A wooden panel with two concealed hinges successfully installed into precisely drilled holes, demonstrating the intended outcome of using the Wolfcraft Forstner drill bit set.
5. Onderhoud
Behoorlike onderhoud verleng die lewensduur en prestasie van jou boorpunt.
- Skoonmaak: After each use, clean the drill bit to remove any wood dust or resin buildup. A brush or compressed air can be used.
- Skerp: If the drill bit becomes dull, it can be professionally sharpened. A sharp bit ensures clean cuts and prevents overheating.
- Berging: Store the drill bit and marking template in a dry place to prevent rust and damage. Keep them in their original packaging or a suitable tool case.
- Inspeksie: Regularly inspect the drill bit for any signs of damage, such as bent shanks or chipped cutting edges. Do not use damaged bits.
6. Probleemoplossing
Hier is oplossings vir algemene probleme wat jy mag teëkom:
- Burn Marks on Workpiece:
- Ensure the drill bit is sharp. A dull bit generates more friction and heat.
- Reduce drilling speed.
- Clear wood chips more frequently.
- Onakkurate Gatplasing:
- Re-verify markings with the template before drilling.
- Maak seker dat die werkstuk veilig is clamped en skuif nie.
- Confirm the drill bit is properly seated and tightened in the chuck.
- Oormatige vibrasie:
- Check if the drill bit is bent or damaged. Replace if necessary.
- Maak seker dat die boorpunt stewig in die boorkop vasgedraai is.
7. Spesifikasies
| Kenmerk | Spesifikasie |
|---|---|
| Modelnommer | 8728000 |
| Handelsmerk | wolfcraft |
| Sny deursnee | 35 mm |
| Shank Diameter | 10 mm |
| Algehele lengte | 90 mm |
| Materiaal | Allooistaal, Koolstofstaal |
| Voltooi Tipe | Onbedekt |
| Item gewig | 1 g |
| Produk afmetings | 3.6 x 14.8 x 20.3 cm (packaging) |
| Ingesluit komponente | 1 Forstner drill bit, 1 marking template |
8. Waarborg en Ondersteuning
For information regarding warranty, returns, or technical support, please refer to the official Wolfcraft webwebwerf of kontak u kleinhandelaar. Bewaar u aankoopbewys as bewys van aankoop.